


Hey Guys!
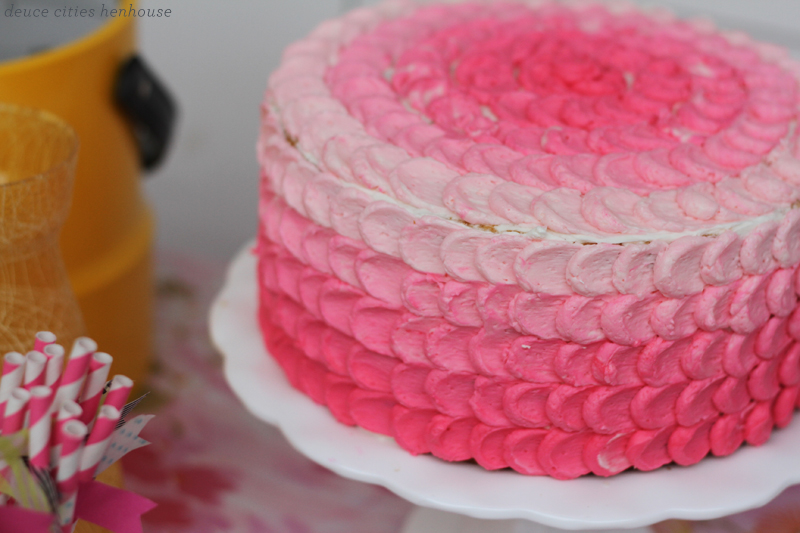
Thanks for sticking with me, I know I totally disappeared last week. That’s cause I was spending all my time baking and icing this cake in preparation for Cam’s baby shower we had on Saturday. If you follow me on pinterest you know I have a shower board going. One of the first things I pinned was a ombré cake from bubbleandsweet.blogspot.com.
Making an cake with graduated colors was def on my radar, and then like magic, last Thursday, just as I was about to start icing my cake, Prudent Baby posted an even cooler tutorial for an ombre pedal cake, by guest blogger, The Hungry Housewife.
It was total internet destiny.
The Hungry Housewife laid it all out. There’s even a vid to accompany her detailed photos.
I make a few of my own modifications though and thought I’d share then with you.
First of all I used this recipe for Swiss Meringue Buttercream via Martha Stewart. This is the first time I had used this recipe and I totally loved it. I am one of those crazy people that is not really into frosting, it’s always too sweet (I have a major salt tooth). In my opinion, this recipe calls for the perfect amount of sugar and the consistency of the buttercream is exactly what I was looking for.
I doubled the frosting recipe and I recommend you do too. It would totally blow to make all your icing, divide it, and color it, just to find out you were short in the end. If that happened to me I would cry, fer real.
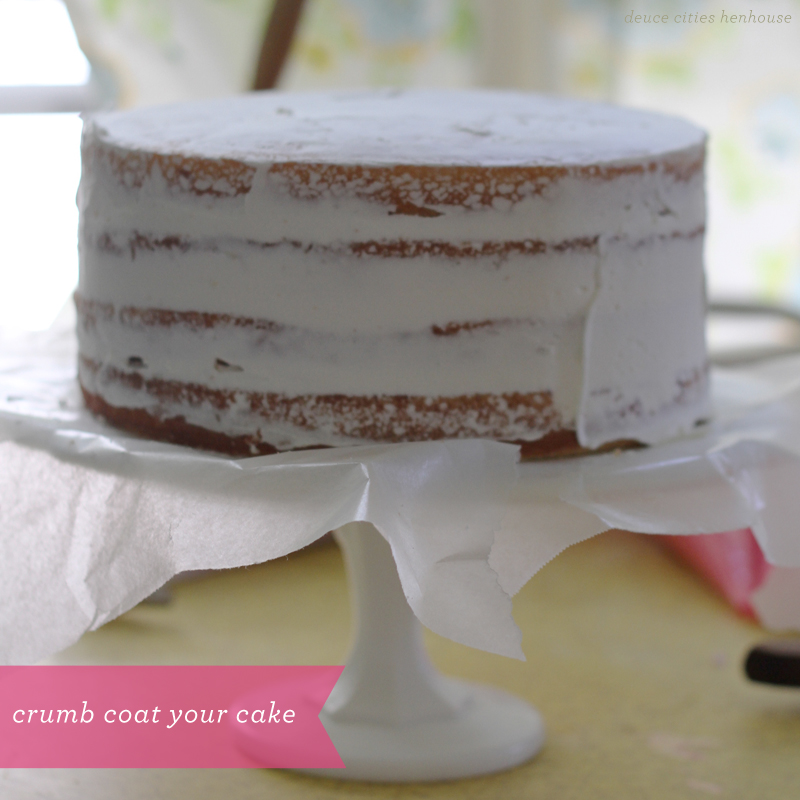
I started by crumb coating the cake. After I was finished I chilled the cake and split the remaining buttercream into 5 equal parts (about 1-1/2 cups per bag).
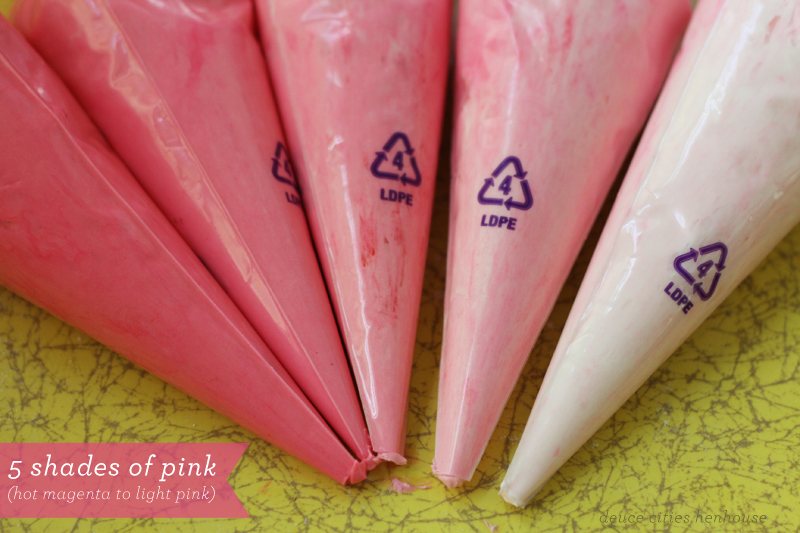
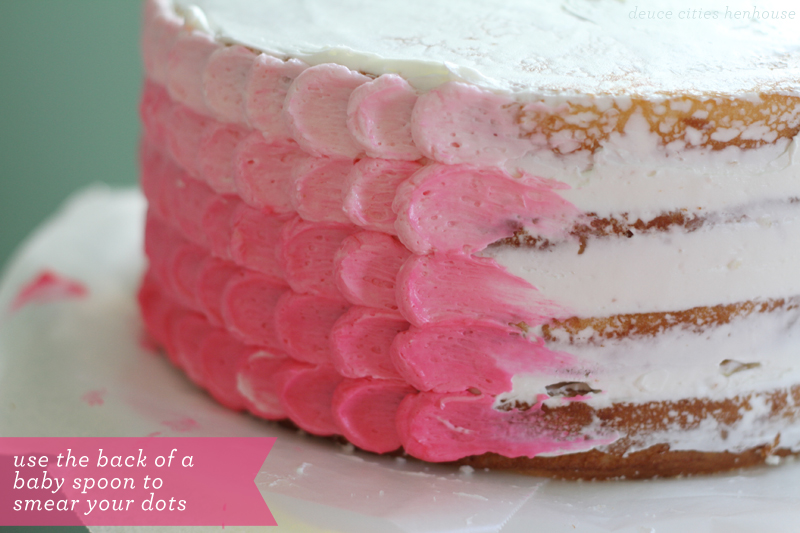
For food coloring I used Wilton’s Rose color and graduated the amounts. The darkest color was made up of about six small dollops of the gel food coloring and the lightest was one (just a shade pinker than white).
In the Prudent Baby tutorial I mentioned above they suggest using a #12 tip, which is all good and fine. I only had one #12 tip and 5 bags of icing, so before I filled the bags I just lined them all up and snipped ’em with the scissors. Totally worked just as well.
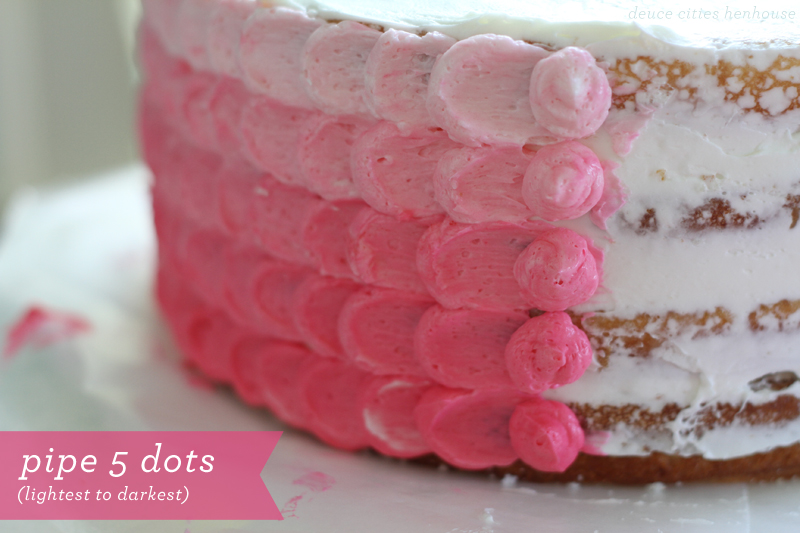
The Hungry Housewife uses a spatula to spread her icing, but I just went ahead and used the back of 5 baby spoons because I had them on hand and it saved me from wiping them off after every smear.
This cake is definitely the best looking cake I’ve ever made and one of the easiest to decorate. It was 90º and I had my oven on, dur. I continually had to cool my buttercream in the fridge, but it all turned out just fine in the end.
If you want to be cool, and have a cool party cake at your next cool party, you should totally try this out. It’s a real winner.


It looks lovely! Thanks for the notes on the spoons, that will be a real time saver.
Oh my gosh, that is beautiful!!! And using baby spoons to decorate a cake is totally something I could handle. :)
It’s so easy. It takes some time, but it’s not like you have to do it all at once. I took three breaks to take care of kids while I made this one. Just popped it back in the fridge when I couldn’t work on it.
CUTE!! Nice work!
Nice work! It looks great. I would love to try to make one, but I fear it would end up in me flinging icing across my kitchen in frustration.
Awesome job on the split and fill – your cake is even and straight! the icing job is just beautiful too – congrats! I’m sure it was as delicious as it was beautiful = )
What a pretty cake! I google imaged chevron bedding, found your page, and then saw the cake! My question is: how do you finish each line since the smeared dots look so layered? I wish I could have seen a pic of that part. And what’s your cake recipe, pans, and bake temp? I’ve never been able to make a cake as straight as that, even with trimming. Maybe I need help with trimming tools.
Hi Shelly, Glad you found me! I just made a seam of single (no-smeared) dots in the back of the cake. It was barely noticeable.
As far as the cake goes… I always use box cakes and make the frosting from scratch. My secret to trimming them level is to freeze them for 24 hours (so they are like a rock) and use a really sharp serrated knife. Hope that helps. Thanks for stopping by!
thanks very much for sharing , looks lovely
THE CORPORATE SCOPE: EXTERNAL BUSINESSA popular corporate site allows one to
have free advertising on a huge scale. The current wisdom
is if a lot of other sites are linking for the content
on the blog, it must be important, which is considered
an authority within the community. Having a strong brand reputation will naturally direct website visitors to your site and eliminate competition inside the process.