


Hi guys. I actually started working on the basement bathroom. I mean how long have I been talking about this dumb bathroom? If you guessed one long stupid year, you’re correct! I finally made my to-do list/timeline, purchased some supplies, ordered some tile, stopped being a baby about it, and actually began to do it. Yesterday was my first day of real work, so I guess this title is a little mis-leading, but I haven’t talked to you in a week, and I’ve been doing a lot of prep and research, so it counts.
This is my first time doing any sort of bathroom upgrades. I am a complete novice when it comes to plumbing and cement tile installation – both reasons why this has taken be so long to start. I’m basically winging it. My timeline is a little backwards, normally I believe you’d tile the floor first, but since I’ll be waiting another 6-8 weeks for my cement flor tile to be delivered, I’m starting with tiling the walls and shower first. I’ll be leaving enough room between the subway tile on the wall and the floor for tile to be installed later on. But before I can really begin, a dry run is in order.
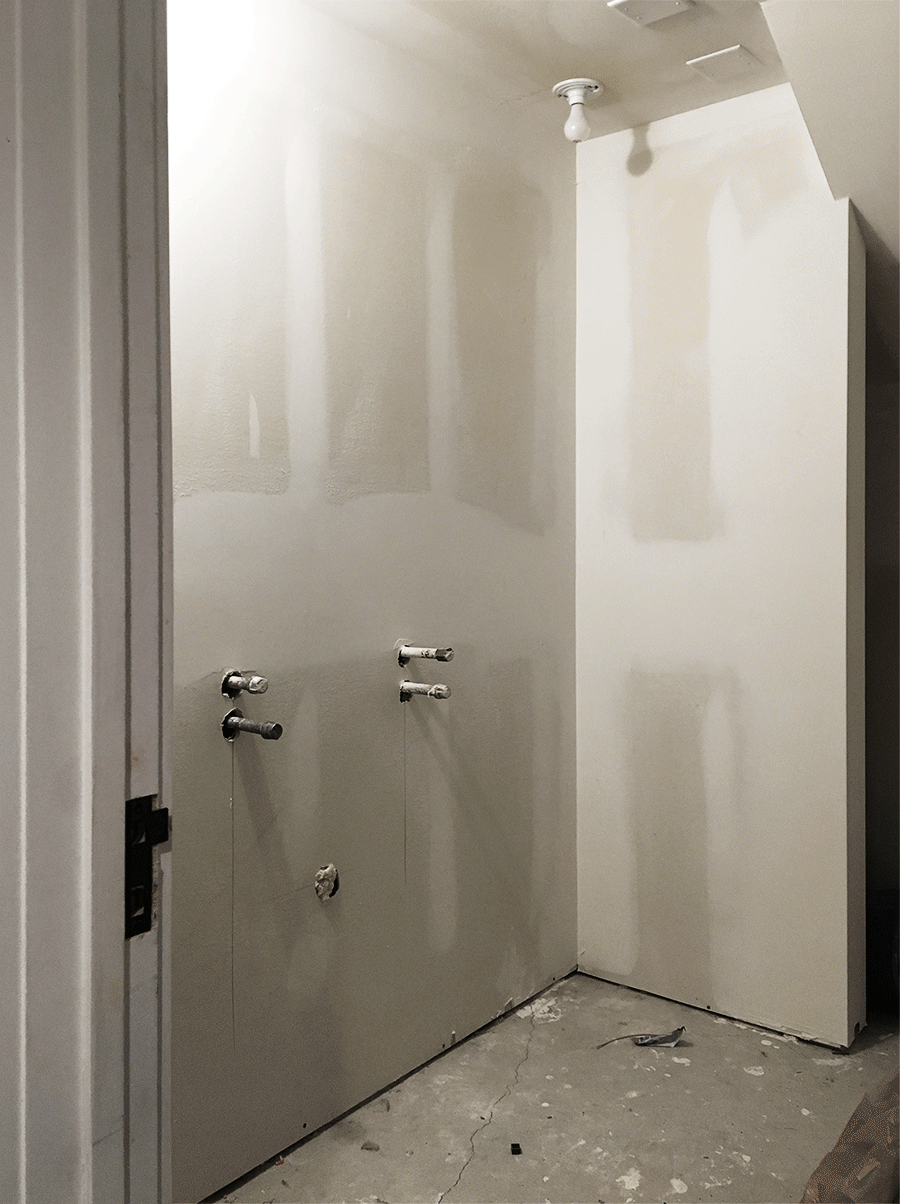
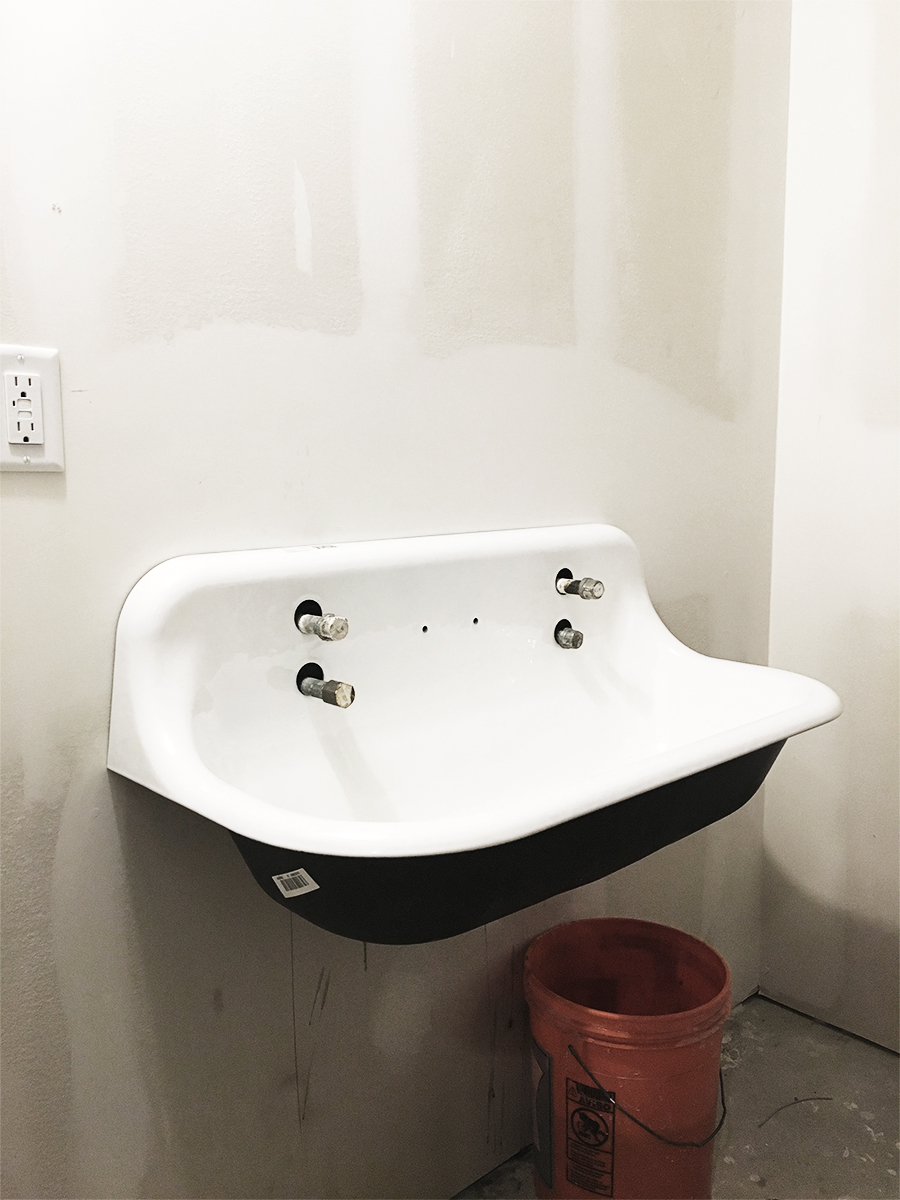
A little background for the 100th time (sorry if this annoying and redund). The bathroom was roughed in for me when we the basement was being remodeled last summer. The bathroom will be a three piece; toilet, sink and shower stall. Being that it is located in the basement, we were thinking it might make the perfect kids bathroom and hopefully do double duty as a guest bathroom (until the day where we get a powder room on the second floor). We need it to be both functional for the kids, and pretty for the friends. I had the floor plan figured out in advance and always had my heart set on installing the Kohler Brockway sink because I like the vintage look of it and I think it suits the age of the house, plus if it was a president it would totally be Baberham Lincoln (SNS). I had the worker dudes include the proper specs for the sink, which focused on the plumbing and bracing behind the dry wall.
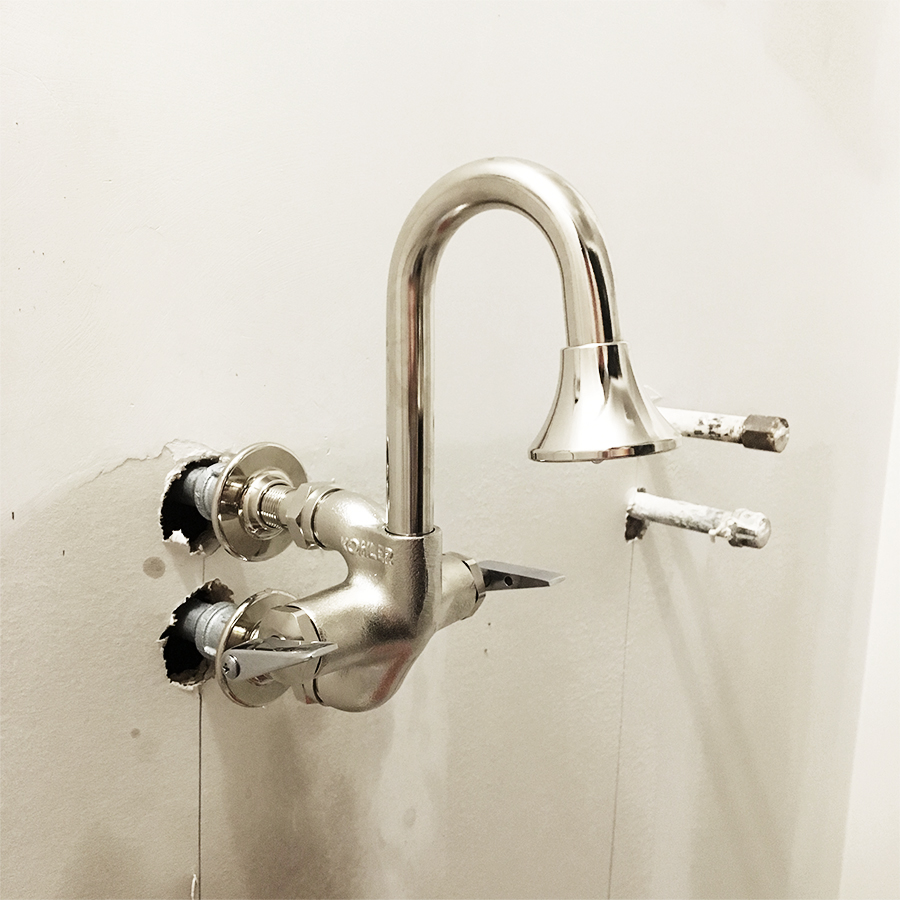
I didn’t want to get all the way into tiling the wall just to discover that there wasn’t proper plumbing or studs in place, so I decided to try a dry run at installing the sink and plumbing prior to tiling, to make sure everything was right where it needed to be. However, I’m doing stuff that I’ve never done before, like use two pipe wrenches at the same time kind of stuff, so it was all a little overwhelming for me. Thankfully, the mounting of the sink wasn’t that big of a deal. I referenced the ungodly amount of photos I have stock piled from the basement construction prior to the dry wall being hung, to double check and make sure all the bracing was where it needed to be. I can’t recommend taking insane amounts of photos of the inside of your walls if you ever get the chance to, I referenced them a handful of times over the last year. Anywho, from the photos everything looked like I expected them to, so that was reassuring. I used a fancy laser level and tripod to attach the sink brackets at just the right height and distance. This was my first time using a laser level and it made everything go together so smoothly. I’ll also be using it for baseboard install, and tile. The sink was hung dead on the nuts, and I was feeling good.
The plumbing was a little trickier only because I lack no confidence when it comes to this – like plumber already googled and dialed type confidence. After turning off the water, I had to remove the caps and pipe from the main 90º pipe that was behind the drywall. I used an assortment of 1/2″ threaded pipes (ahem, which involved many trips to HWS) in different lengths until I found one that would achieve the proper distance from the drywall. The pipes need to protruded out from the dry wall so that they would account for the distance between the wall and the “backsplash” on the back of the sink. I then attached a 1/2″ coupler to the pipe so that I would be able to thread on the Cannock faucet. After the pipe and coupler were tightened very very well, I attached the faucet per the instructions, and turned on the water. Success my friends! Can I just say that this is not typical for me to have this much good luck at one time, there is usually way more trial and error when it comes to me and projects. I’m hoping that this good luck doesn’t mean something horrible will happen to me in the future.
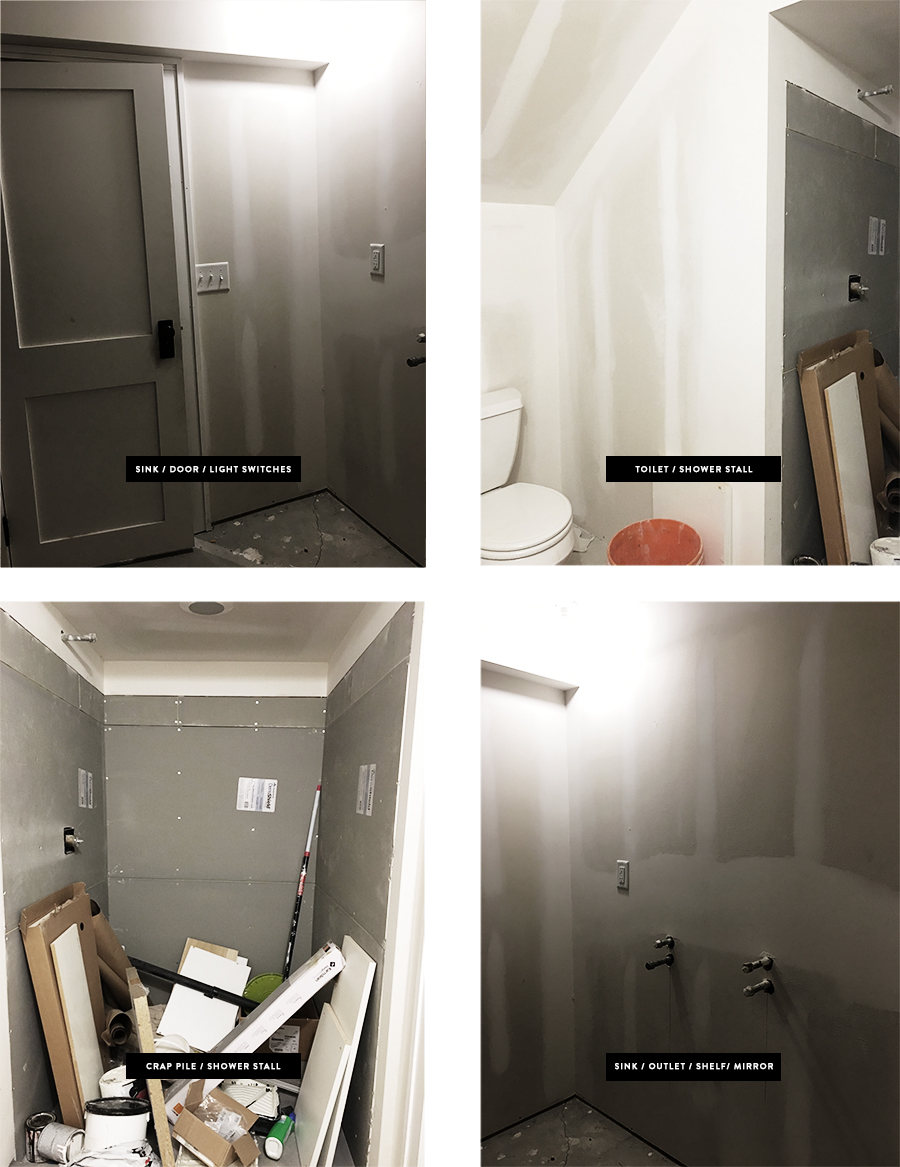
A quick tour around the bathroom — don’t worry, I’ll explain all about the rest of this space as the weeks go on.
Paint walls
Seal tile
(Jeff thought this was a photo of a shower — god help him.)


Duuuude! Josh and I are getting ready to start a basement bathroom remodel this winter. Unfortunately, we’ll be jack hammering into the cement floor to tie in the plumbing. I think we’ll try and do most of the work ourselves with some STRONG guidance/help from a plumber. Looking forward to seeing your progress!
Ooof, jack hammering the floor sounds tough! Part of our basement reno was having the worker dudes jack hammer up all the plumbing and replace it with PVC since we were having lots of backups from all the rust that had collected in the old iron pipes. I can’t imagine doing it myself, but I don’t have a second head to figure it out with either. I’m sure you guys will do great at it!
Looking forward to seeing the progress on this project. Just bought my first house and had to completely replumb one of the bathrooms, and I kinda love plumbing now!? One of the last projects on my list is tiling, so I’ll be watching for tips/tricks. I love those changing photos by the way, it’s a great visual aid!
Hey Ana! I want to love plumbing, it all makes sense in theory, I just need to build up my confidence. I’m going to try and tackle installing the shower valve too — worst case scenario is that I have to call a plumber. I always figure the more success I have, the easier it gets to do the next unfamiliar thing. I’m glad to hear that you are comfortable with plumbing and I hope that I have the same success! I’ll try and share some new tips and tricks when I begin to tile, especially when it comes to the floor tile. I have tiled a few times and feel pretty comfortable with it. I find these posts from Yellow Brick Home pretty valuable: 1 | 2
love your work. kinda coveting that sink…perfect!
Thanks so much, Deb! I really love the sink too. It fits into the little nook created for the sink so perfectly, better than I expected!
That tile wall and sink are going to be awesome!!
I think so! I’m going gung ho on this project, so I hope I have lots more to share next week!
You got this, Scoops! Can’t wait to poop in there!
I bet you can’t!
Might even invest in one of those fancy holder things that people put their TP on.
Oh man, I can’t wait to follow this reno. It’s going to be good!
One question – what kind of waterproofing system are you going to use in the shower?
Getting the shower ready for tile was one of the parts that I subbed out. They used DensShield Tile backer board around all three sides of the stall, and then for the floor they had a dude come in and lay down a plastic membrane that went up the walls (behind the board) about a foot, and then he poured a special mix of concrete on top of that. It was at this time that he also made the lip for the door so that water wouldn’t go all over the bathroom.
I need to go back in and change out the shower valve and uncover a niche that the guy had accidentally covered when installing the tile backer. Once that is complete I’ll go over every corner with a plumbers caulk to seal it up tight. Finally I will tile with thinset, grout, caulk and seal the tile and it should be good to go! I’ll write more about it as I go!
You are awesome! I’m so inspired. I love that sink. My parents have an old farmhouse sink in their basement that they use to drain the washing machine. I keep hoping that someday I will be able to use it in my house.
(Maybe that’s why we keep holding off on the kitchen reno? Nope, that’s the money thing)
Thanks, Lauralou! I love that sink too, I feel really lucky to be putting it in my house. I wanna know what your folks’ sink looks like?! I saw so many old cool, inexpensive, deep, cast iron sinks when I was at the salvage shop, might be a place that you can find a good vintage one if your folks aren’t in a hurry to pass theirs on to you.
Lady, I just want to tell you that you have one of the best DIY blogs around. I love reading your posts and I don’t even own a home yet! We have very similar style, I love everything you do. I am planning on buying a house in Denver in a year or two and I constantly catalogue your ideas for reference in mah brain so I can use them for inspiration once I get to redo my own place. Best of luck!
Hey Mandolin! You are too sweet, thank you so much, seriously makes my day. I wish you all the best when you start the house hunting process, it’s so exciting once it finally begins! Thanks, and have a great weekend!