


Hello Friends! I don’t know if you remember me sharing, but I wanted my new kitchen to have lots and lots of plants in it. I was envisioning shelves in front of the pantry window filled with lush greenery. That was a great idea and all, until I installed my first window shelf, and realized I hadn’t thought this through all the way. With even the most narrow shelves installed my cabinet doors could only open a few inches.
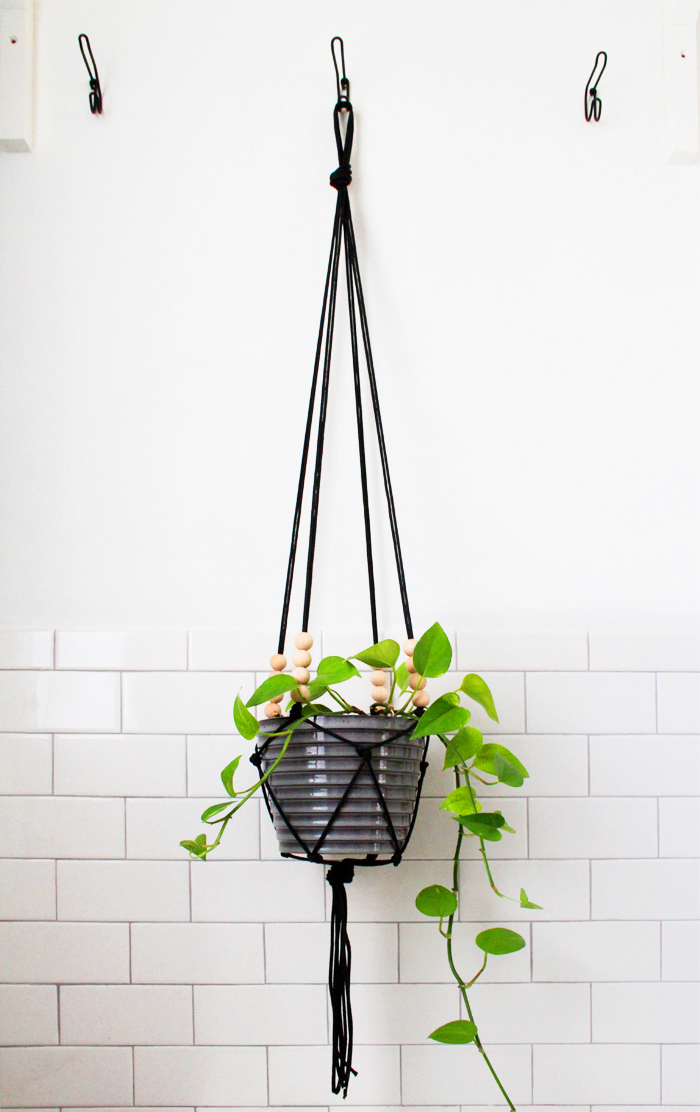
Sometimes ideas just don’t turn out the way you hoped they would. I wasn’t going to take no for an answer on this though, I wanted needed plants in my kitchen! Time to get crafty and figure out another way to add greenery to my kitchen without taking up counter or floor space. I bring to you the macrame hanging planter – the new more modern version that is. I’m not gonna lie, I have a ton of love for that old 70’s macrame, but I wasn’t looking for that in my kitchen. I wanted a hanging basket, but I wanted it to not look dusty, old and gross. Instead of using your standard macrame cord I tried something new and ordered up some nylon paracord. I liked the clean look of the paracord, plus it has some elasticity to it, which I think lends itself well to this type of application.
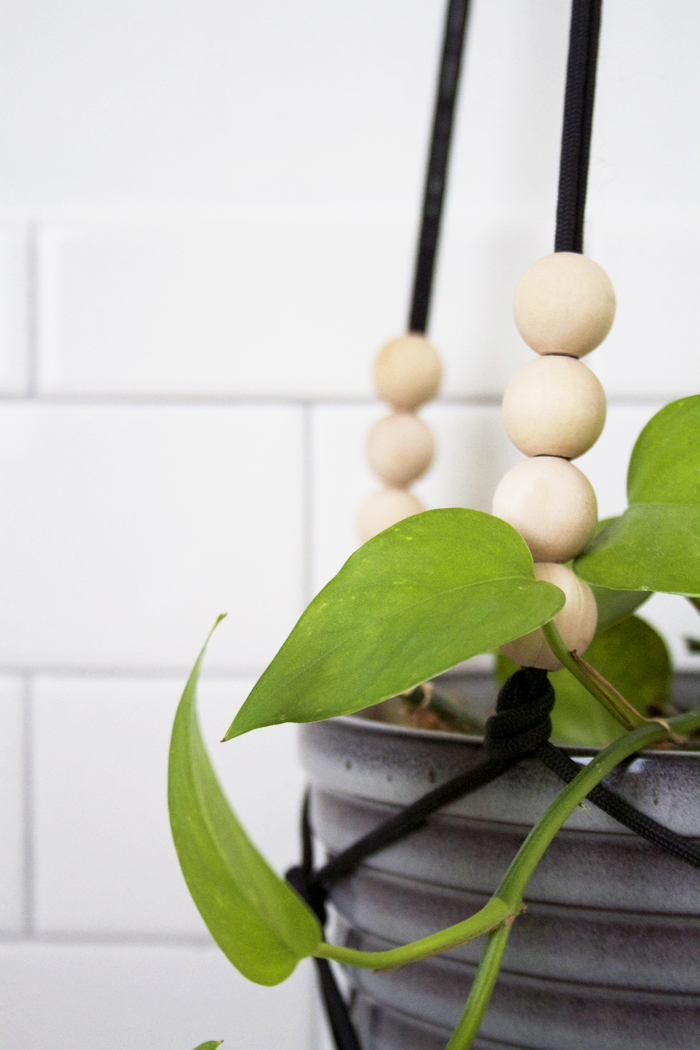
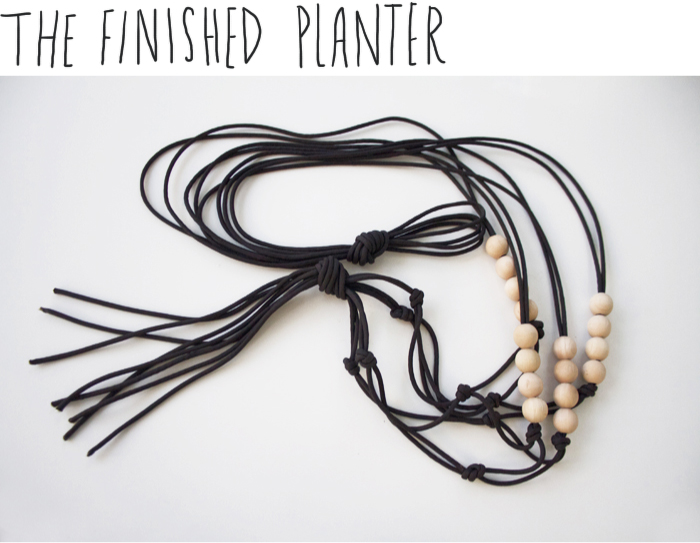
This project was really simple, after my supplies arrived in the mail it only took me an hour to put together, totally free style, dawgz. Basically you are making a simple net that a planter rests in. I really like the results, especially the wood beads. The beads look good with all the butcher block and cutting boards I have floating around my kitchen these days.
Down below I have posted the step-by-step instructions and supply list. The instructions are based on a pot that is roughly 6″ tall by 7″ wide. If your pot is larger or smaller than this you might have to adjust your measurements a bit. The nylon cord is very forgiving though. The key is to making sure your knots hang evenly from the previous knot.
Psst, also, paracord comes in tons of different colors. I had a hard time resisting neon cord – I think it would look super awesome though. If any of you guys try this for yourselves, you gotta send me a pic of your results, I’d love to see how this planter turned out for you.

|
Supply List |
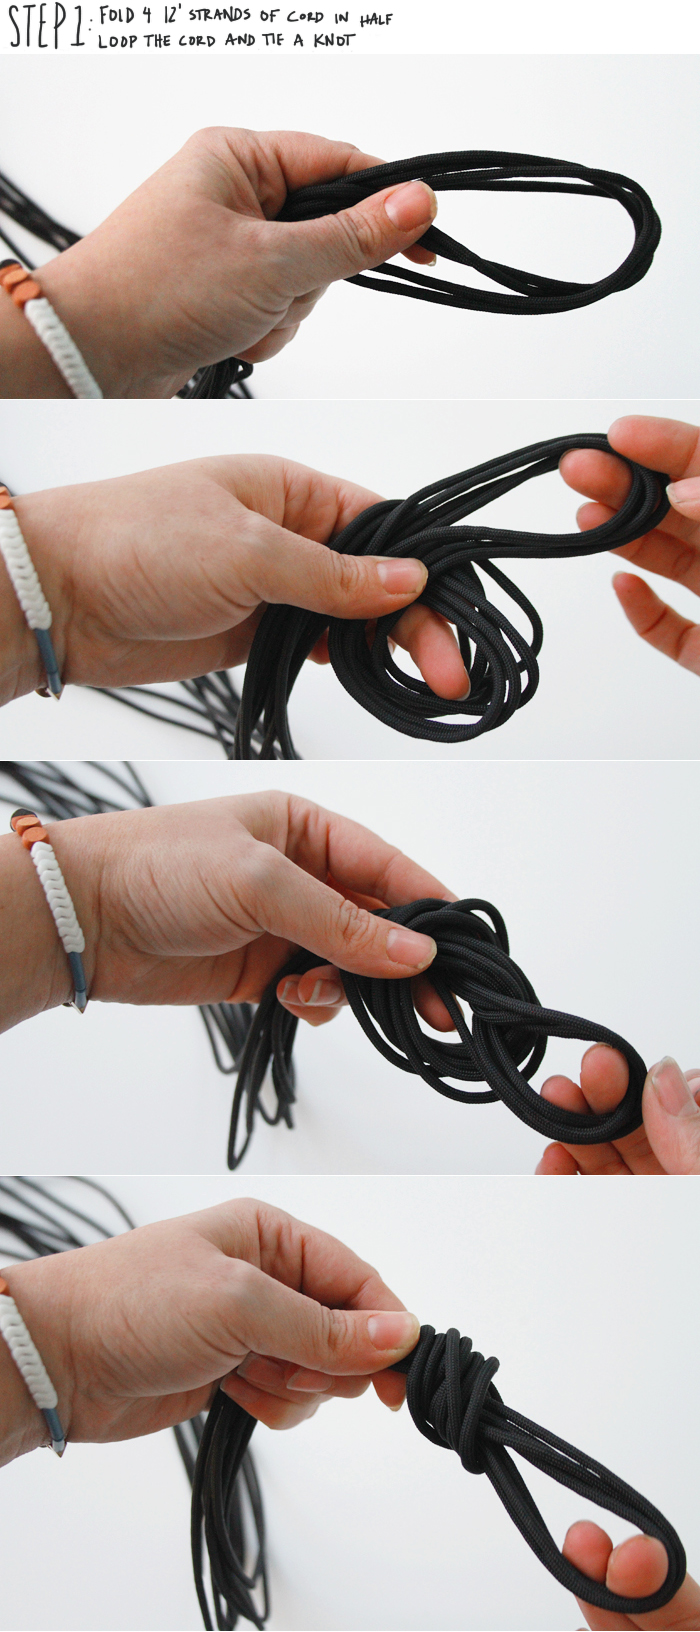
Step 1
Just a heads up, if you try this project and you want your planter to hang a good 4 feet from the ceiling, you are going to need a lot of cord, more then you would anticipate. For this project I ordered 50ft of paracord and then just divided it into four long strands before I folded it in half and tied a loop and knot in the top to start the project. Get it?, when you fold the four strands in half and tie a knot in the top you now have 8 strands. Cool huh?
Since it’s not obvious in the photos above you are working from the top (the loop where the planter attaches to the hook or ceiling) down to the bottom where the pot rests in the macrame netting.

Step 2
I would suggest working on this project on a table separating each set of 2 strands of cord out into a cross shape. You could also work upright attaching the top loop of the paracord strands to a hook or curtain rod. Do whatever is easier for you.
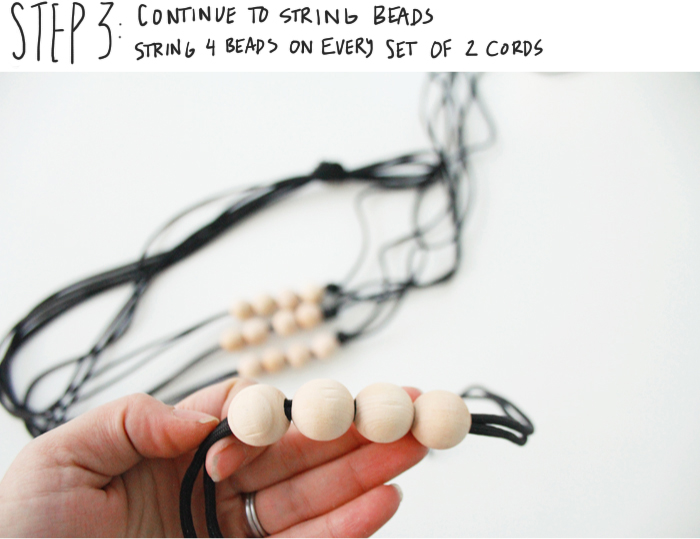
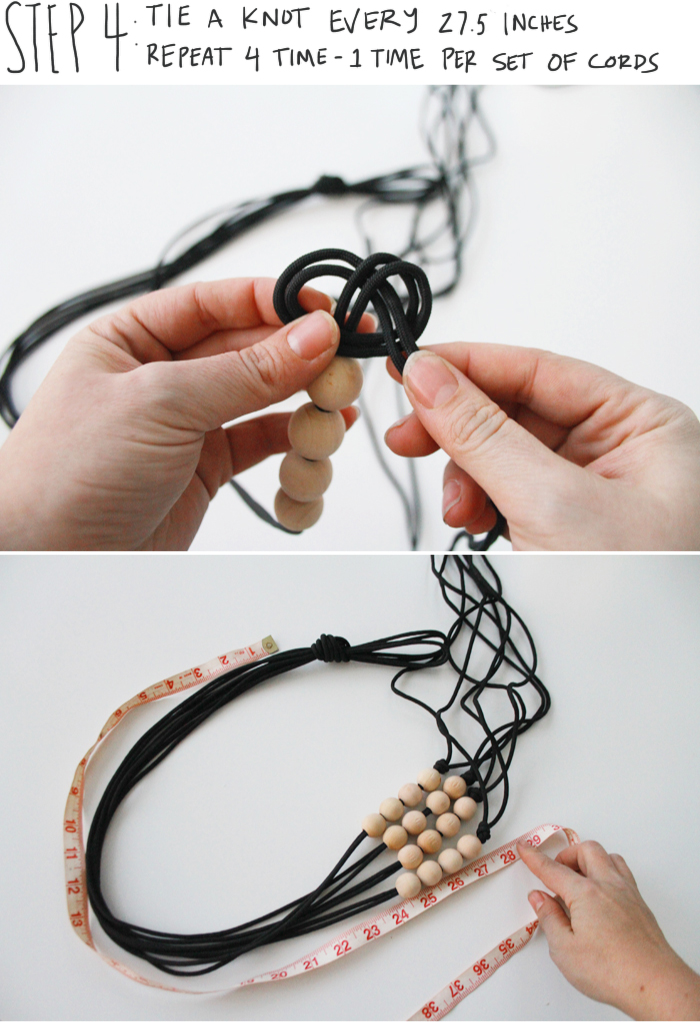
Step 4
Leave a space of 27.5″ between the first knot at the top of the planter and the second set of knots below the beads. See the picture above for a diagram.
Step 5
This is when you begin to build the netting that will hold the pot.
Click below for the rest of the tutorial after the jump!
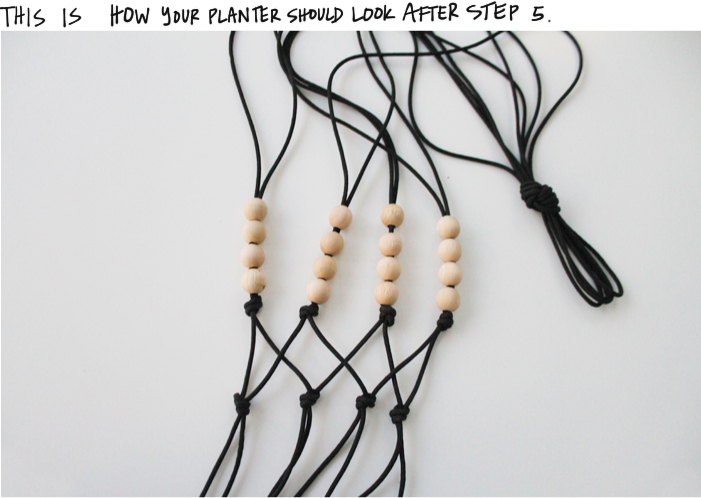
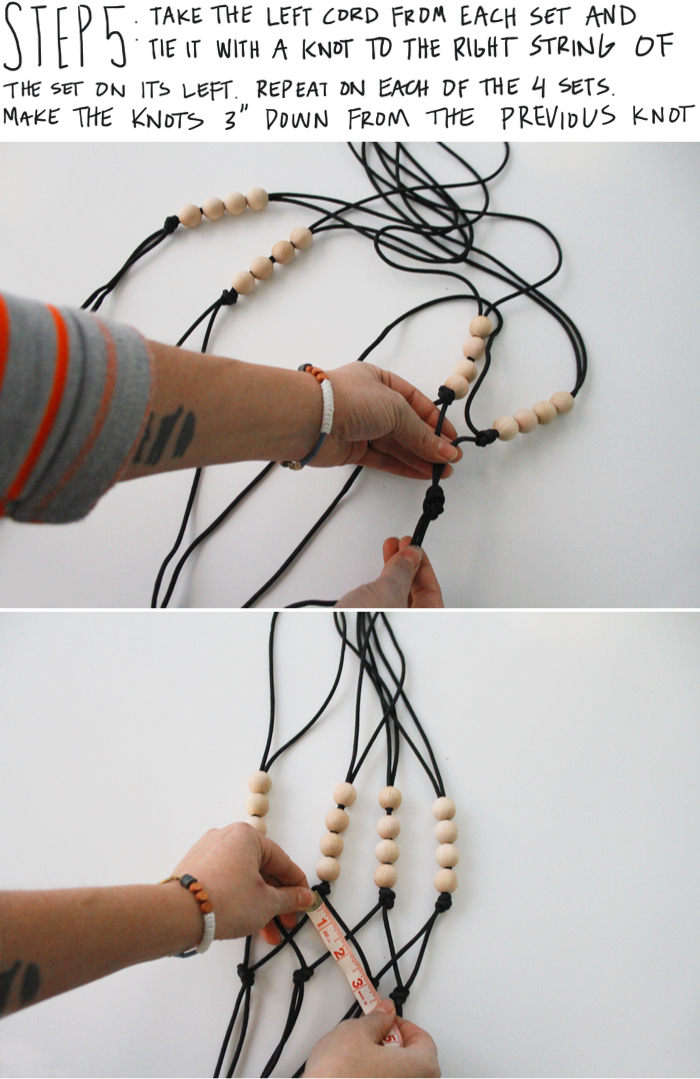
Step 5
Just like in step 5 you are creating a net, so take the left strand from every set of 2 cords and tie it with a knot to the right cord from the set of 2 strings directly to it’s left. Repeat on all 4 sets of cord.
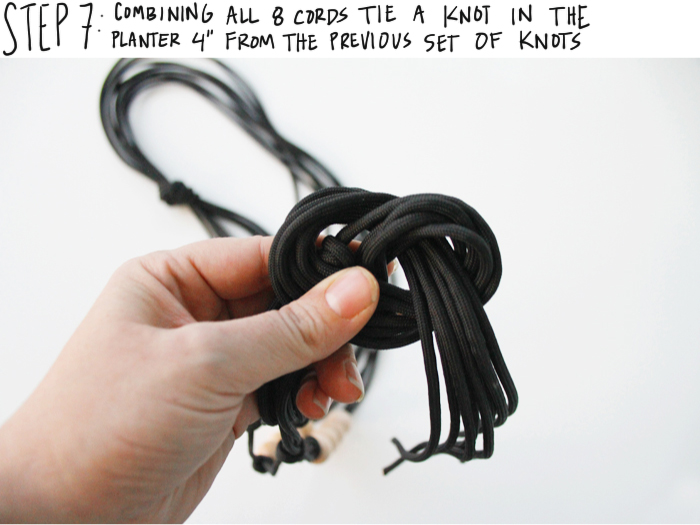
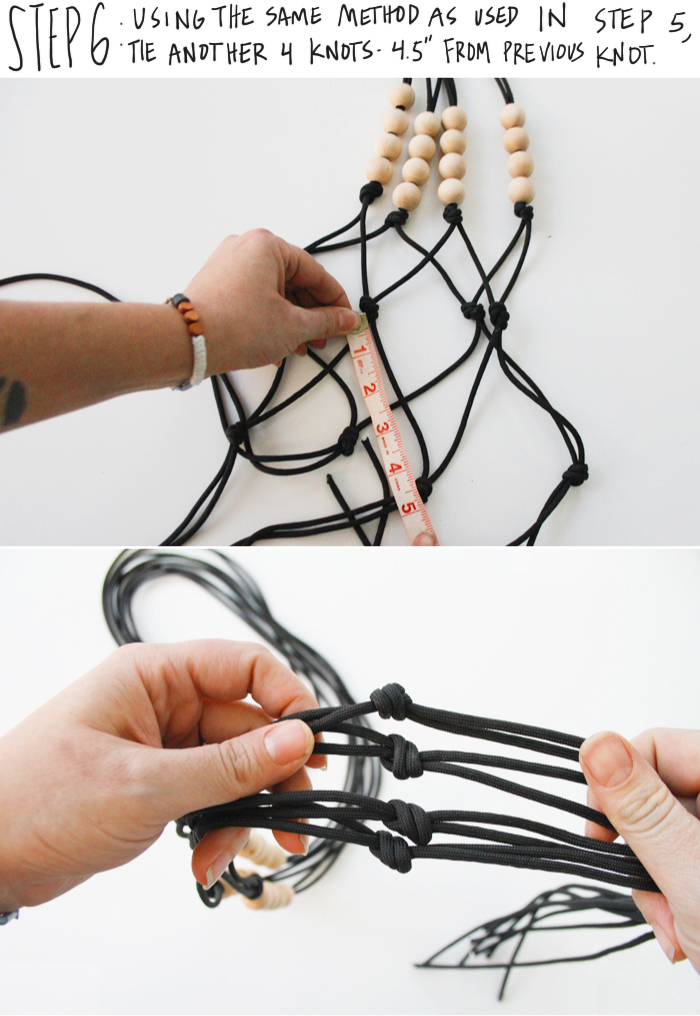
Step 7
This is the base of the planter. The big knot here will prevent the pot from falling through when you set it in the hanging planter. I would suggest taking a lighter or match and melting the ends of each cord so that they don’t fray. It’s a little stinky but worth it.


This is so cute, I need one for my kitchen window! Your instructions look easy to follow – I’m going to try this!
These are great! i made some for my living room a while back but want to add the wooden beads!! A+! Where did you get your hooks? I like that style!
I made this over the weekend with black jute. I love it so much, thanks for the inspiration and the how to! My daughter picked out a dark pink pot to go in it and it is so great!!
Awh, I bet that looks great! Glad the tutorial worked so well for you!
I just made this last night and I’m in love!! I needed something hanging because my cat loves to chew plants and I didn’t have any shelf space left on my high shelves, and this is perfect! It looks modern but homey, which is a hard mix to find sometimes, so thank you for this :-) LOVE!!
Is there a trick to getting the beads to go through both cords? I have all the correct supplies, but can’t seem to make it work! Thanks!
I had the same problem! I just didn’t use the beads for this one. I’m going to get thinner black cord and use the beads on that one.
There is a tool that is used to string beads. It has a wire loop that goes through the bead and then you threat the cord through the wire, pull the handle to draw the cord through the bead. Easy peasy. You can get it on Amazon.com
No trick, you can use a large eye needle as for crochet, or the have need threaded. It’s stong thinv plastic , you seperate thetwo connected side put yarn in center . Then pull platic with yarn through bead. Then again you can use your fingers. Lol. Have a gr
Hi, I’m going to make one for my living room. Thanks for sharing this DIY :)
Awesome! Glad you like the tutorial.
THANK YOU FOR SHARING THIS. WOULD YOU CONSIDER MAKING A YOUTUBE VIDEO ON THIS?
THANKS
Thanks so much for the easy-to-follow tutorial! It’s exactly what I was looking for to update a clay hanging pot I have. Your instructions worked out perfectly.
Yeah! So glad it worked for you. For the other commenters who were having trouble with the bead holes, I would suggest melting the end of the cord and/or possibly using a drill bit and pliers to widen the hole.
I used bright green cord, no beads, and aten inch clay saucer to make a hanging birdbath. I tied the first knots and second making adjustment for the diameter, then I fitted it around the pot. I tightly secured the top in place with a temporary knot, flipped it over and continued making the knots as instructed, but snugged each knot up to the bottom of the saucer. I continued the knots till all loose cord hung from the center, making a flat bottom. I braided the remaining cords from the center. I love my hanging birdbath. Thanks for the tutorial!
Thanks for a great tutorial! I’d love to know where you got your hooks from? Cheers, heather x
They are just simple wire hooks, they look vintage, but you should be able to find them at your neighborhood hardware store. I spray painted these black.
LOVE your homemade macrame hangers, Scoops – thanks for the step-by-step! Wish I would have come across this a little earlier before Christmas! :-)
If you’re looking to jazz up your wire haoks, we have beautiful indoor/outdoor stained glass hooks to hang your macrame hanging planters with. They’d look even more gorgeous!
I think that is one of the most vital info for
me. And i am happy reading your article. But should remark on some normal things, The website style is
perfect, the articles is in reality excellent : D. Good process,
cheers
What pot is this? I love the look!
Hi there,I log on to your blog named “DIY Modern Macrame Hanging Planter” like every week.Your writing style is witty, keep doing what you’re doing! And you can look our website about love spells.
CasinoKiwi is your No1 conectado casino guide in NZ! http://www.fssaicentrallicensingapplication.com/great-cycling-clothing/
I see you don’t monetize deucecitieshenhouse.com, don’t waste your
traffic, you can earn extra cash every month with new monetization method.
This is the best adsense alternative for any type of website (they approve all
websites), for more info simply search in gooogle: murgrabia’s tools
I wish I could post a picture! I LOVED your instructions! I just made my FIRST EVER macrame plant hanger and I am so thrilled! Thank you so much!!!