


What up dudes? After a few long months of enjoying the summer weather and fully giving into the gardening bug I finally got the fire to start a new indoor house project.
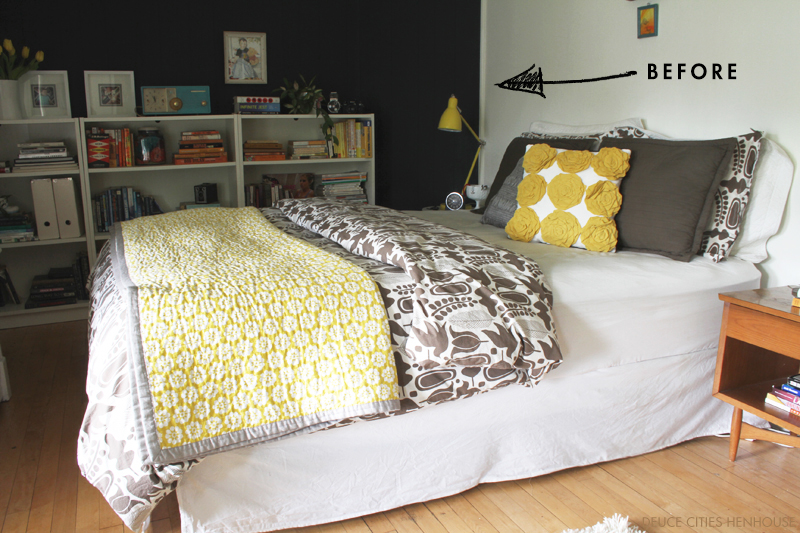
Let me start at the beginning. In our entire adult lives Jeff and I have never had an adult-put-together bedroom. We have never had an actual bed, we only use a rickety bed frame and a pile books to hold up our mattress. We have a hodgepodge of furniture, much of it we have been carting around since we left our parents houses. After setting up the boys with super cool digs last fall I realized that they have a sweet bedroom, and we do not. Something was wrong with that picture.
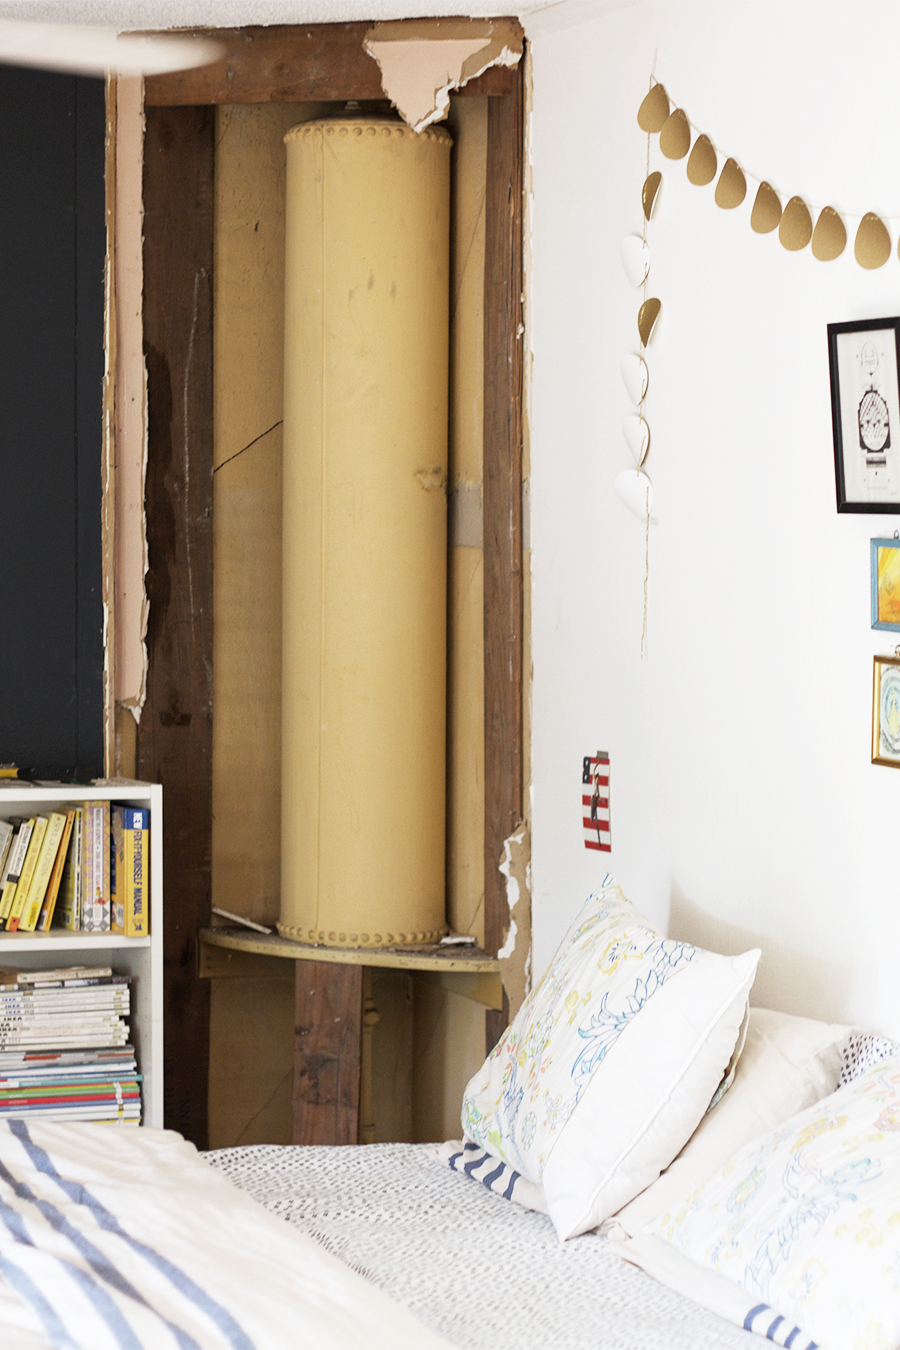
I painted the bedroom back in 2012 – it’s a nice bright white space. The far back wall is made up of cheap paneling, I painted it black to help disguise it by absorbing the light and down playing it’s vertical grooves. I always knew the paneling was hiding something, why else would it be there? The paneling covers the back wall and then angles out in one corner. I’ve been curious to discover what is hidden behind that panel ever since we moved in. I knew it had to be trouble. After pounding on the walls I could hear a metal reverberation behind them. Since we don’t have duct work I had no idea as to what it could possibly be. I was hoping hard for some sort of sweet time capsule.
Last Friday morning I decided to solve the mystery. After feeding the kids some breakfast, something magical took over my body. I was possessed. I have a bad habit of starting projects by putting myself in do or die situations. I ran down to the basement, grabbed a crow bar, a hammer and a blade and headed back up to our bedroom to finally reveal the secrets of the corner wall. I got the panelling down in no time, discovered drywall beneath, and within minutes I was sitting face-to-face with a large steel, yellow, riveted tank, connected to what appeared to be the radiator system. The can of worms was opened, you guys. I was secretly kind of excited about it. My husband, who had no idea what I was up to, was not.
I had a visit from the radiator guy yesterday – he was hopeful that he could get my tank out that day, but after poking around a bit we discovered that the boiler system would have to be drained first before we could move the tank. Plus I’d have to remove some of the floor so he could access a connection joint to cap the pipe off. The good news is we can remove it! IT, is an old radiator pressure tank – in case you were wondering, and he’s never seen one hidden in a corner or on a second floor of a house before.
So how did it get there? From what I can deduce, that corner used to be part of a closet. I believe there was a closet on either side of the room, just like in the boys room. Someone removed the closet to make the bedroom bigger, and in doing so they had to figure out a way to cover up this tank, thus the angled corner.
Removing this tank and repairing the plaster walls, ceiling and moldings is going to be step uno in a two step process. Before I can move on to decorating our bedroom I need to be able to start at square one with a clean slate. In order to get there I will have to make my way through a giant to-do list.
TO DO LIST
REMOVE HARDWOOD FLOOR : I’m a little uneasy about doing this but it’s the best way to access the radiator pipe connection that needs to be capped off. The other option would be to access it from the dining room ceiling, which is covered in the hated popcorn texture. It would be too much trouble to patch the opening if we accessed it through the dining room.
REMOVE SUBFLOOR : I’ll have to remove the subfloor making sure I’m not chopping through any wires.
REMOVE TANK : This will involve having my radiator buddy come back to remove the tank. Hopefully no more worms will be opened during this process and all will go smoothly.
RE-INSTALL SUB FLOOR AND HARDWOOD : Hopefully I will be able to put everything back the way I found it.
SKIM COAT PLATER WALLS : Between the plaster hidden in the corner and the plaster in the rest of our room, there is a raised edge created by years of paint layers. I’ll have to do some research and figure out the best way to skim coat the corner and level this gap out.
DETERMINE WHETHER OR NOT I SHOULD REMOVE THE POPCORN CEILING OR PATCH THE CORNER : This item is a big IF. Yes, I’d love to remove the popcorn ceiling or even drywall over it, but I’m afraid that it might be out of the cards. We are trying to work within a budget. I am worried that the popcorn ceiling contains asbestos, and in that case our only option would be to drywall over it. I want to do this at some point, and when that happens I’d like to do all the ceilings at once. Even though I hate the popcorn ceiling, the best option for right now might just be to patch it.
REPLACE CROWN & BASE BOARD MOLDING : There is only a shadow of the molding that existed at one time in this corner of the room. I am hopeful that I will find the same molding at a local salvage center, and paint it to match the rest of the room.
I’ve got my work cut out for me – big time. I’ll have to try and save a good chunk of this project for the fall and winter months even though I want to dive in now. I’ll be back later this week to share a “mood board” for the room – I need to have a prize to focus on. Wish me luck you guys, and if anyone has tips on removing hardwood floor, skim coating walls or opening large cans of giant worms, leave yer pal a comment :)


When we reno’d our main floor, most of the popcorn ceiling was removed because of the needed demolition. But for some rooms, our drywall guys were able to skim coat over the popcorn, creating a smooth ceiling. That may or may not be cheaper/easier than putting drywall over your popcorn.
Hey Meredith, Interesting, I’ve never heard of this before. I’ll keep that idea in the back of my mind.
Eep! Exciting times! We had to remove one of those tanks from our attic (well, we didn’t HAVE to, but the pipe leading to it was exposed and it wasn’t doing anything, so it made sense while we were replacing the boiler anyway), and while it wasn’t a big deal, the plumber neglected to DRAIN THE TANK FIRST. Evidently the system was drained and I think they assumed the tank would be empty since it had been out of commission for so long, but NOPE. Big flood through two floors. Ceiling staining. Fun times. So don’t let that happen to you, haha.
This might be a dumb question, but are you *sure* removing and patching a section of the ceiling wouldn’t be easier than removing a section of the floor? To properly remove the floor, you’d really want to take out entire boards so you don’t end up with an obvious patch when all is said and done…and removing hole boards comes with risks of damaging the boards during the removal (especially the first board) and probably some light carpentry to get them back in and looking OK, and if anything gets damaged you might need to find salvaged pieces, and…I don’t know. It seems to me like a ceiling patch and a can of that popcorn texture to make it all blend is the way to go…even if the patch doesn’t blend 100%, the popcorn is on your hit list for someday anyway. You’re never going to change the floors.
And since I’m already being so annoying already…if *I* were you, I don’t think I’d have the strength to remove popcorn ceilings, particularly throughout a whole house! That sounds no bueno. If the ceilings are solid and in good shape aside from the popcorn, I’d probably opt to 1/4″ drywall over all of it and call it a day. A crew could have that done in a few days and I’m told it’s not very expensive. If the popcorn is asbestos (which is sort of hard to determine, since it’s possible different rooms were done at different times, so some may have it and some may not, or you might end up testing a sample that was really a later repair that comes up negative even if other areas do contain asbestos…blah blah blah), hiring out new drywall will be WAY easier and cheaper and safer than abatement.
OK, I’M DONE NOW.
Oh God, Daniel. It IS so exciting but so scary too! I miss having indoor projects and I love the thrill of trying to figure this out.
Okay, so your comment about approaching this thing through ceiling vs. the floor has really got me thinking, like a lot. I am obsessing actually, and I’ve barely even done anything physical to the space. The more I think about it (which has been all day now) the more I think you might be right. I have had experience with patching a ceiling with that gross horrible popcorn spray once before. Let’s just say I didn’t master the technique. I still cringe every time I looked at the patch job on my living room ceiling. I don’t know if I can put myself through the daily torment of looking at a shitty patch job every time I step foot into the dining room. However, you had a good point that someday we will drywall over the popcorn – which I have always considered doing before scraping it anyway, just didn’t know all the logistics and cost etc.
Anyways, I still need to consider these floor vs ceiling options, neither is super cool, but one has to be better than the other. Thanks for your input, I really appreciate it. I know I’ll be referencing your posts about skim coating n’ stuff when the time comes.
Also, Sorry to hear about your tank flooding and causing damage – how come those dudes didn’t have a back up plan when they went to take it out, so lame!
I am a little superstitious when it comes to speaking possible misfortune aloud, so I cringed every time I read ‘hopefully”, but it’s all good- I knocked on virtual wood for ya! Can’t imagine why anyone would drywall over that tank to begin with- don’t know much about theses things but it seems like that might have been more work for less gain. What will you do with it once you take it out? It’s rather pretty considering it’s unglamorous purpose!
Hey Caroline, I thought about that when I was writing the word ‘hopefully’, but there was just no better word for it. I have no idea how big of a project this will or won’t be. All I know is that it will feel so much better in the space when it’s done, and I like adventures. My neighbor likes the look of that tank too, maybe I’ll give it to him ;)
Well if nothing else, metal is recyclable. A metal scrapper will come and pick it up. Good luck with this one and don’t feel like you have to DIY the whole thing. When we hire out, I like to think I am sharing money and they are sharing expertise.
I’m with you, Vanessa. I think I’d probably through it out in the alley, it would be picked up by a scrapper within minutes.
“…something magical took over my body. I was possessed.” LOL.
I also like the tank. It could make a cool plant stand.
It could probably make a cool something, but I just don’t know – it’s super heavy and not really that cool on close inspection.
WOW. What a discovery!! Cool, but scary..but cool. Im totally sending you good vibes that you can get this taken care of in the least painful way so you can sail into a cool proper adult space bedroom. Weve never had a legit master either and that’s top priority on the to do list when we move into our new digs. Cant wait to see everything come together.
Thanks Shavonda! I hope I can tackle this beast, although I’m pretty sure I can. I always seem to figure it out somehow. I know it probably seems crazy to do so much for a corner of a bedroom, but right now I can’t even fit my nightstand back in that space. I’d love to have a proper right-angled wall ;)