


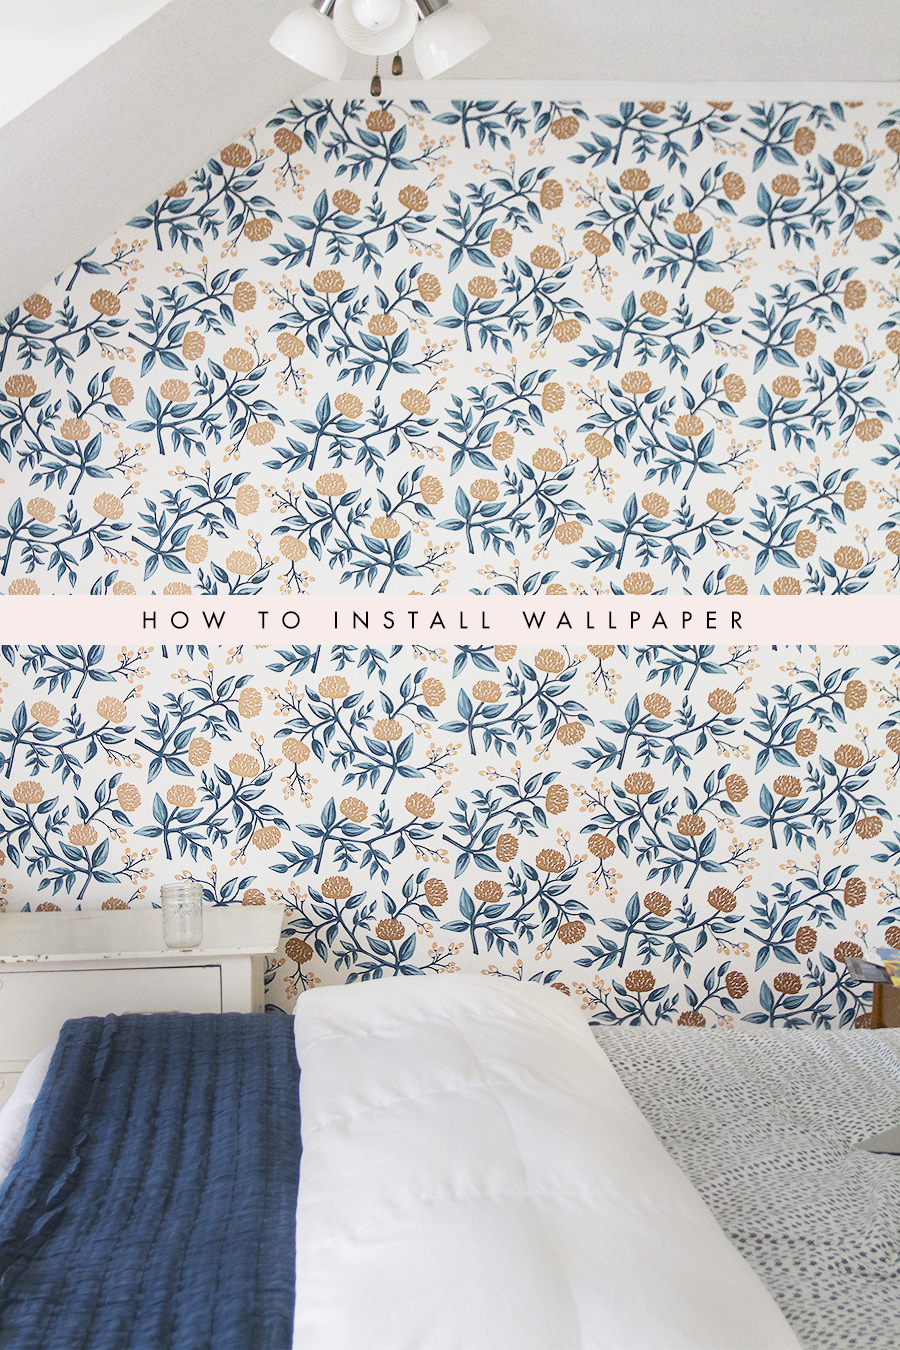
Guys! Today I am going to teach you how to install wallpaper on an accent wall. This is a job that is fairly easy, a tiny bit stressful, and 100 percent totally worth it. This my friends, is the third time I have ever wallpapered, so I pretty much consider myself an expert. Stick with me and you’ll be alright.
I have a method and it seems to work pretty well, so I’mma share it with you. Wallpapering isn’t that scary, actually it’s pretty straight forward and makes a lot of sense. You are pretty much gluing paper to a wall, which isn’t that hard, my six year old does this sort of stuff all day at kindergarten. A more complicated project might involve wallpapering around fancy moldings, windows or in a small room. I am not showing you how to do that stuff, I am simply sharing instructions with you on papering that all important “accent” wall. I am going to share with you the basic principles of wallpaper (aka wallpapering 101) like finding where to mark your plumb line, determining paper length, matching the pattern, hanging the paper, removing bubbles and trimming the edges. It’s not rocket science bros, but it works.
I’m not gonna lie to ya, there is always a stressful moment in wallpapering, you know, that serious “oh shit” moment. Anticipate that and you’ll do just fine.

|
1 Wallpaper – Peonies in Copper Colorway from Hygge & West 2 Zinsser Sure Grip Wallpaper Paste 3 Straight Edge 4 Level 5 Paint Brush & Roller 6 Seam Roller 7 Paint Tray 8 Tape Measure 9 Pencil 10 Wallpaper Squeegee or Smoothing Tool 11 Sponge 12 Straight Edge 13 Bucket or Pail |
Prepare Walls
Make sure to fill any holes in the wall with spackle and sand down any rough spots. Make sure to wash your wall with a damp sponge prior to starting your wallpapering project
Draw Plumb Line & Cut First Strip of Wallpaper
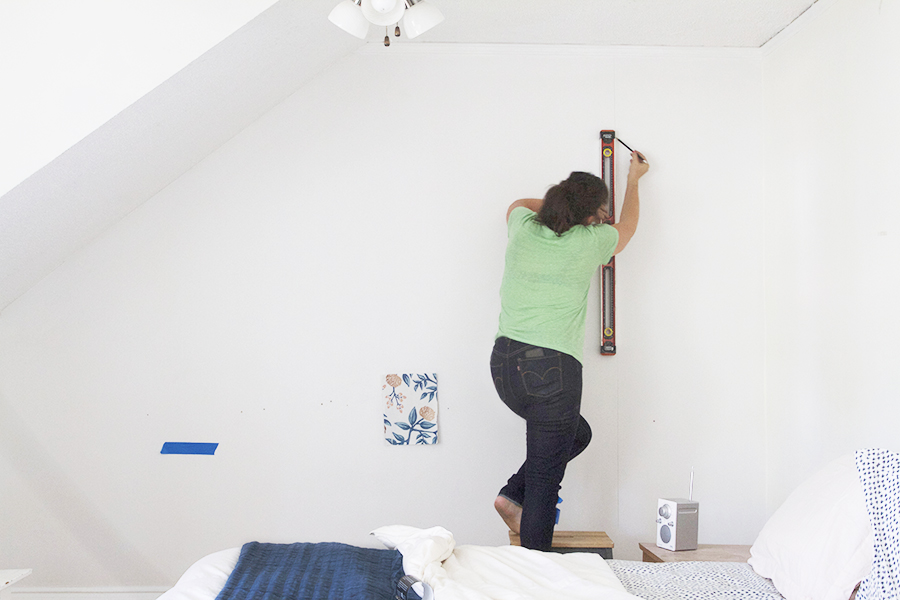
Measure the width of your wallpaper. Working horizontally out from the right corner of the wall, measure out the width of wallpaper minus two inches. Draw a vertical plumb line at this spot on your wall, using a pencil and a level.
Measure the vertical length of the wall.
Measure out your first strip of wallpaper, take the length of the wall and add five inches, (this will allow you to have a few extra inches of paper for both the top and bottom of the sheet). The excess paper will later be removed.
Match Repeat with Second Strip on the Floor
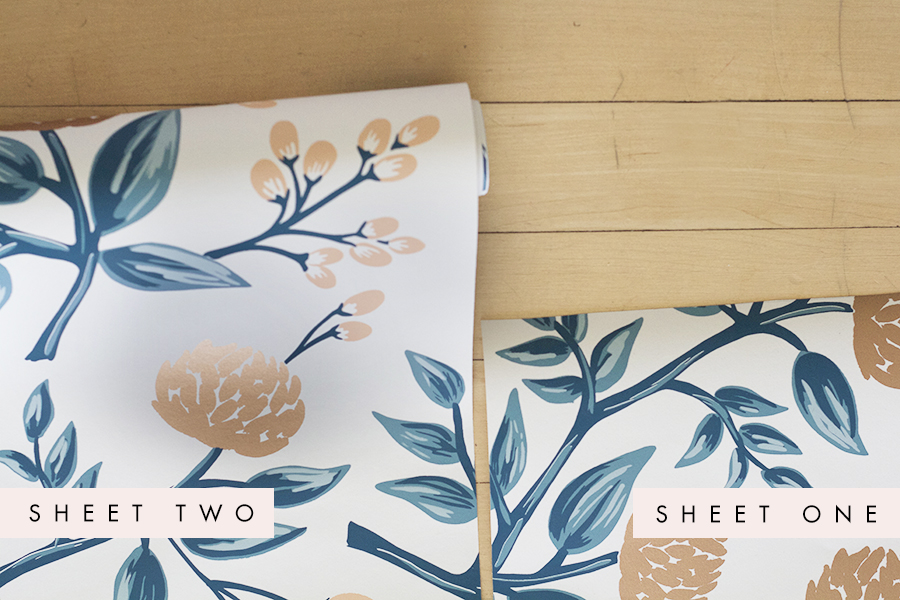
Prior to hanging the first strip of wallpaper layout the second strip on the floor to the left of the first strip. Wallpaper patterns have repeats, and you want to make sure to line up your second sheet of paper to match the pattern repeat from the first strip. When you have the pattern lined up, roll out the paper and cut the second sheet to match the length and pattern of the first.
*Note, your second sheet will most likely be longer than the first sheet due to the placement of the pattern repeat.
Roll Paste & Fold Paper Book Style
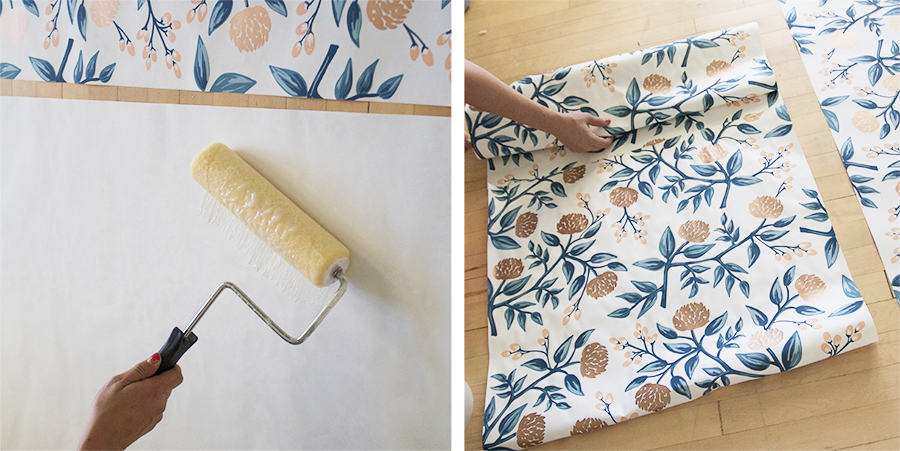
Make sure to read the label of your particular brand of paper before beginning to paste. Some wallpapers come pre-pasted, in that instance you only need to wet them to activate the glue. I’ve also used paper that only requires the walls to be pasted prior to hanging. The point is, make sure to read the label of the wallpaper as well as any instructions provided on the label of the wallpaper paste.
This specific wallpaper required me to roll out paste on the back of sheet of wallpaper. After a generous pasting I was instructed to fold the paper to the center (booking the ends). I made sure that the edges lay flat so the glue wouldn’t dry out. Booking the ends of the paper also allows you to easily move the wallpaper around the room without risk of dimpling or kinking the paper. After folding the paper wait 5-7 minutes for the paper to “relax” while at the same time allowing the glue to get nice and tacky. Feed it a cocktail to ensure extra relaxation.
Hang First Sheet of Wallpaper on Plumb Line & Smooth Out
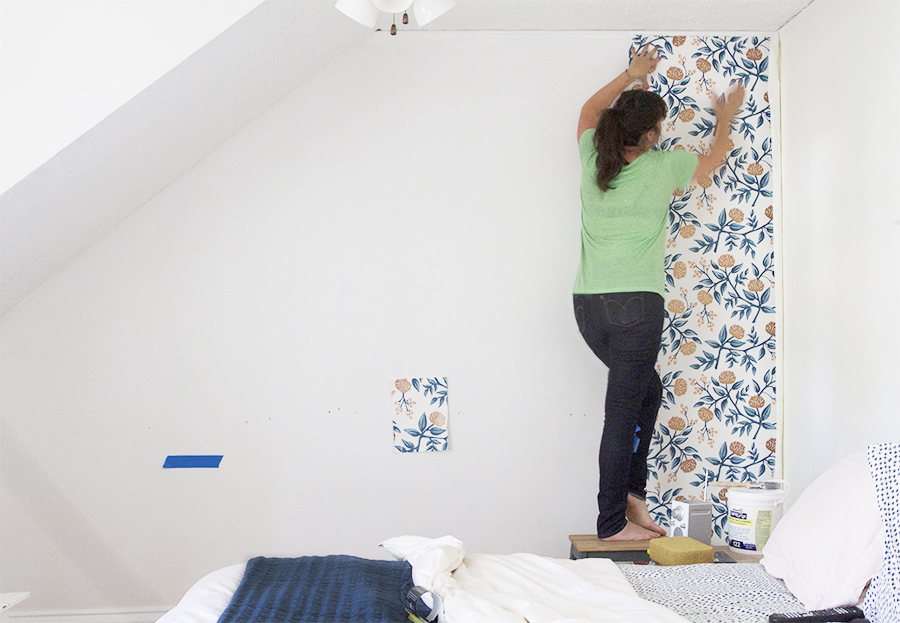
Now this is where it gets a little hectic. I’ve wallpapered three times now, and even though I think I am a pro, there will always be a few minutes of stress and chaos, guaranteed. Usually it happens sometime around the first or second sheet of paper.
I start the process of hanging the first sheet by unfolding the paper, it easily drops down when you use the book method of folding. Begin lining up the paper with the plumb line you previously drew out on your wall. Once the paper is place, begin smoothing out the paper using your hands and good pressure. Follow it up by using a the edge of your smoothing tool (aka wallpaper squeegee) to remove bubbles. The squeegee tool is essential, and is the difference between having a successful project and a shitty one. If your wallpaper isn’t lining up how you wanted it to, try not to worry! I know, that’s hard, believe me. Go ahead and redo what you have done, partially remove the wallpaper from the wall and start over. Crazy, I know, but it can be done if you are working quickly and carefully. Generally speaking, you have about 15 minutes from the time you start hanging the wallpaper to get it right.
Line Up Third Strip on the Floor & Hang Second Strip
Now you might want to go ahead and hang that second strip of paper you have lying on the floor, but don’t! Before hanging the second strip use the same exact technique as explained in step 3 and 4 (above) to match your pattern and determine the length of your next sheet.
Trim Excess Paper with a Straight Edge and Sharp Utility Knife
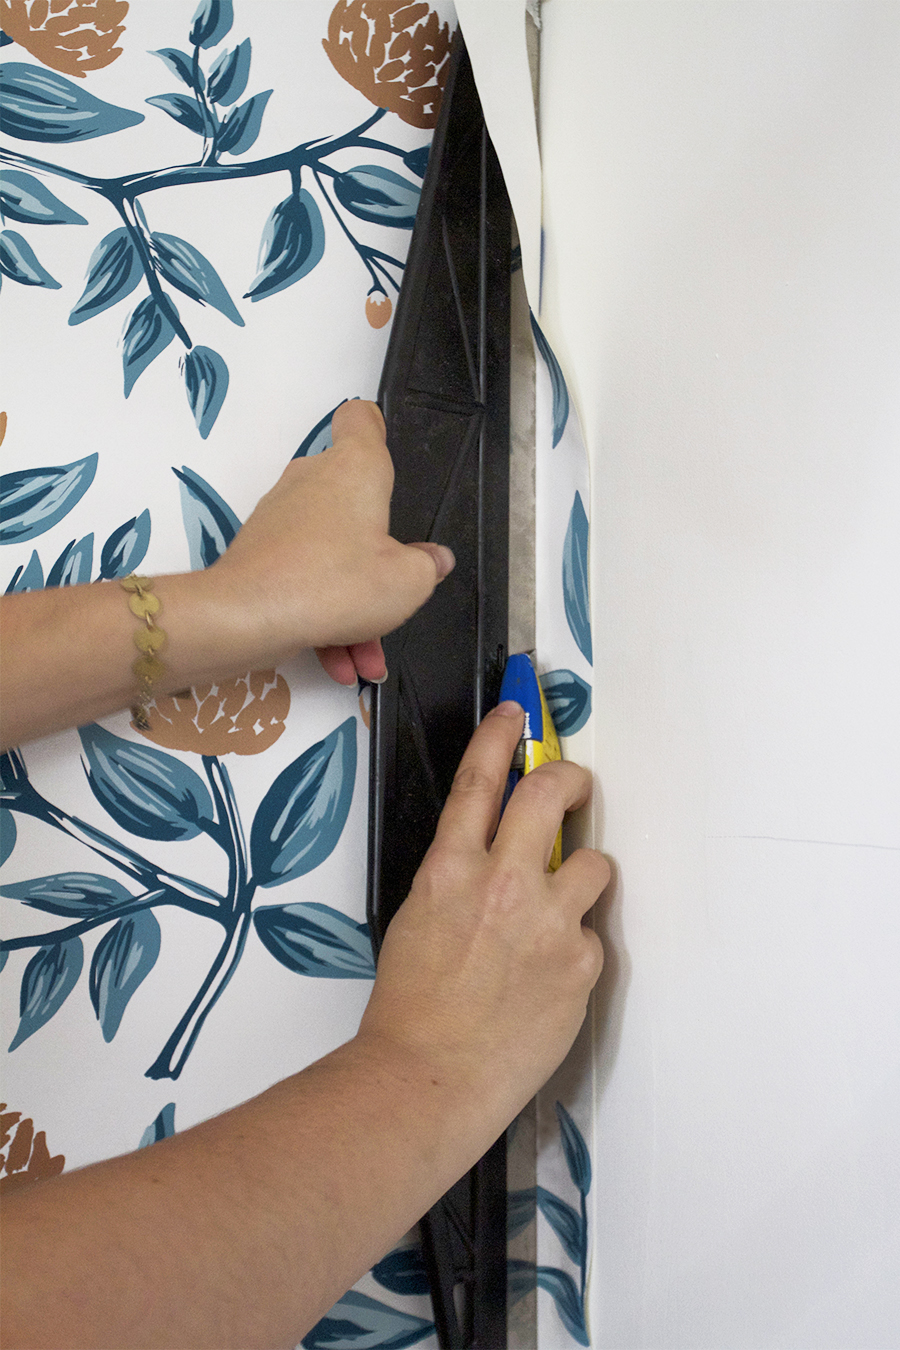
While you wait for 2nd sheet of paper’s glue to set up, go ahead and trim the excess paper from the first sheet hanging on the wall. This part is really satisfying because you finally get to see a crisp clean edge, and everything begins to seem possible! Use a straight edge and a very sharp utility knife to slice the edges of the paper. Be extra careful around corners and moldings. If you are wallpapering a large wall change your blade throughout the project.
Hang Second Sheet, Butt up Seams
Okay, now I give you permission to hang that second sheet of wallpaper! Begin by lining up the second sheet with the first sheet at eye level. I suppose they say to do this because that is where your eye will naturally go, so might as well have get it right at eye level, makes sense, I guess.
Smooth the paper out from the middle moving upward and out to the left, and then downward and out to the left. Follow it up with a good squeegee working down from the top. I find it works best to move your squeegee out from the seam, towards the left and across the paper. Don’t overlap the wallpaper, carefully butt the sheets up to one another. The paper will expand in contract throughout the seasons, so small gaps may occur depending on how humid or dry the air is.
It’s never going to be perfect, guys! Wallpaper has give and it will stretch! No matter what you do and how hard you try, it will never line up perfectly. The good news is that no one will ever notice except you, and even then you’ll really have to look for it. Believe me, I am crazy about that stuff and I barely notice.
Use seam Roller to Flatten Seams, Clean up Excess Glue with Sponge
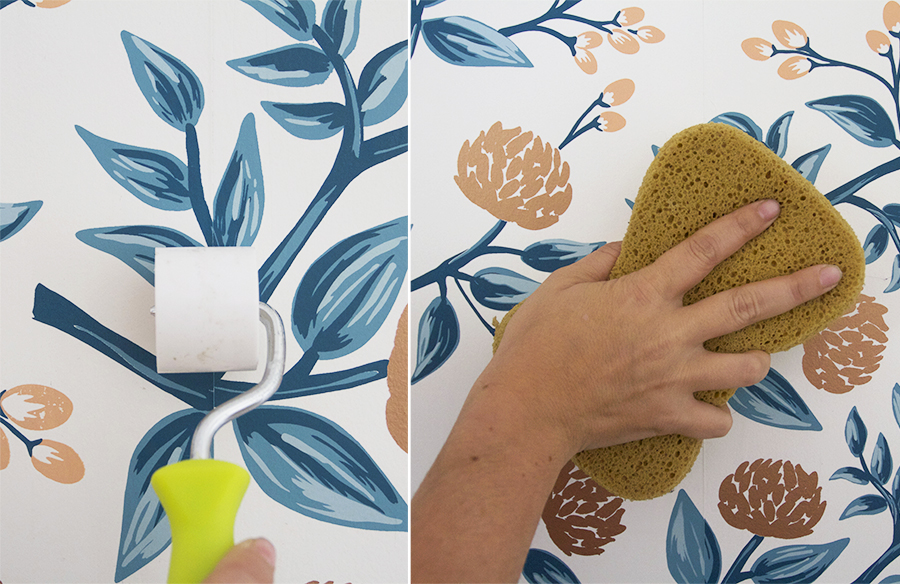
So your edges aren’t sticking down as nicely as you’d like? This is where a bit of glue and a seam roller comes in.
Using a brush add a bit of extra glue to the back edges of the paper. Using the seam roller and applying even pressure, roll it up and down the seam. Use a damp sponge to clean up extra glue that might spill out.
Repeat!
I feel like you’ve got the hang of this, continue on repeating steps 3-9 until you finish your wall!


Looks fantastic! I lived in a crazy land of wallpaper in the 70s and 80s, so I have a really hard time even considering it for my house. Do you have to do anything to prep the wall, like with a special primer? I seem to remember how the walls were prepped being the key to how easy it was to remove said wallpaper later on (and my parents made me remove wallpaper so many times!).
On another note, instead of running your bed parallel to the wallpapered wall, why don’t you turn it 90 degrees and center the bed on the wall? Without the boiler of doom, it looks like it will fit.
Hey Stacey! Thanks! I primed the wall prior to wallpapering, but that isn’t necessary. The wallpaper paste I used is water based AND can be stripped, so technically the wallpaper should come down without too much of a fight. We will see if that really happens when that time comes. For now though it’s staying ;)
The first thing I did after wallpapering was turn that bed 90º. We slept like that for one night and determined very quickly that we just couldn’t do it. That side of the room is just too dark and there are no windows to look out of. It’s nearly impossible to get up on these dark mornings anyway, we don’t need to move ourselves back in the darkest side of the room on top of it. It’s also a little more narrow than maybe these photos make it look. Our room is about 20′ x 12′ long so when you put the bed all the way down on the far side of the room it makes the rest of the room feel really far away. When we had it set up that way there is enough room to put night stands on either side of the bed, but there is no room for any other sort of dresser or furniture. I wish it worked better, but it just doesn’t. I’ll share a floor plan with you guys in the coming weeks. Thanks!
Beautiful! I agree that having a squeegee is essential. I’ve never used a paste wallpaper but I did install temporary wallpaper in my bedroom and the vinyl bubbles like crazy if you don’t have a squeegee around. Thanks for the tutorial!
Hey Maeve! Did you have good experience with the vinyl wallpaper? I’d be curious to hear your thoughts on it.
Hi Allison. Yes, overall it was a good experience once we figured out a system of getting it on the wall. Basically, you uncover half of your panel, line it up next to the pattern repeat, stick it to the top of the ceiling and squeegee it down, smoothing out any bubbles or wrinkles, uncovering the vinyl backing as you move down. Used a blade to trim at the end. We used a screen printing squeegee I had leftover from college so it was almost the same width as the paper. It’s been on our wall for almost 3 years now and hasn’t peeled off, and should not leave any residue when we decide to take it down. Our paper was from Tempaper and I’d buy from them again, although CB2 just put out some sweet temp wallpaper that I would like to try out next time.
Hey Maeve, This is so good to hear! I didn’t even consider temporary wallpaper when I started the project, but I should have. I had no idea that temporary paper held up equally as well to the real deal. Thanks for sharing, I’m sure this info could really help out other readers. I know the next time I wallpaper I will totally consider using a temporary paper.
Yeah~ it’s definitely a good option but the selection is limited. Also I would like to mention that I live in Texas which is full of heat and humidity so no peeling in 3 years speaks well for the product.
Whoa – it’s even prettier close up. I believe that I will hire my wall papering out. It would kill me to rip the paper or something awful.
I hear that – Especially when it’s so expensive! I ordered two rolls of paper but was able to get this job done in one roll. It is stressful, but wallpaper isn’t as fragile as you would think.
That looks fantastic. I have to admit I wasn’t sold on your selection but its perfect and looks so good! I love the pattern, well done YOU! I’m still trying to talk myself into tearing out the wallpaper in the bathroom and re-papering. Thank you for doing this tutorial I’ll book mark this for later this fall…please standby for emergency emails!
Thanks Anya! I wasn’t sold either ;) I’m happy I went with it though, it really looks great in the space and ties in all the colors that are happening in the sunroom. You should really consider rewallpapering especially if you have a really pretty paper in mind. Taking the old paper down is a pain, but it’s not the end of the world. I did wallpaper our vestibule and it was really hard to operate in that small space, I thought because it was small it would be easy. Good luck if you decide to go for it!
Stunning!
Thanks, Dawn!
Thanks for the really clear and thorough tute. I actually feel like it might be possible for me to wallpaper for the first time in my life. I love the coronata star wallpaper, but was so afraid to paper, I stenciled it instead. In the end, it was probably more work than just wallpapering.
Hey Lexy! This makes me happy to hear that you think this tutorial makes wallpapering seem possible for you. Tutorial success! The star wallpaper is really sweet – I bet the stencil looks great. I agree, they are probably both a bit of work. I meant to put this in my post – I wallpapered this one wall in 3 hours. In doesn’t take a ton of time, you just have to be prepared to be stressed out for the entirety of the project.
Hi Alison! Fellow Twin Cities resident currently renovating my 100 year old house in South Minneapolis. Bit of a odd question but I have been dying to get my hands on some remnants of Copper Peonies Rifle Paper wallpaper and cannot find it anywhere on Facebook marketplace or ebay now that it’s discontinued. I saw that you used it in a bedroom way back when and was wondering if you had any little leftover pieces for a tiny project I am doing. I’d be happy to pay for it!