


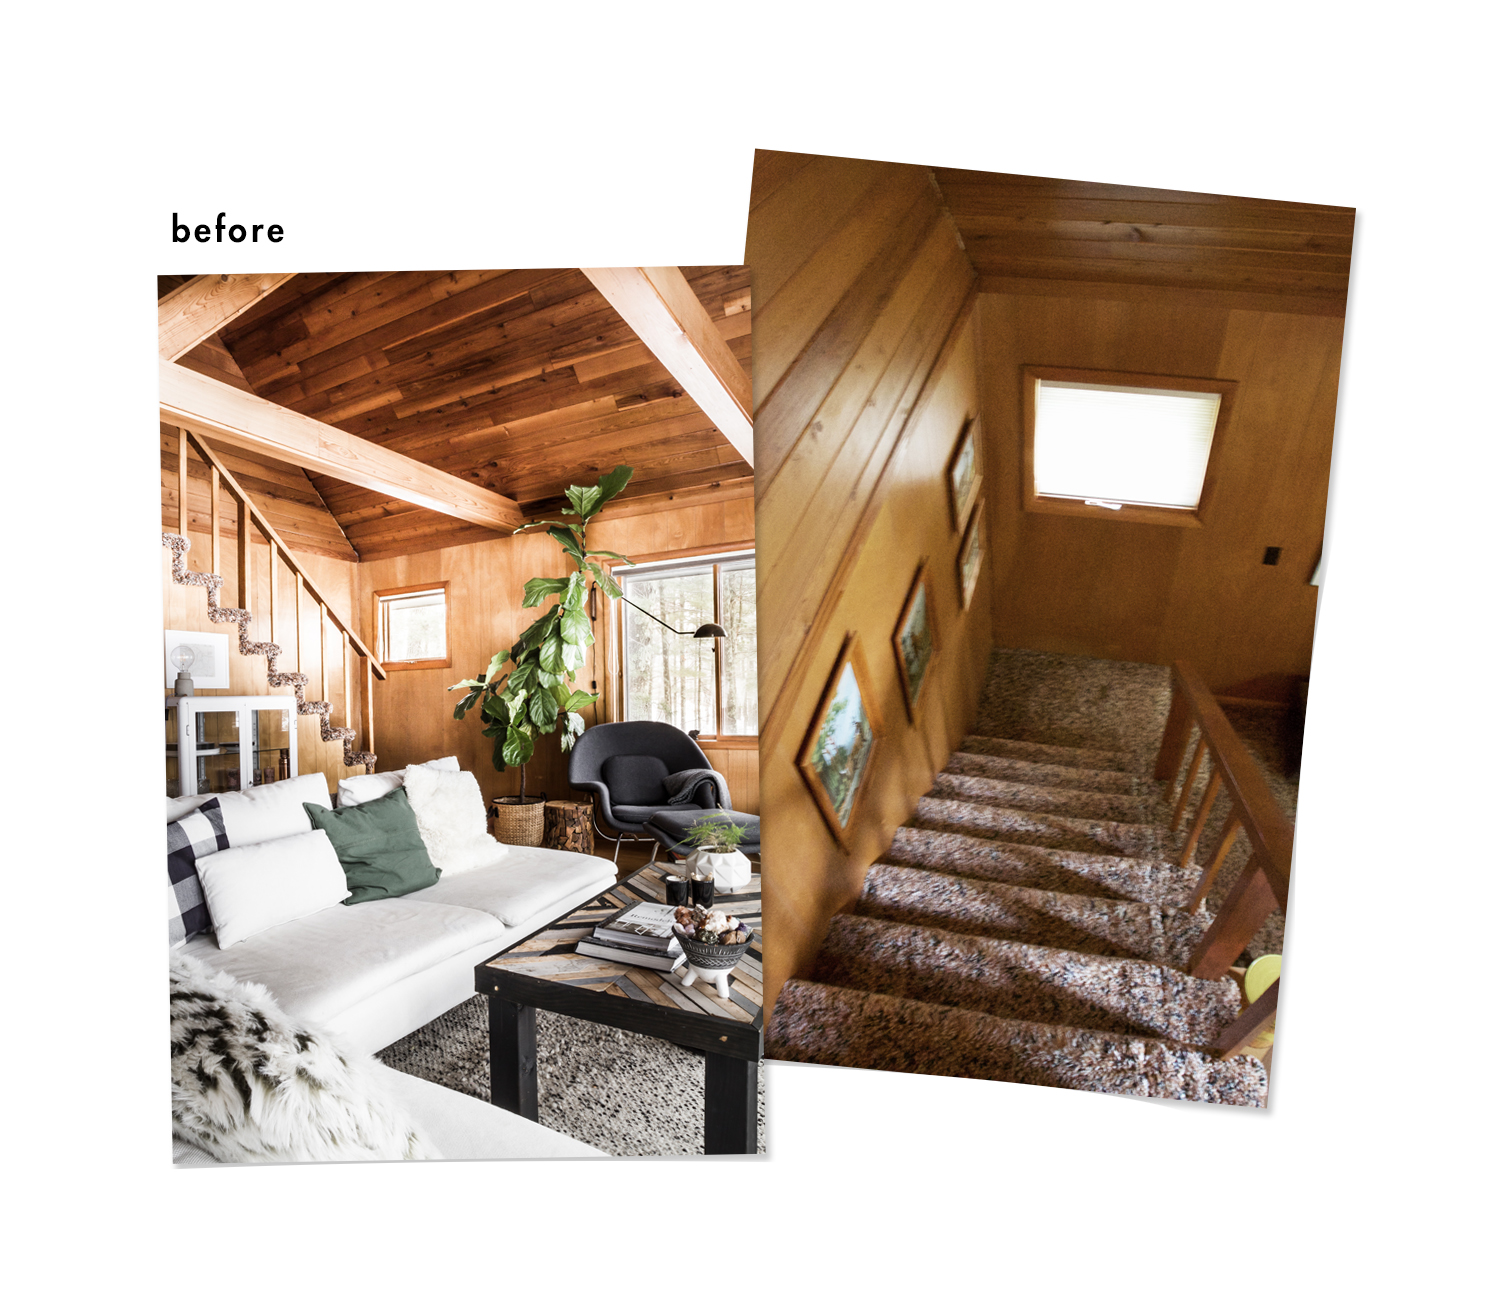
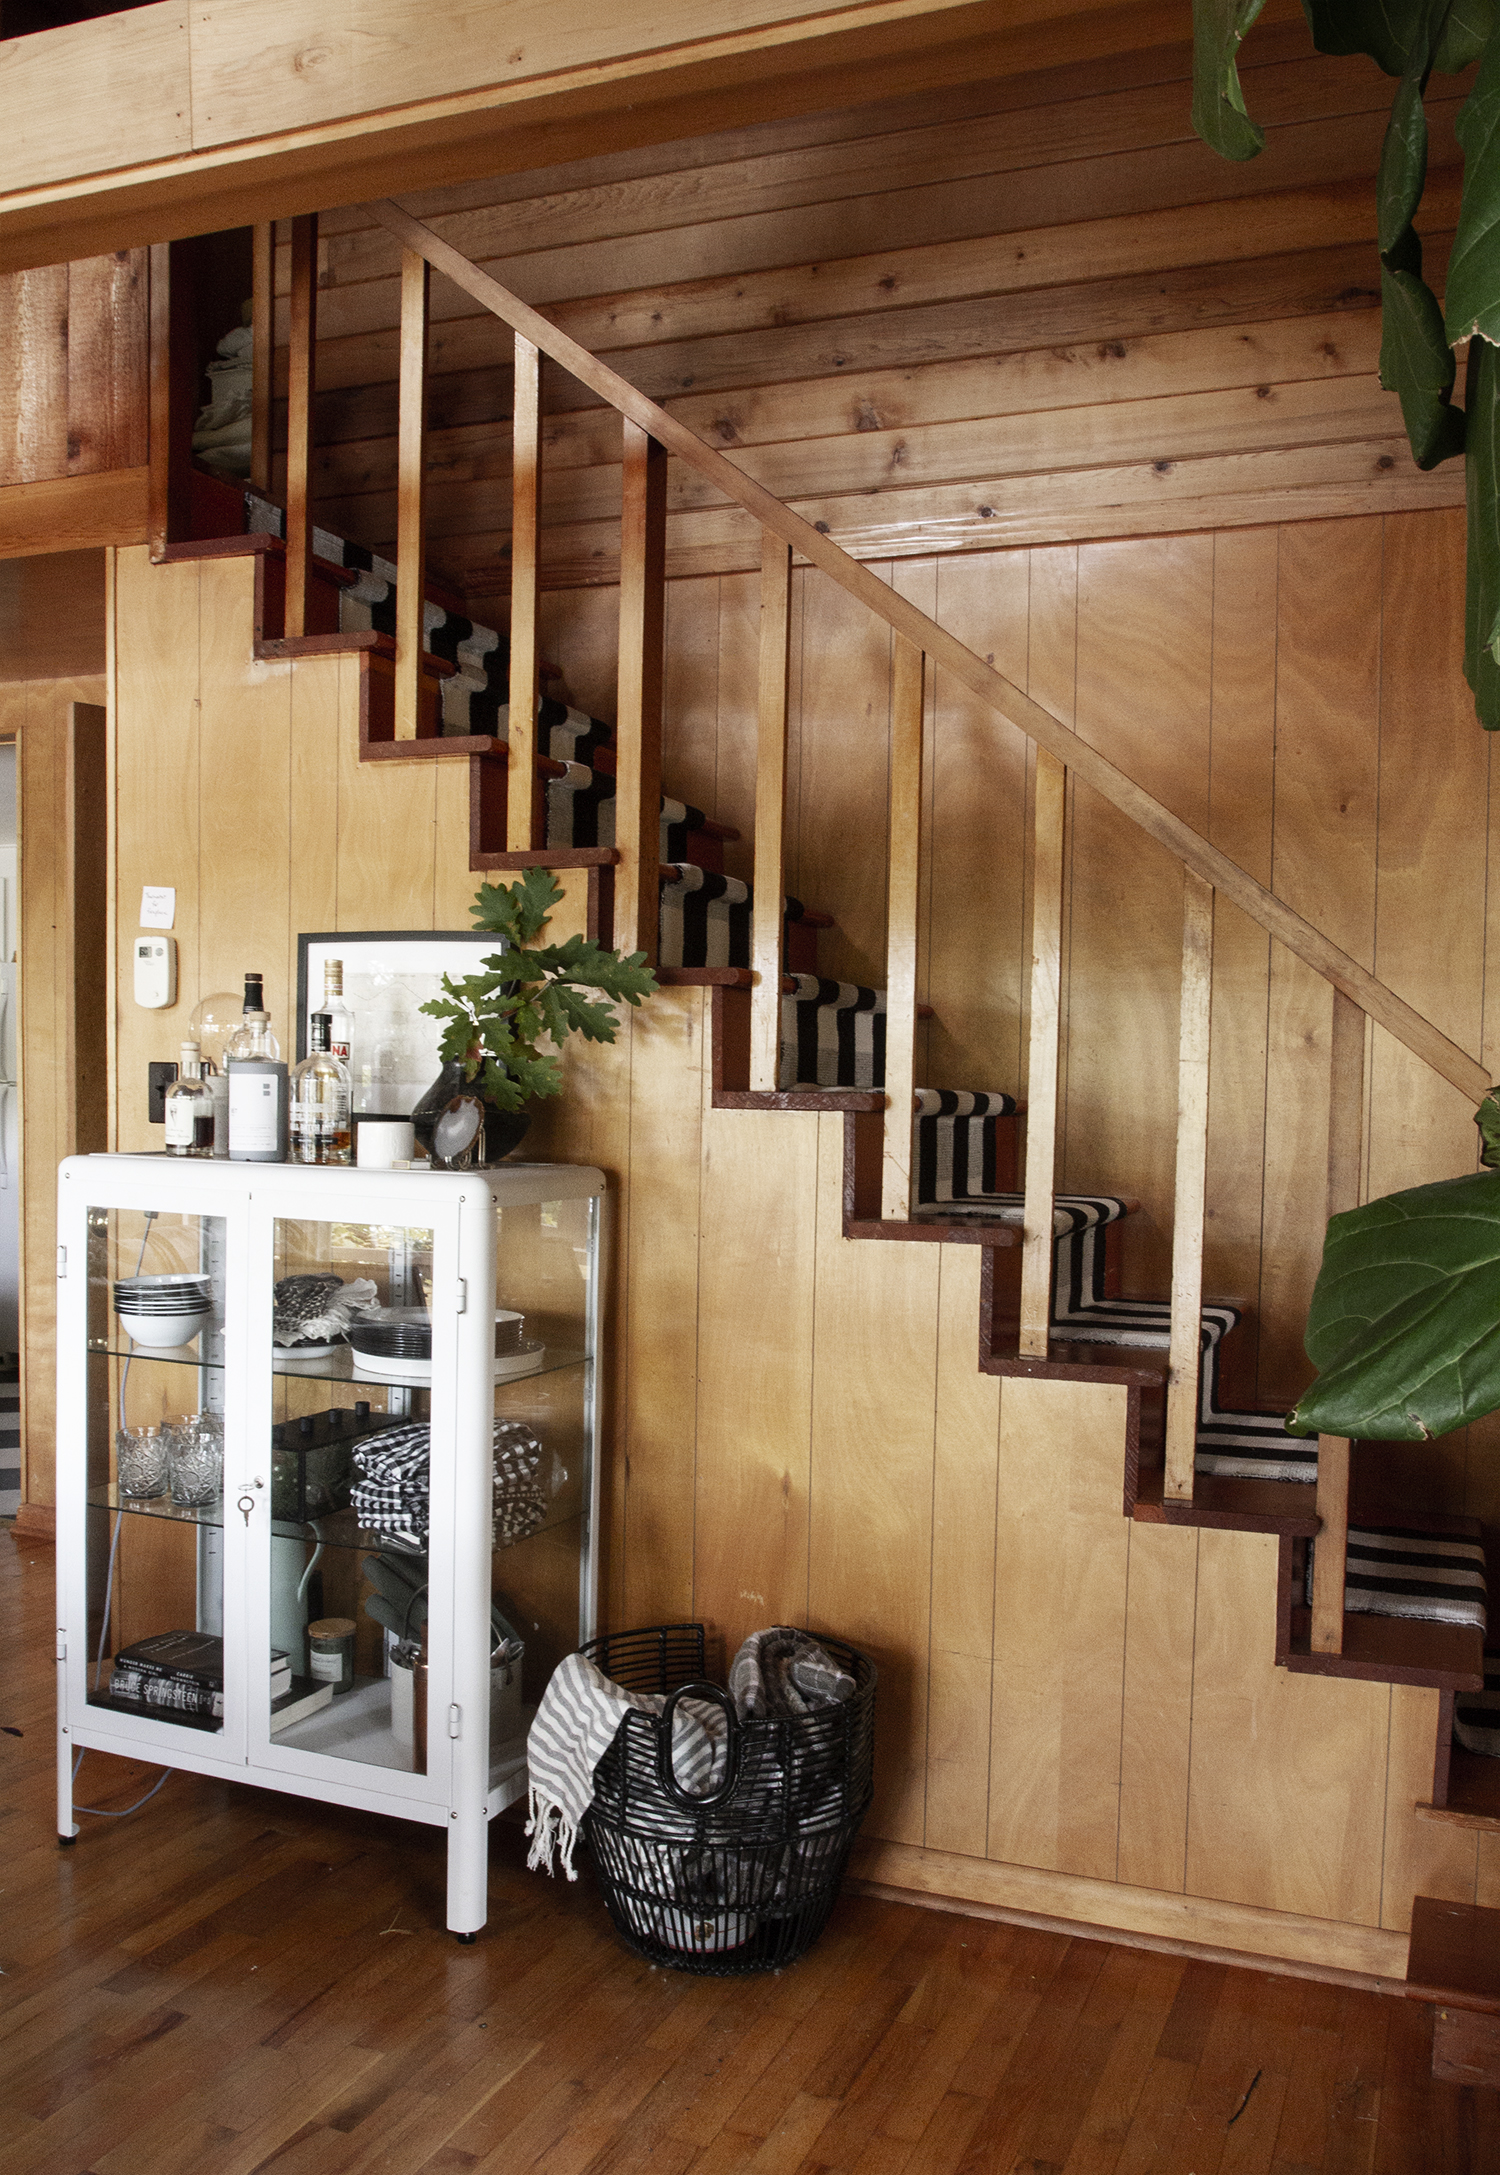
For the last year I have been slowly removing the wall-to-wall 40 year old carpet that plagued our cabin. Can you imagine how many wet feet and soggy bodies this carpet had seen? Barf. The majority of the carpet was ripped out the minute we closed on the place exposing the hardwood floors underneath. For months after I continued to find staples that needed to be pried up, but eventually we had the floors totally uncovered. There were a few areas that still had remnants of the carpet, and the stairs were one of them.
Imagine the year 1978, you decide that your bare wood stairs are just too undressed so you choose to have them carpeted in a shag carpet speckled in a cacophony of brown and cream tones. Because you love your uber plush carpet soooo much yoou will have decided that this carpet must spill over the sides of each and every step, up under the bullnose edges so it can be on display from all vantage points of your home. Your carpet is so thick that you decide to use millions of inch long staples to secure it forever, ensuring its eternal resting place.
Now imagine this actually happened and it’s 2018 and nobody likes old shaggy brown carpet anymore. However, I hope you can understand that no matter how ugly and stinky, the plethora of staples is the reason why I avoided tearing out the carpet. It wasn’t until Better Homes & Gardens scheduled a visit that I actually decided to face my fears, look my future blistered hands right in the face (or hands) and start pulling up that carpet and prying out those staples inch by endless inch.
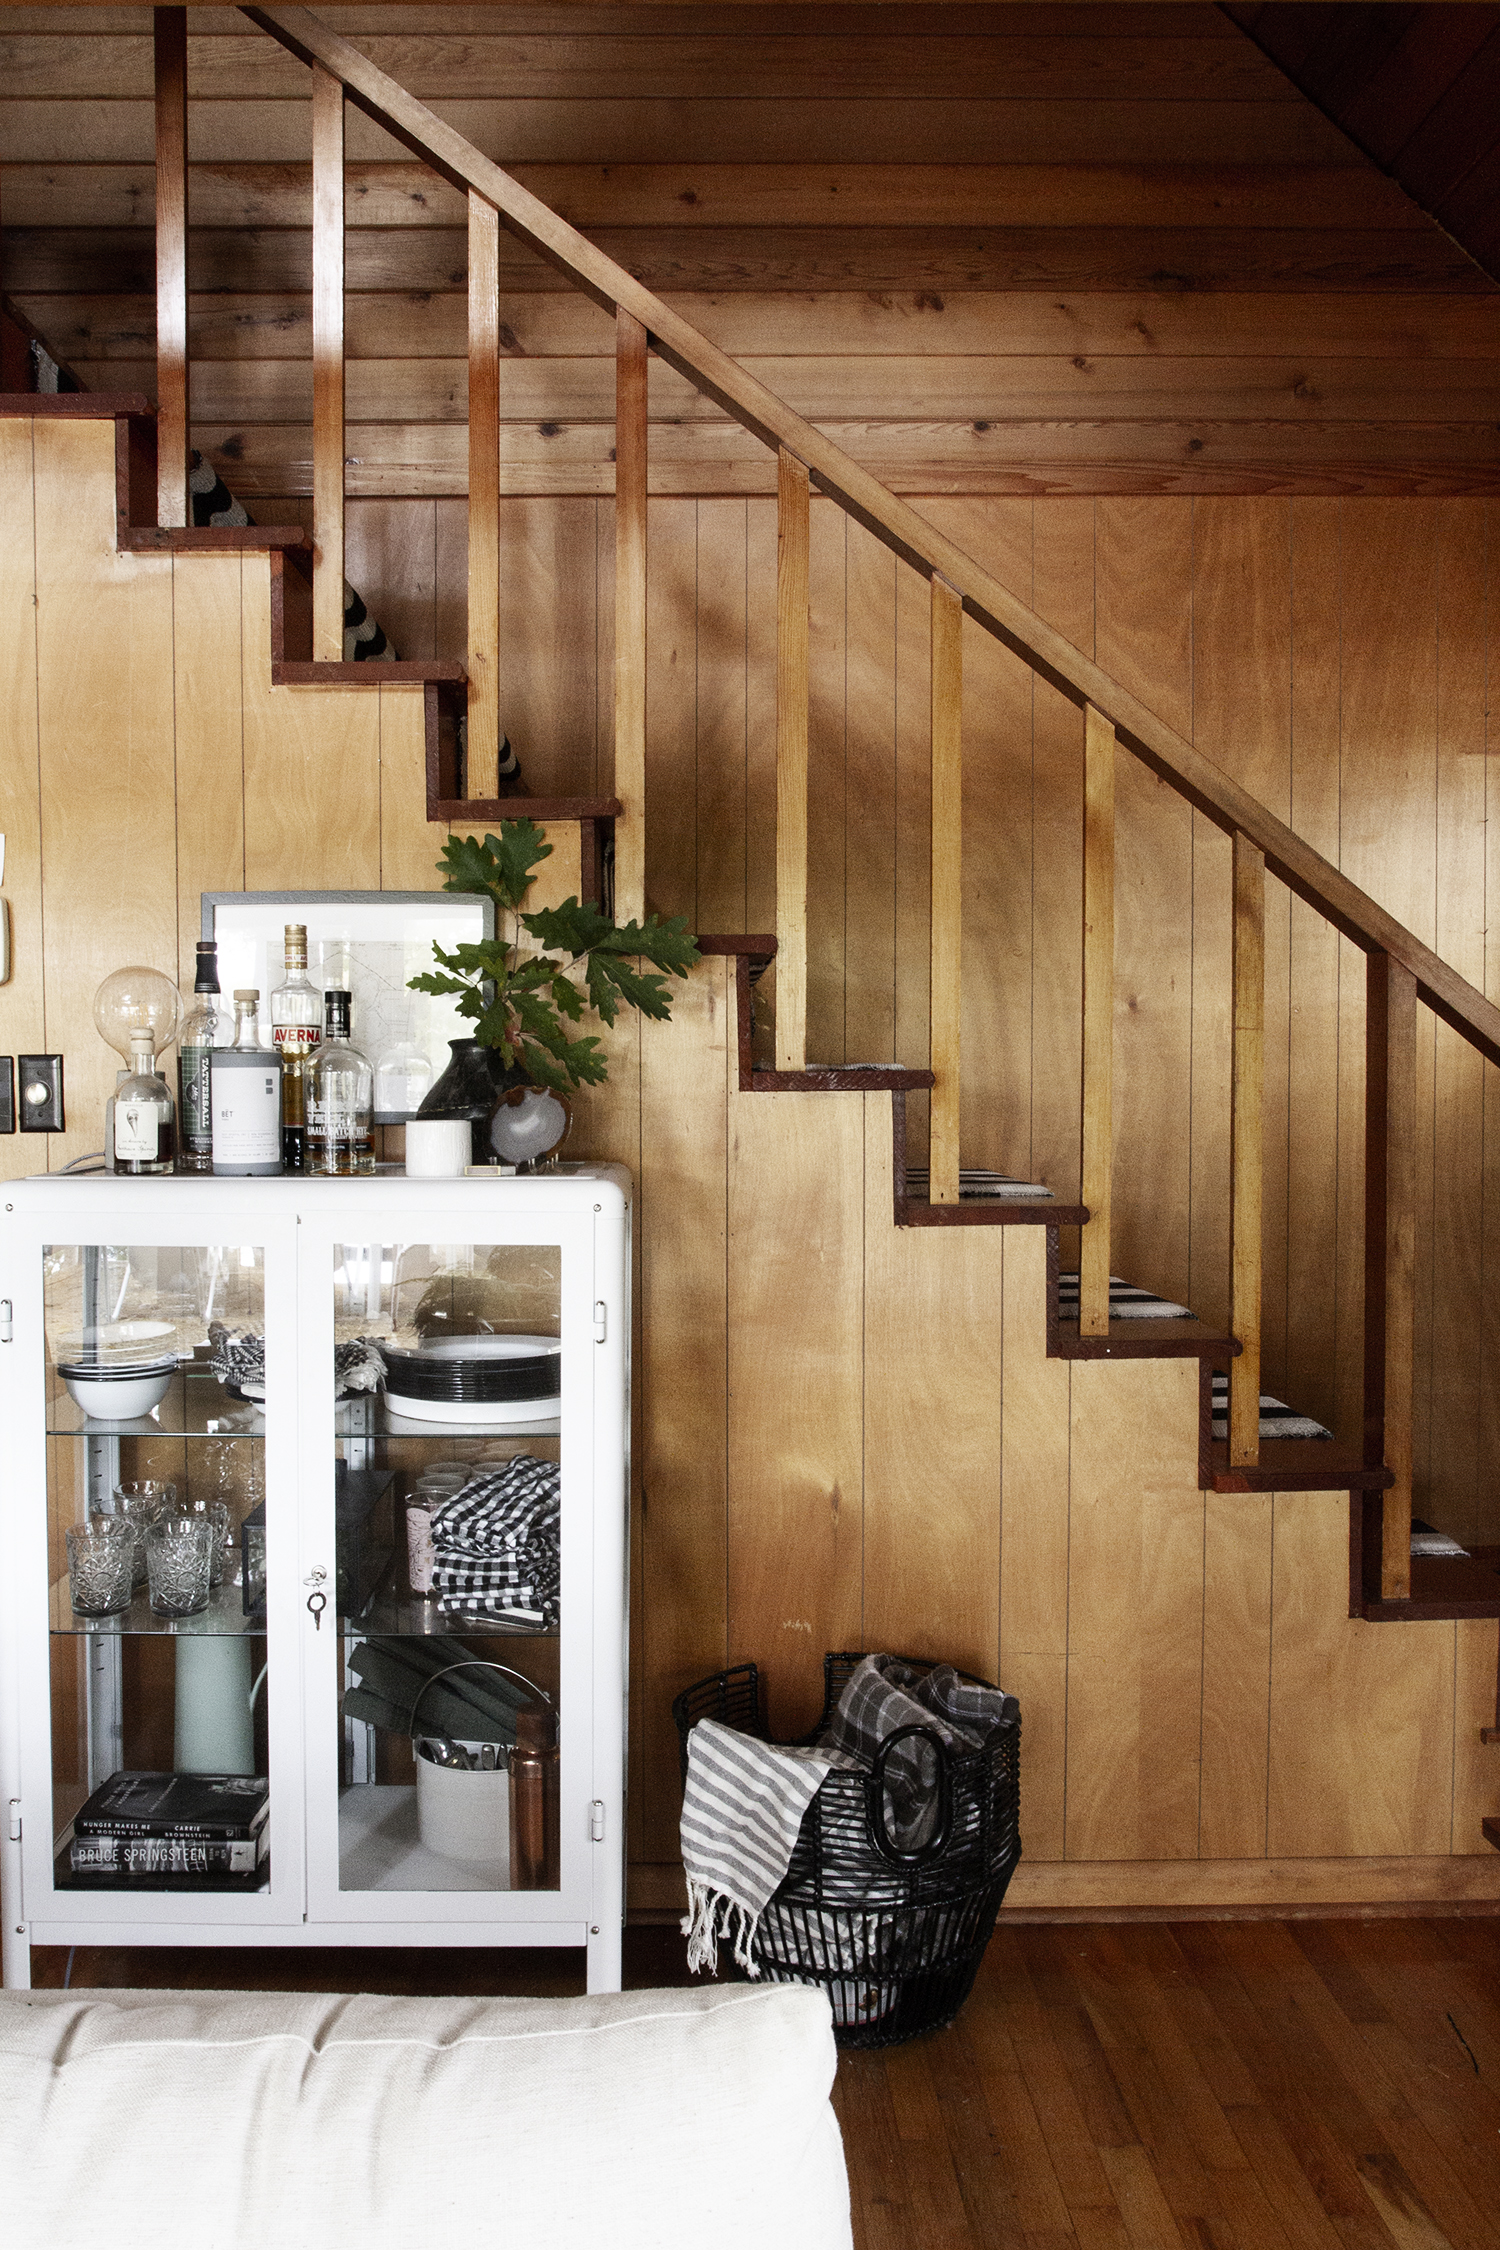
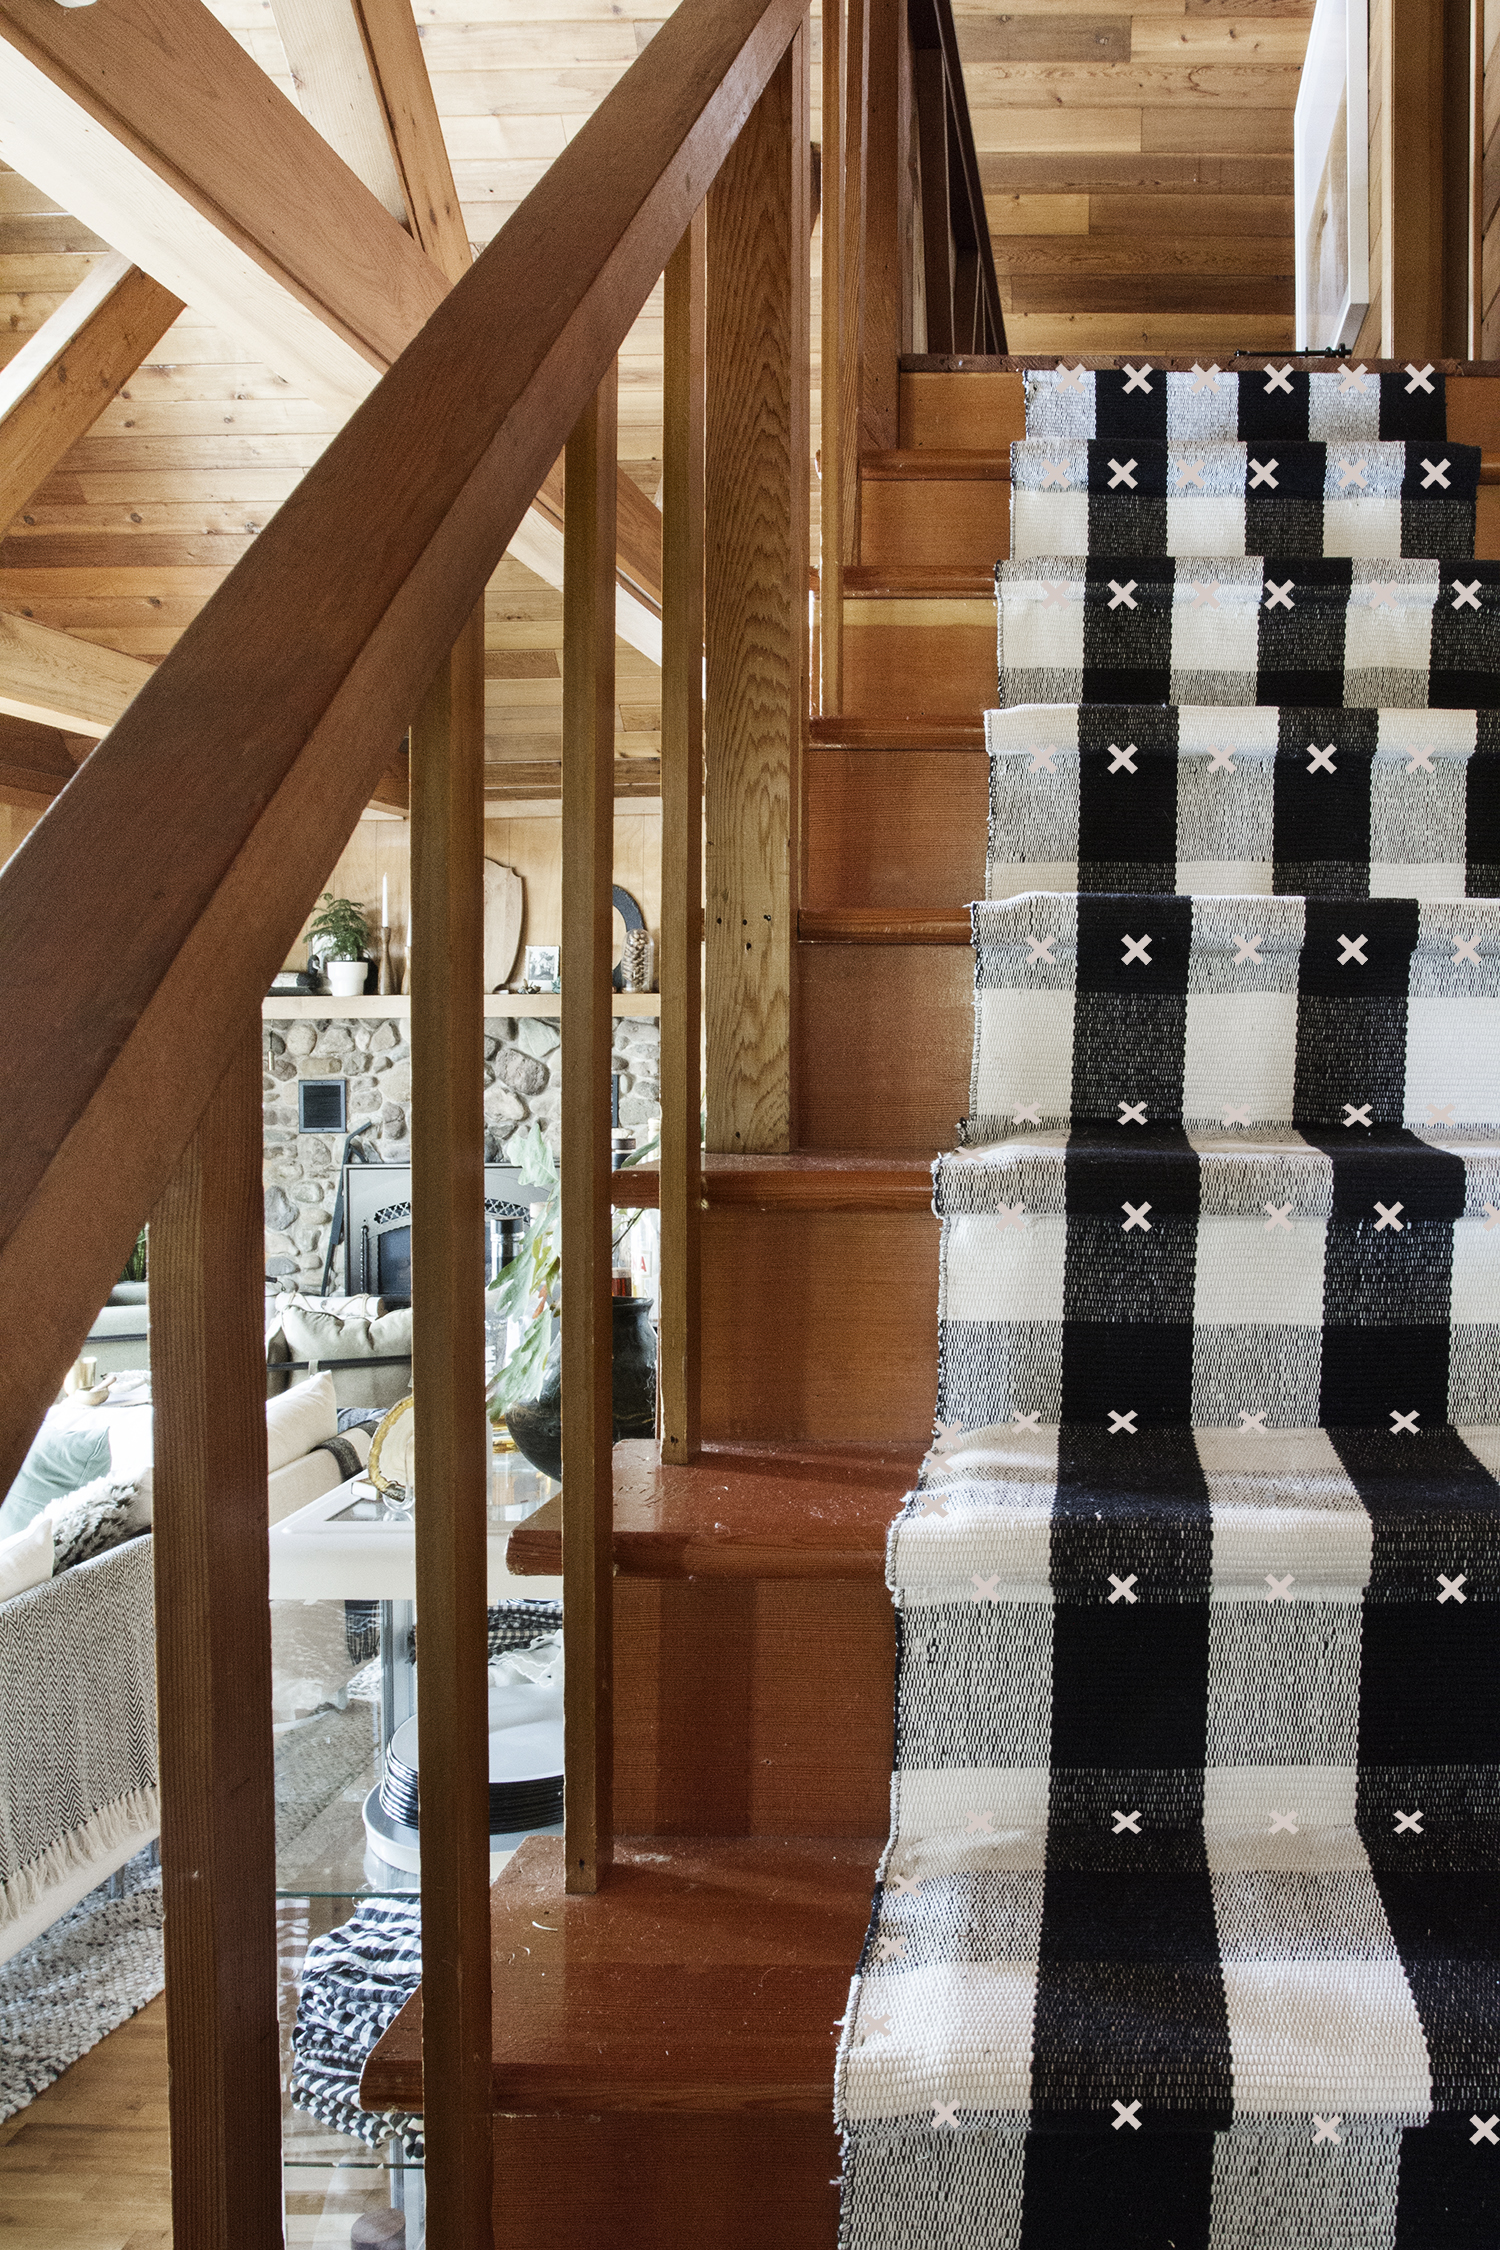
Fast forward to the removal of aforementioned carpet. I now realized I had a new problem, slippery stairs. I decided to do a quick fix since I had a houseful of photographers and stylists and writers I was soon expecting. My solution was to lay the large buffalo check rugs that I had been using as door mats over the stairs. My resolve was temporary and I only used a few staples to tack them into place and get us through the shoot. It was cute, but wasn’t intended for the long term. Over time I grew to really like the look of my inexpensive stop-gap solution and decided to install the rugs permanently.
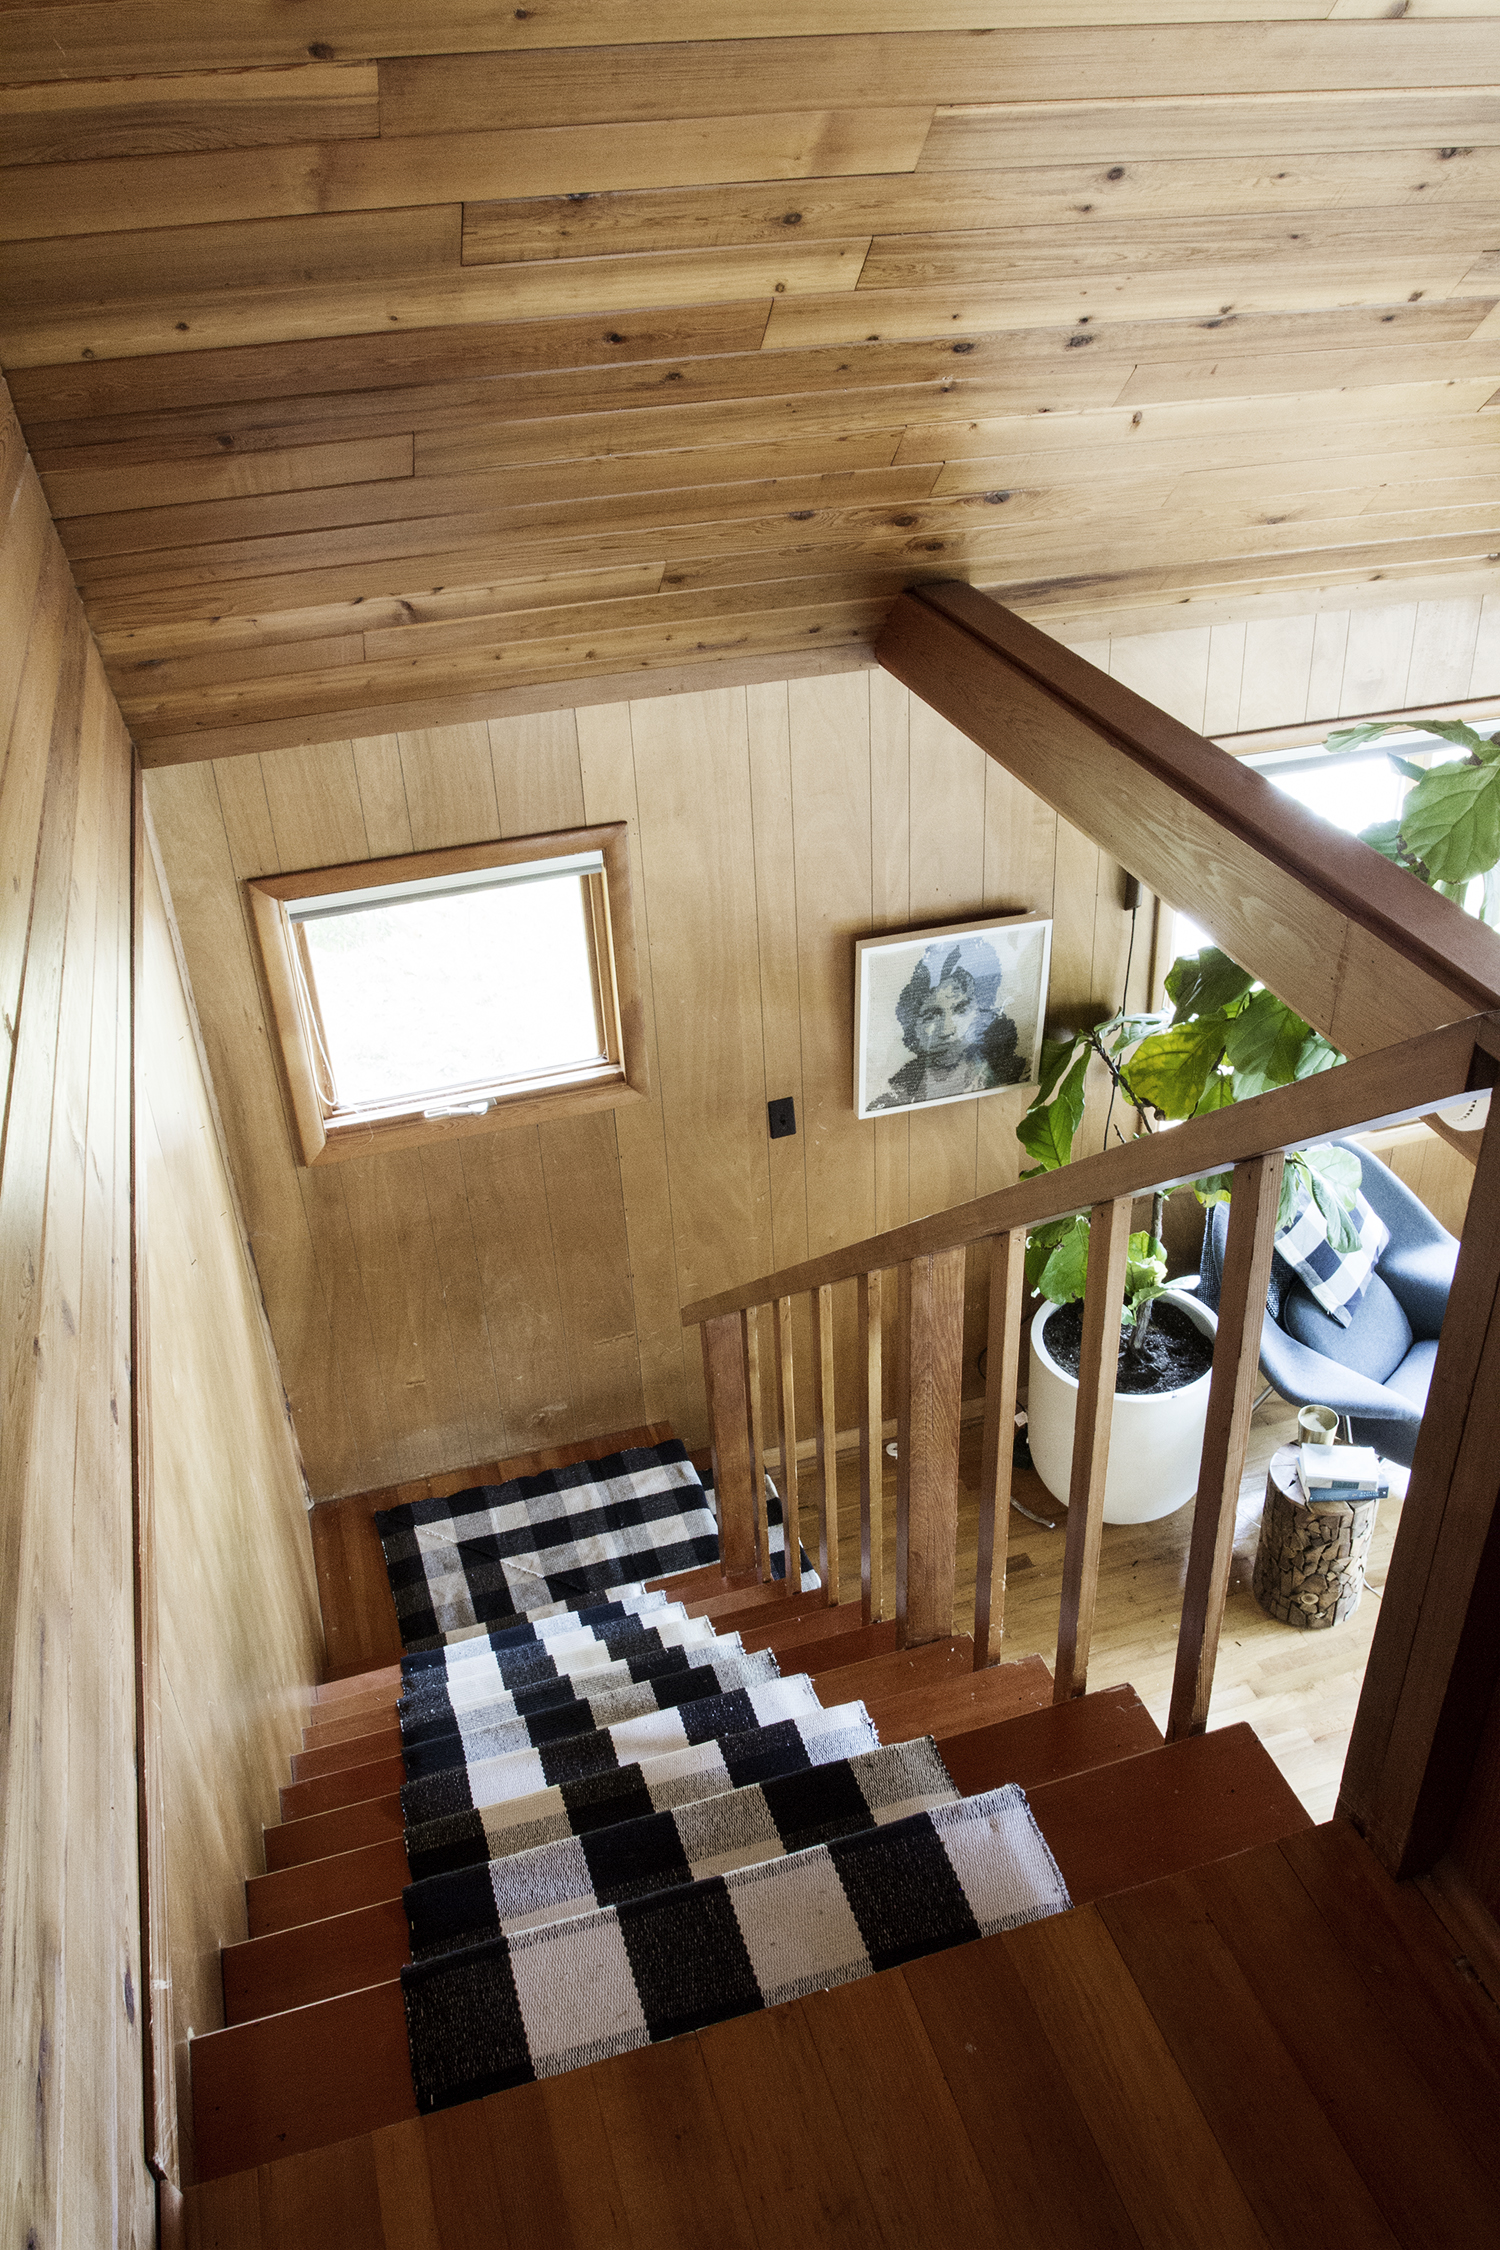
This fall I committed to properly installing the rugs the right way, with rug pads, and tack strips and all the stuff that would have them last and be comfortable underfoot. I wanted to share with ya guys how I was able to add a runner to our cabin staircase for relatively inexpensive using multiple small rugs. You could do the same with rugs, runners, carpets or tapestries. Here goes.
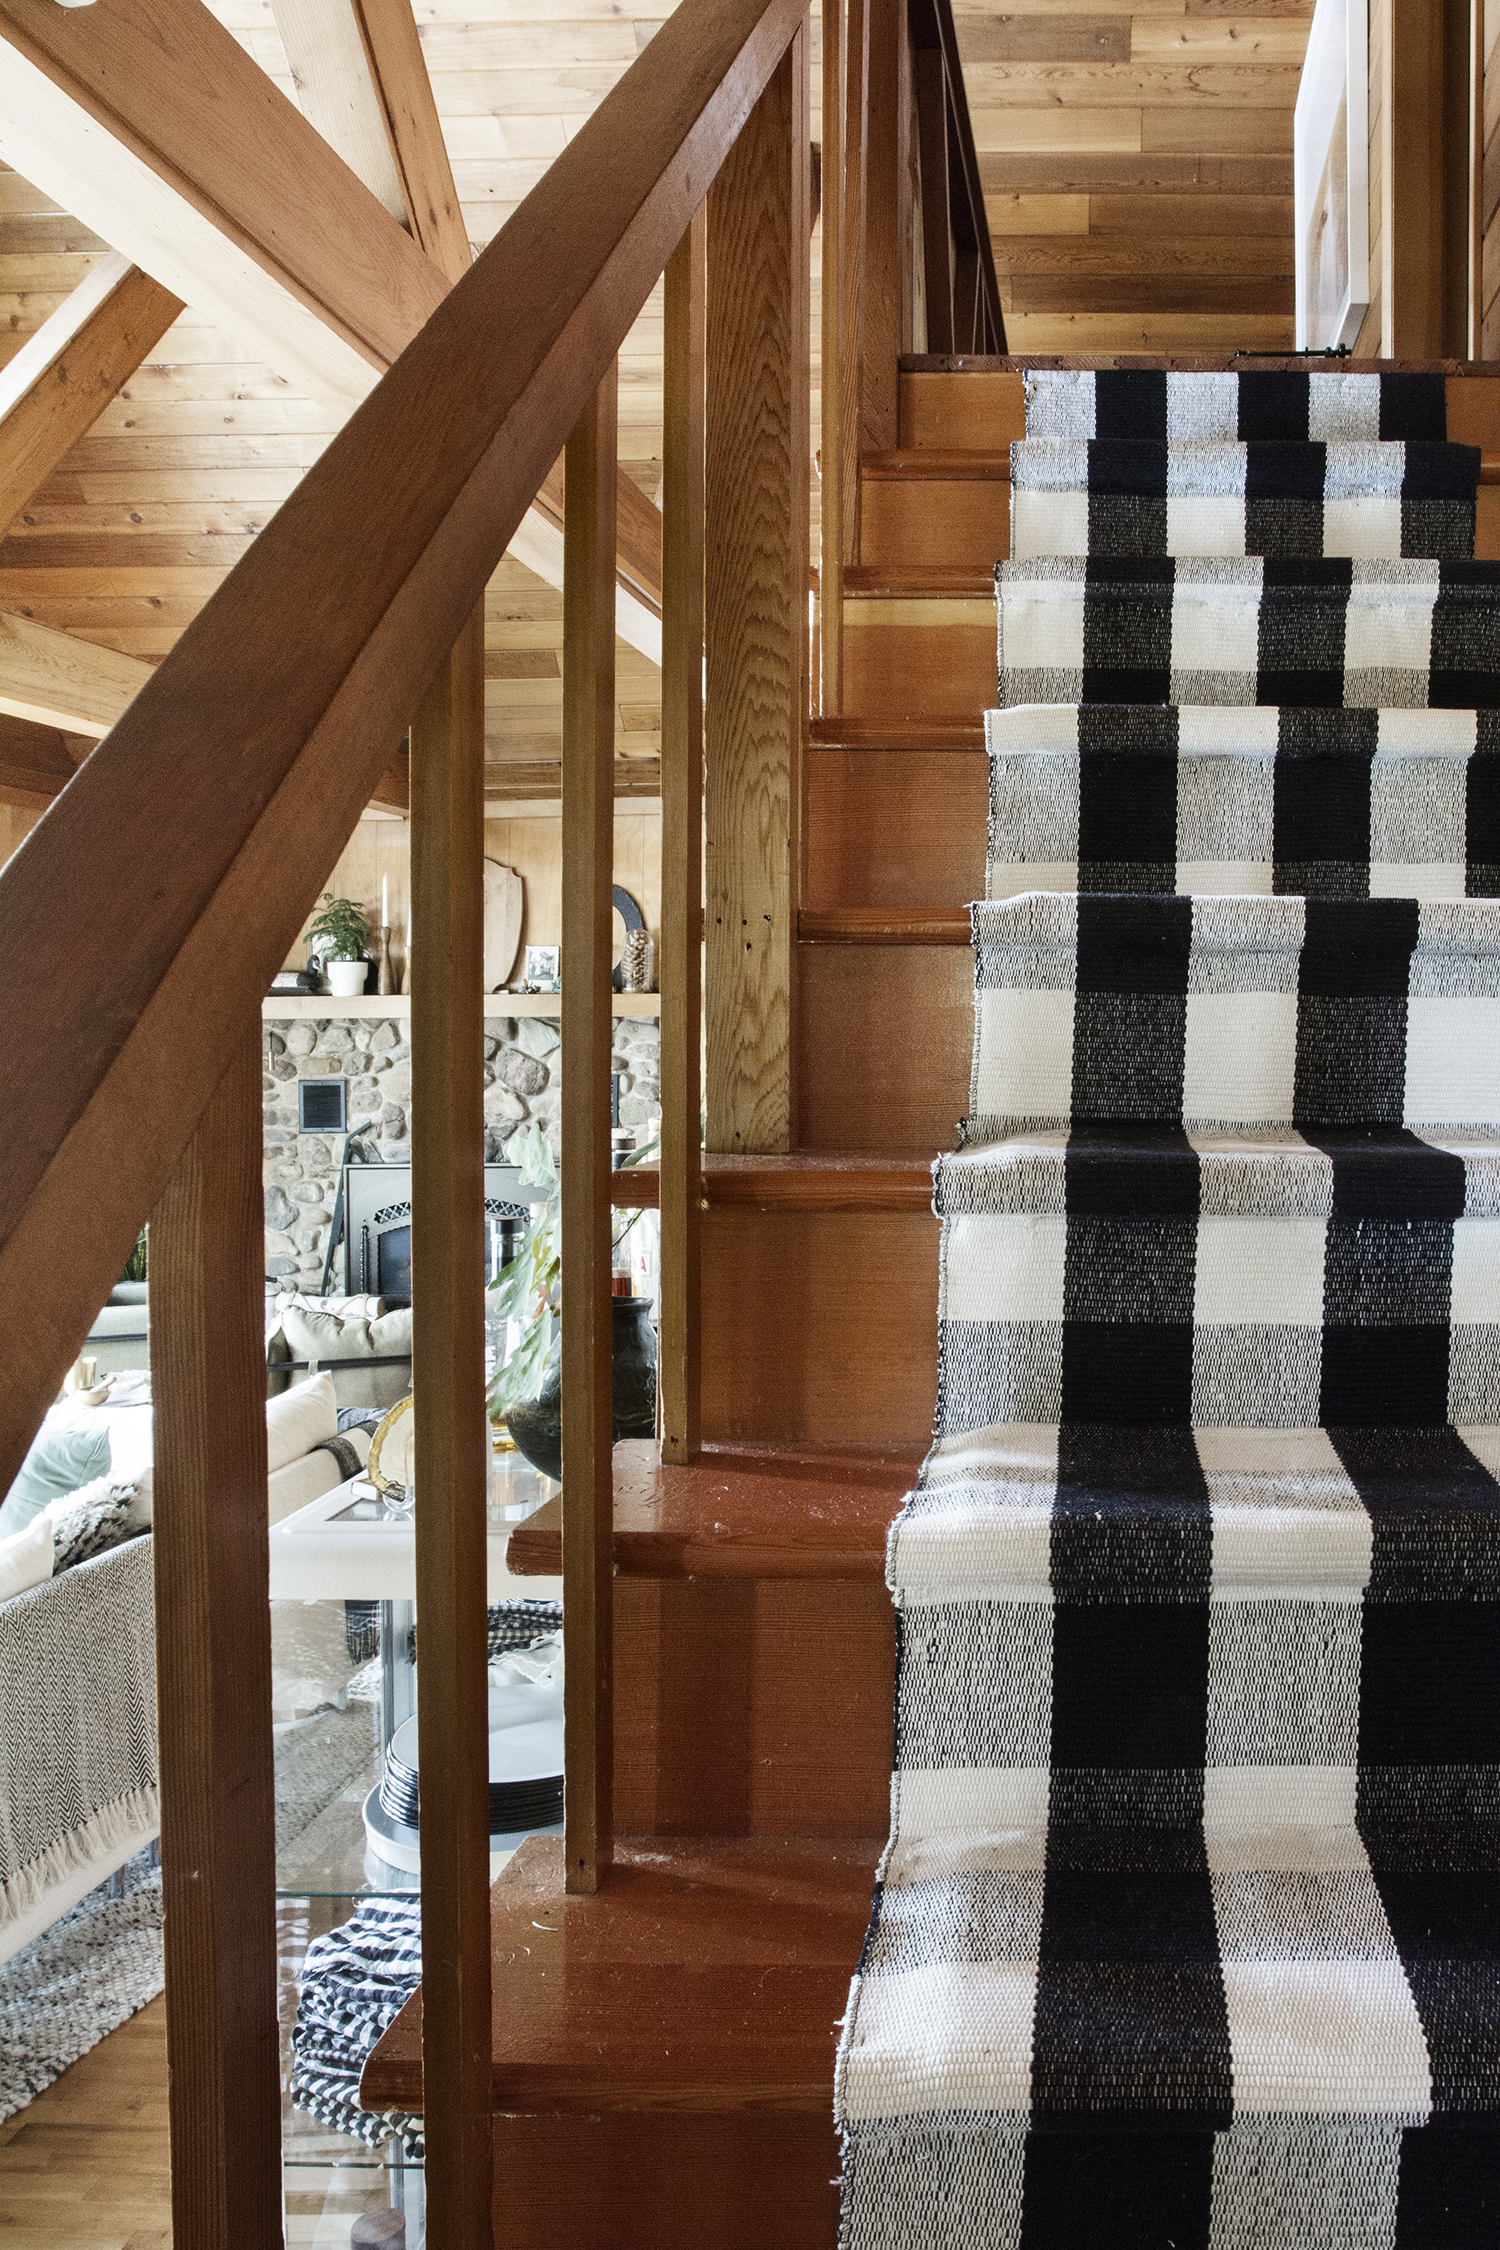
First things first. You’ll want your runner to be centered in the middle of the stairs. To do this, measure the width of your stairs and subtract the width of the rug you’ll be using, and then divide by 2. This number is the distance from the edge of your stairs that you’ll want the edge of your rug to be positioned, or as I am calling it “The Margin”.
I kept a tape measure with me during the install process to double check each step, and make sure I was keeping a consistent margin.
I also marked the center of each stair with a pencil. That way I could easily center the tack strip and carpet padding which were both more narrow than the width of the rug. For my installation I used a rug pad that was 24″ wide and I trimmed it to 22″. The buffalo check rug that I was installing was 24″ wide. Trimming the carpet pad would cover the rug pad by an inch on each side.
I also trimmed the tack strips to 22″, the tack strips are easy to cut with a small hand saw.

|
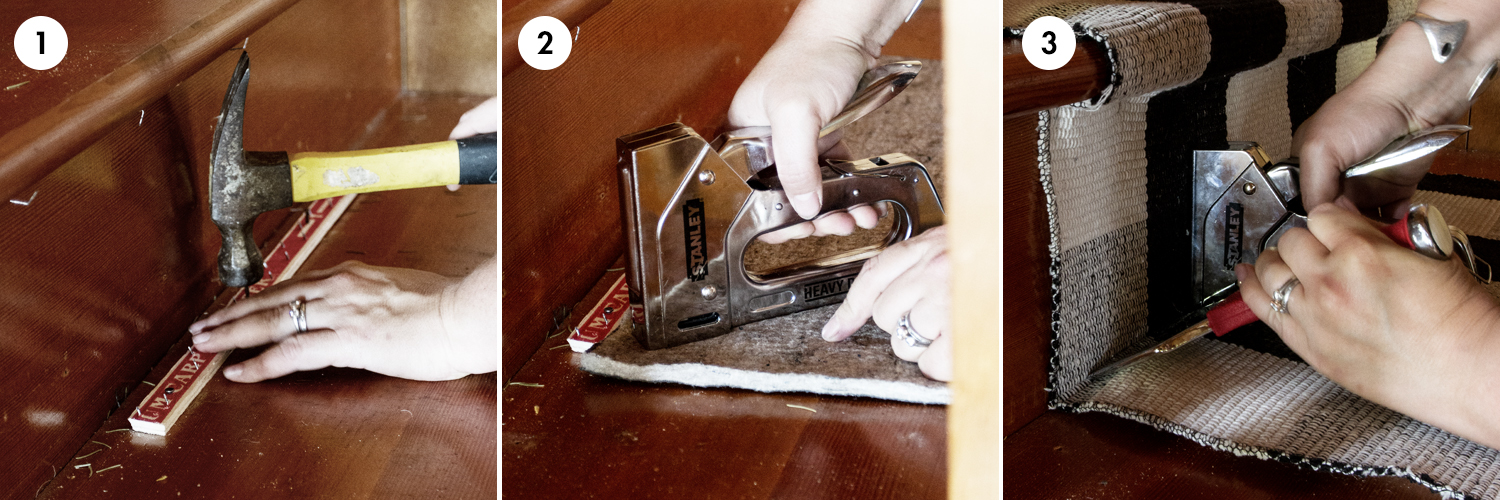
1 Center the Tack strip, install You’ll want to start by determining the center of the tack strip, in my installation the center was at 11″ because the tack strips were cut to 22″ wide. I lined the center of the strip up with the center mark I made on the stairs. It is important to leave a fingers width of space between the riser and the strip. This is where you will “tuck” your rug into later on. Continue this process for each tread. 2 Staple the Padding to the Treads Find the center of your pre-cut rug pad, for me the center was 11″. I lined up the middle of the padding with the mark I had previously made for the center of the stairs. Begin to staple the pad into place, be generous with the staples. Continue for each tread. 3 Tack Rug Under the Bullnose and on the back side of the stair treads. Starting at the top of your stairs you’ll want to begin stapling the rug to the stairs, right below the bullnose. Start at the top of the uppermost riser. At each tread/riser intersection you’ll want to use a “stair tool“. Use the tool to push the rug into the corner taut, and then tack into place with the stapler. Make sure to measure the distance between the margin of the stairs and the rug to make sure you are in the correct position and then staple three times on each side of the pad. I have included a diagram below indication the position of all the staples used in installing the rug. |

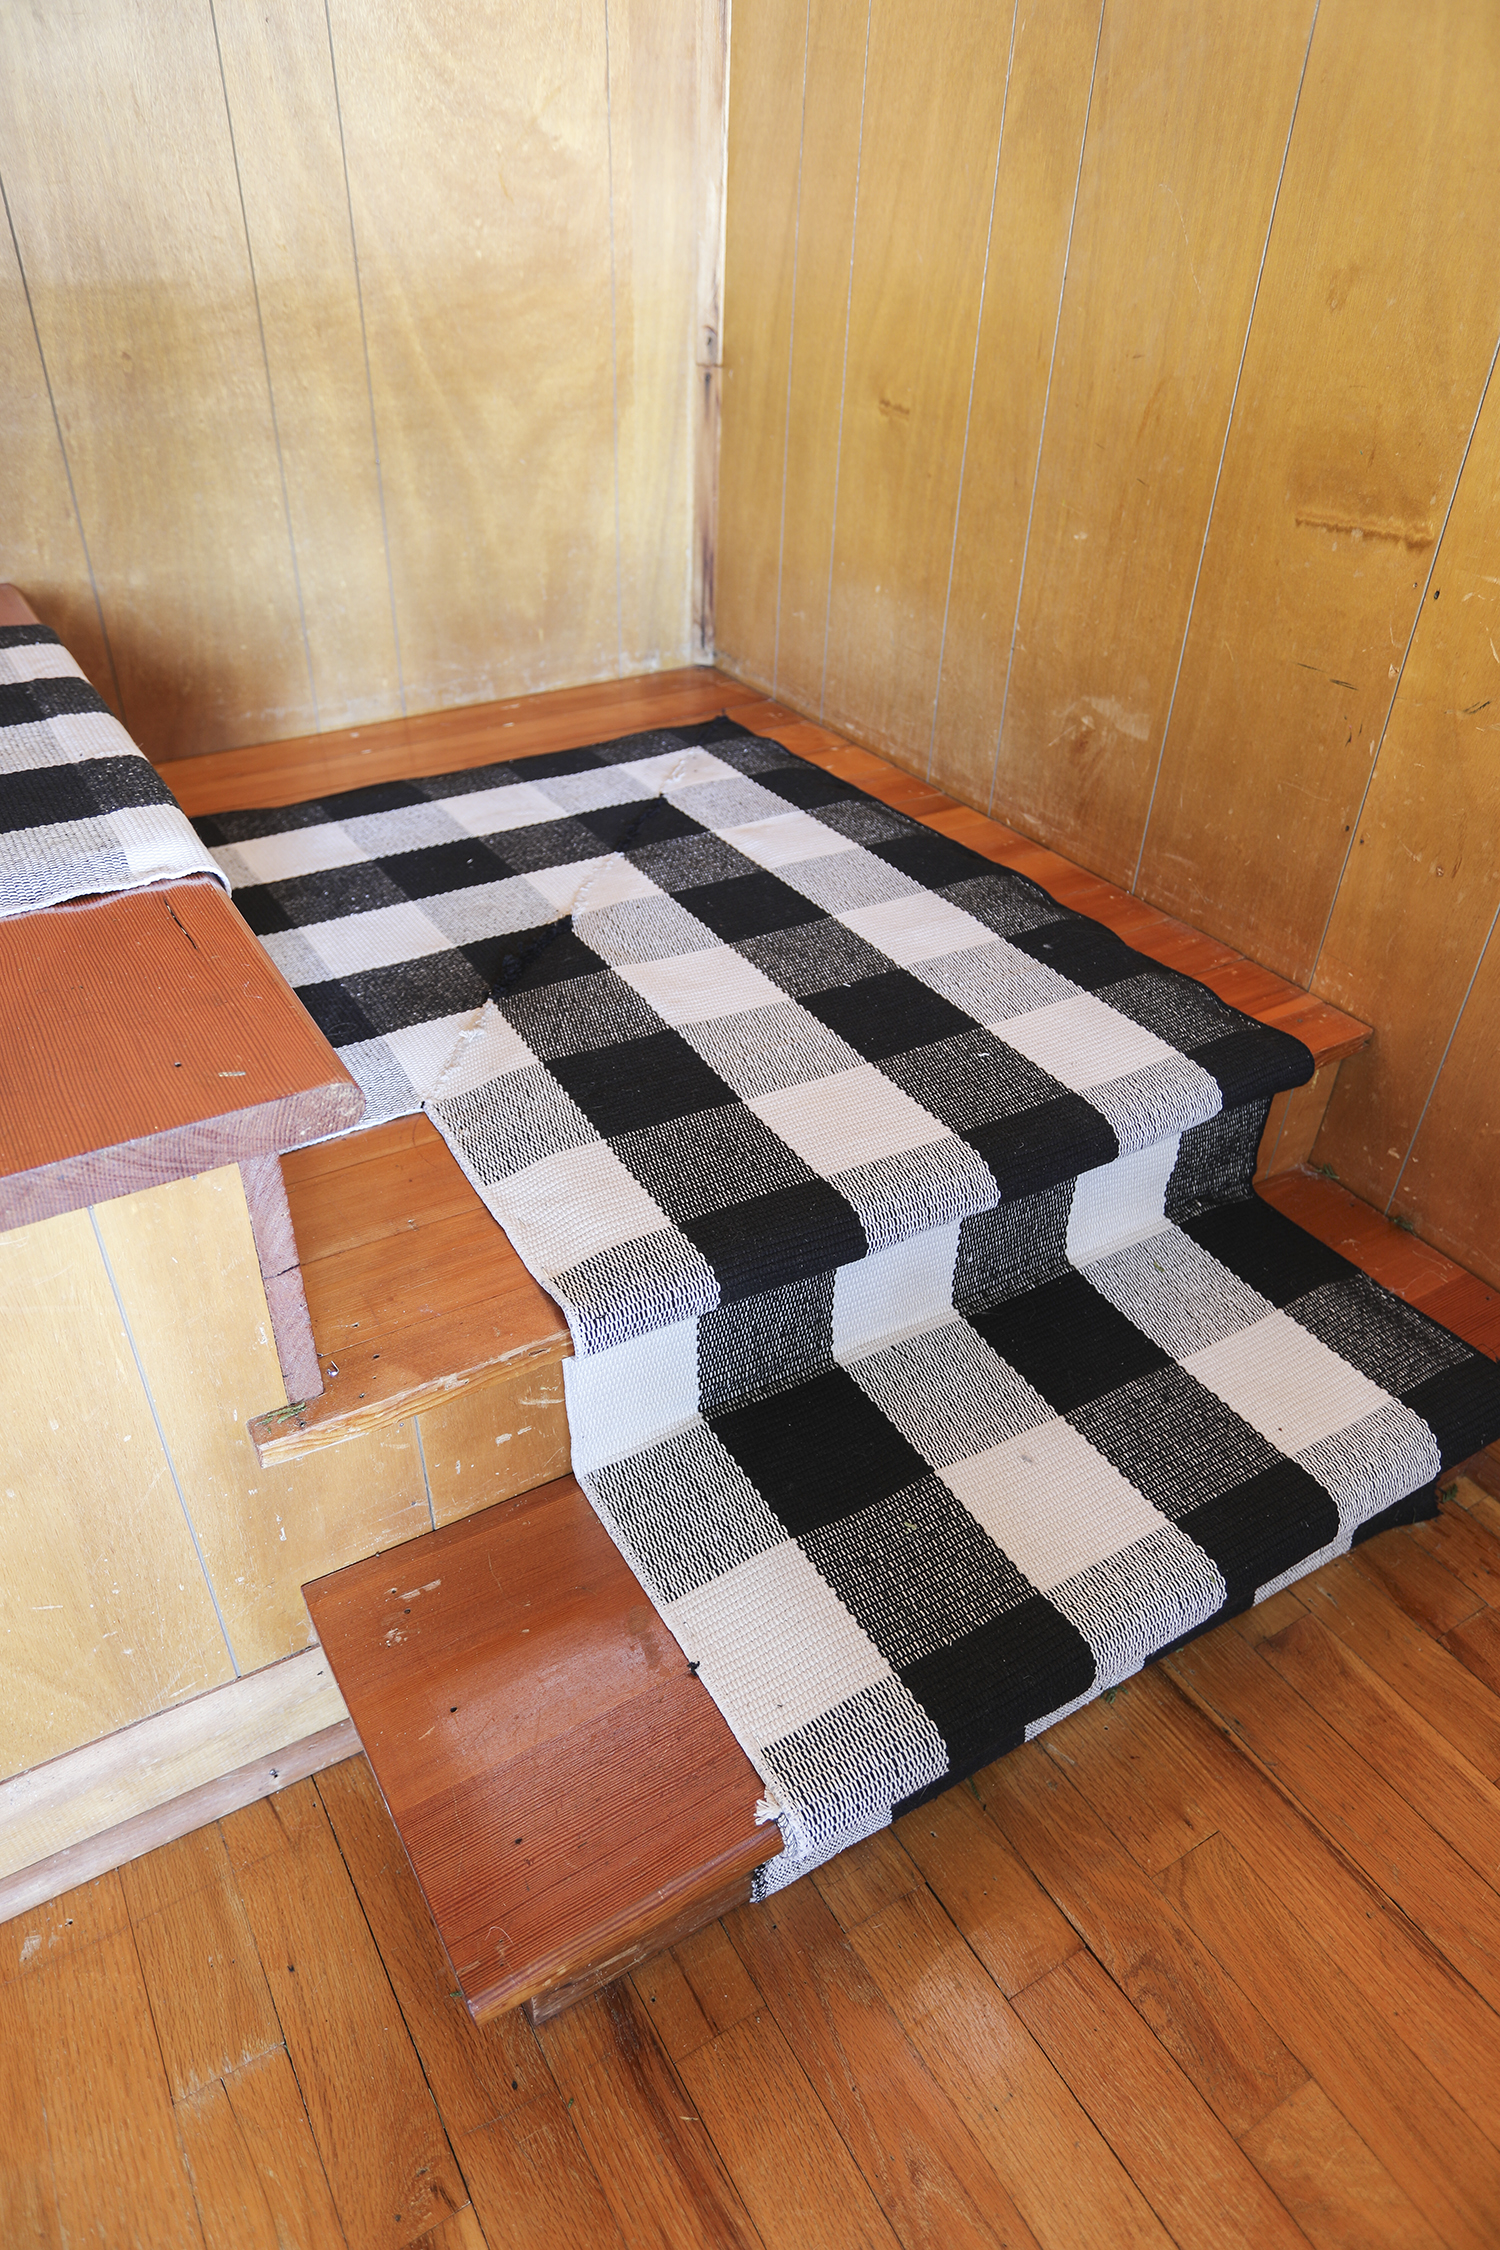
If you’re doing this on the cheap like I did, you might be using multiple rugs to create the look of one continuous stair runner. Follow the steps below to achieve this seamless look.

|
4 Trim the Rug to fit just slightly over the bullnose edge Use a sharp scissors to trim the length of the rug to fit just past the edge of the bullnose tread. It’s okay if the rug overlaps the riser, it will be covered by the next rug. 5 Staple under the bullnose, not into the tread I had completed half of the stairs before I realized that if I staple directly into the underside of the tread, that the staples wouldn’t be visible. I had been stapling into the top of the riser, which you could easily see. 6 Position New Rug at the top of the Riser Begin just as you did the first rug. Staple the rug to the top of the riser. Your staples will be visible but with some post-install cajoling you should be able to “hide” the staples within the texture of the rug. For the darker areas I used a sharpie to dull the bright shiny metal of the staples. Continue the installation following steps 1-3. |
step-by-step instructions to add a mitered corner on the landing and continue the runner around the corner of our stairs. click here for all the details
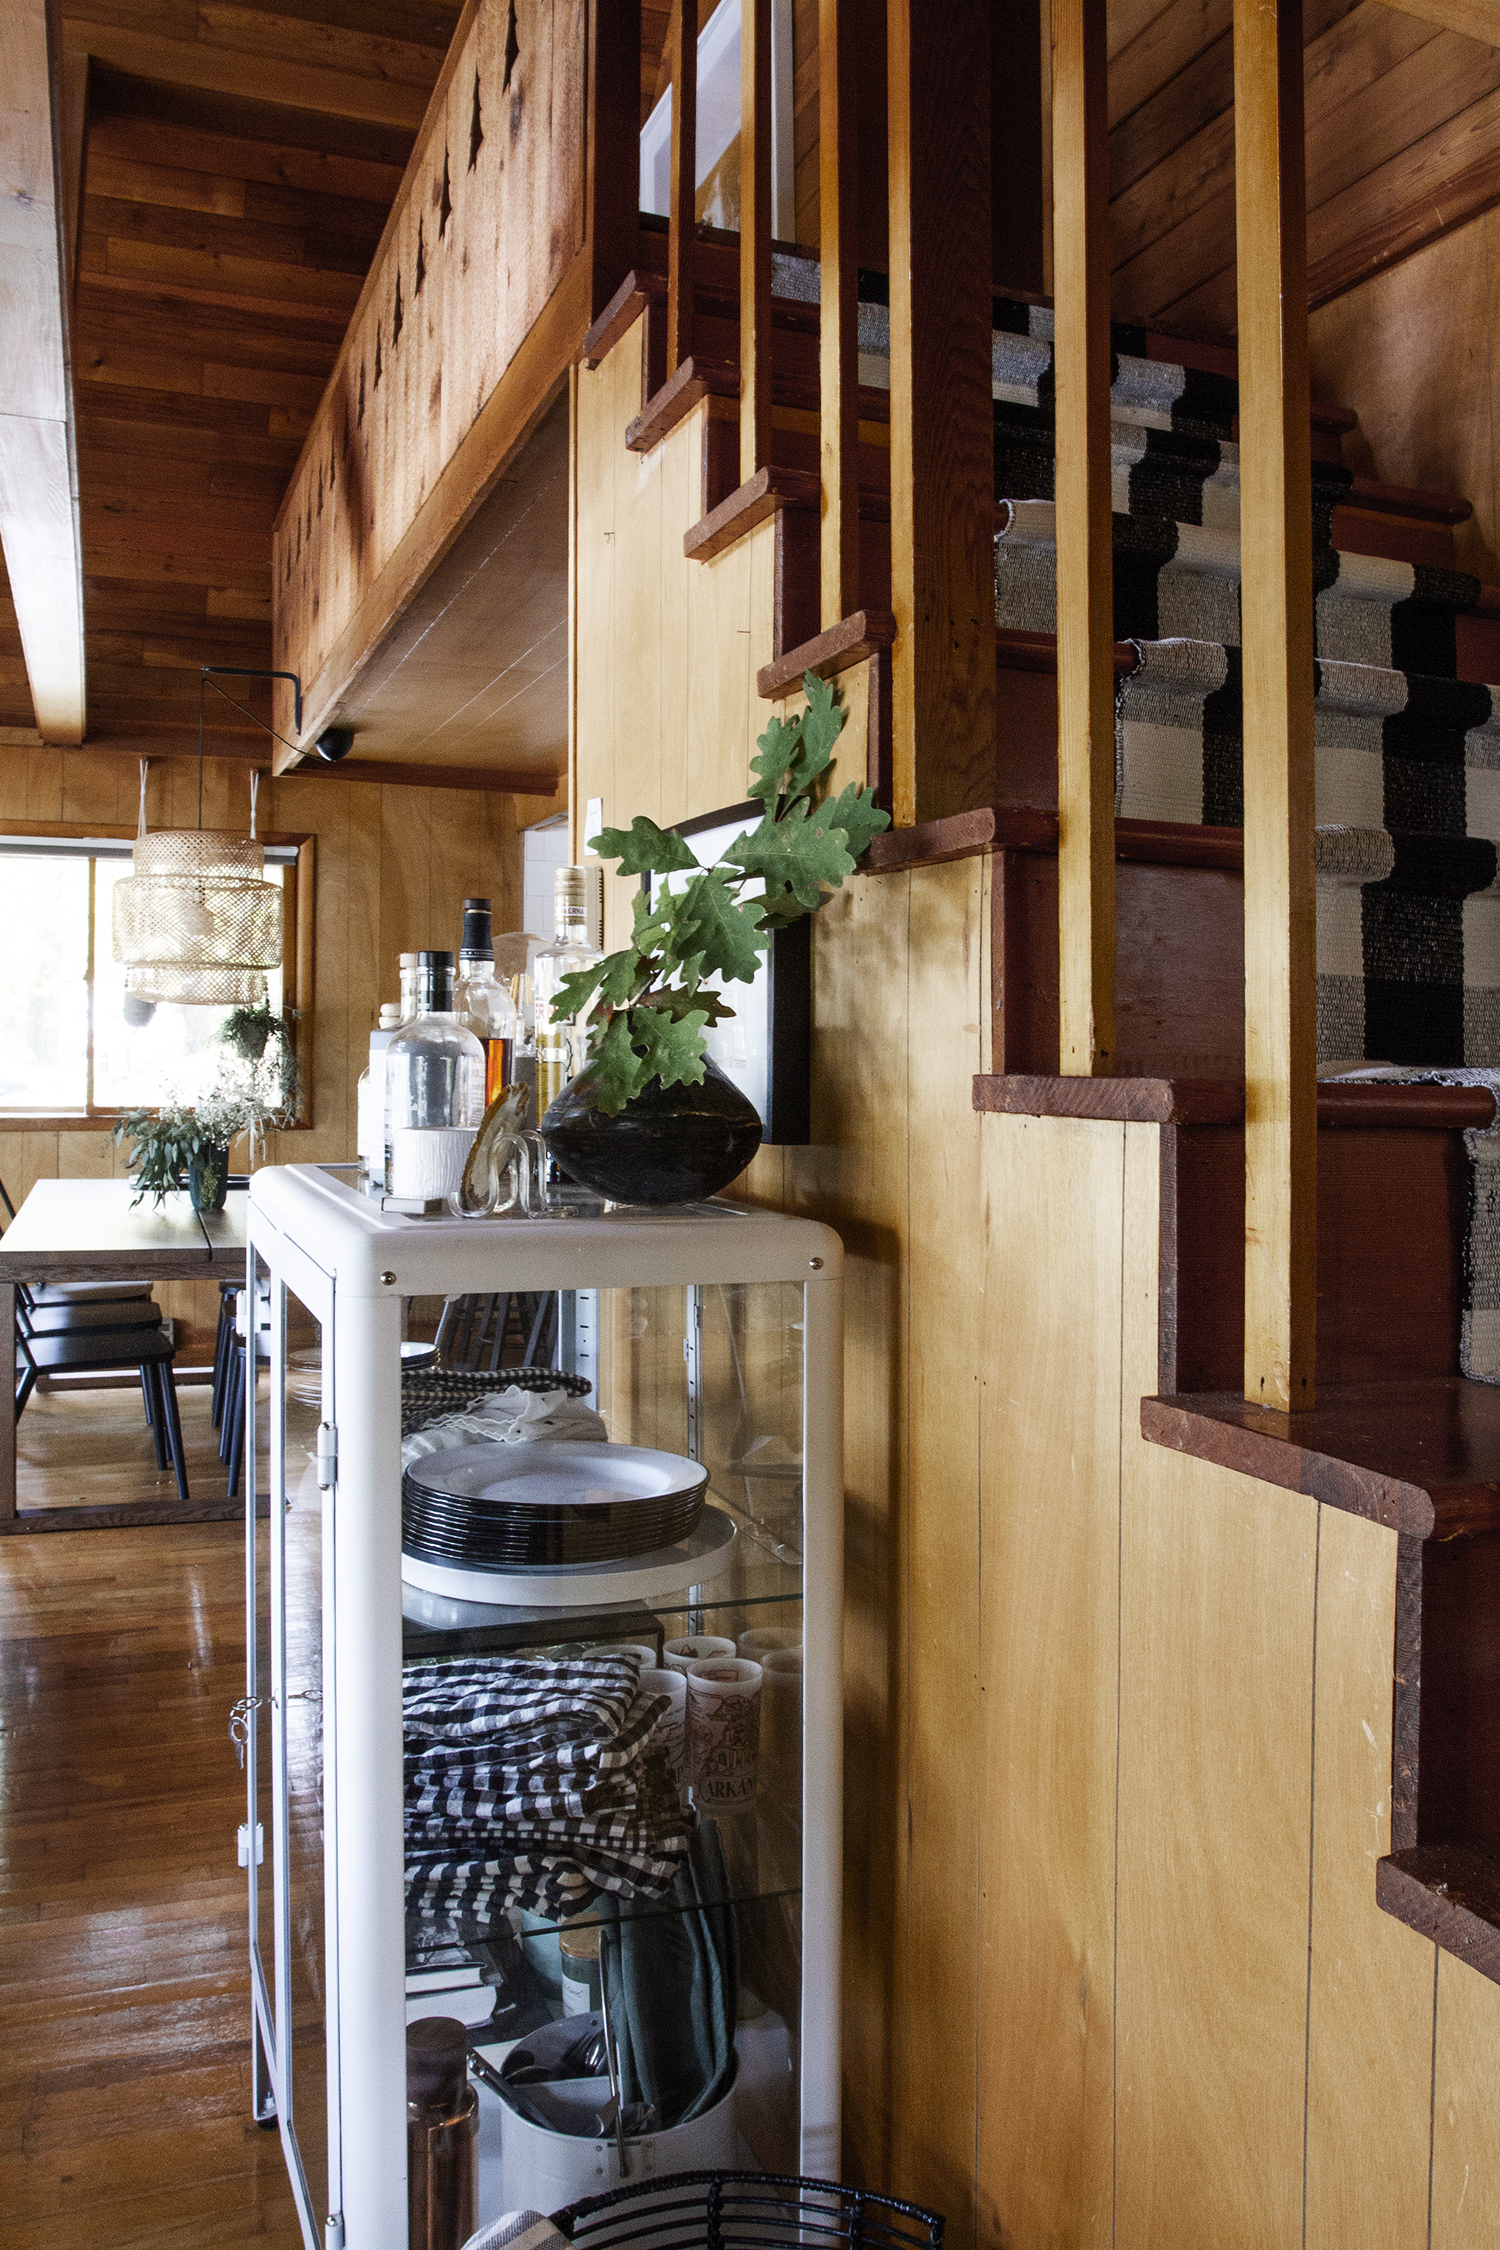
Installing the carpet was most def the easy part of this project. Wrestling to remove the previous carpet was both exhausting and disgusting. This project added a lot of character to the plain pine stairs, was reasonably inexpensive because I used lots of small rugs instead of one long expensive runner or carpet, resulted in a super comfy and cozy step with the addition of chunky padding on top of each riser, and the rug is safe and secure making for a better West Wisco Country Club.


Woah, the stairs look great! I’ve seen similar tutorials before, but none that included the tack strip and that makes sense to me so thanks for the addition! The tricky part, for me, is picking a runner that I will like for the long haul/doesn’t clash with the hall runner down below. 6 years of waiting and it hasn’t happened yet, but I’m still hopeful that I will find inspiration/a runner one of these days!
Thanks, Danielle! I did look at a ton of tutorials before starting this, and since I had already done my stop-gap job of temporarily installing the runner, I knew how much it wanted to slip around so I was looking for something that would for sure keep it in place. The tack strip was the right move. I can see how it would be hard to find a runner that could be competing with another textile or pattern like a rug. Hopefully you’ll find what you’re looking for soon.
This is so awesome! Could you do a follow up on how you did the right angle on the stair landing; I have been wanting to add a runner but I’m no sure how to diy the landing part. Thanks!
Hey Beth! Yes, I’d love to do a follow up. For full disclosure, I ran out of time to photograph it when I was at the cabin. I am hoping to take photos soon and write a post (or add onto this one) on how I achieve the mitered joint on the landing. Thanks for letting me know you’re interested.
Looks great Scoops!
Thanks, Vanessa!
I know your pain! My old tenants (I rent out a condo) were the worst human garbage the earth has ever seen and they completely destroyed my place including letting their large dog pee on my stair carpet claiming it was just “a couple of accidents”. I had to rip off that stinky, gag inducing carpet, bleach the wood underneath several time and finally have a company install a nice new full stair carpet (not a runner). The carpet before wasn’t thick but for some reason, the people who installed it felt it would be best to add a million long ass staples to every single inch of each step. Removing them took me 3 days and a lot of skin and blood from my hands. Horrible job but the results are great :)
Isn’t removing carpet from stairs just the worst job ever? Glad you don’t have to deal with those bad renters anymore – sounds horrible.
Omg your description of the old carpet made me both chortle AND guffaw!!!
I had my roof raised a couple of feet and that gave me two usable rooms in the former attic that had only been accessible by using a ladder propped against the access opening in the kitchen. A stairway was put in, its width 45 inches. Yesterday I installed padding on each step (35 inches wide) and fastened them with double sided tape on the edges and 1/2 inch staples. I bought 6 x 8 feet indoor/outdoor carpeting, cut down to 4 x 6 feet and managed to install this carpeting on the bottom six steps and landing. I wanted to cover the entire step and not use and wood trim on the sides. I did this by turning over approximately 2 inches of carpet on each side. I also used double sided tape and staples to secure the carpet. To go through the pad and carpet, longer staples are needed. I installed the carpet using the “waterfall ” style. I am 82 years old and a little hampered by a broken wrist so my project will take me two days instead of one to complete. I will install baseboard only on the landing.
I forgot to add that the indoor/outdoor carpeting is attractive, and quite easy to handle and lighter weight than conventional stair runners. This was important to me because I am a woman and my strength has diminished over the years