


Guys! It’s like DIY project week around here. Two tutorials in one week, that’s like super crazy. If you’ve had any trouble viewing the blog this week, I apologize. My host’s server was down and it was causing my site to load very slowly – because of this I’ve been not been able to reply to comments. It should be better now, so please check out the Trellis tutorial and giveaway from earlier this week if you haven’t already.
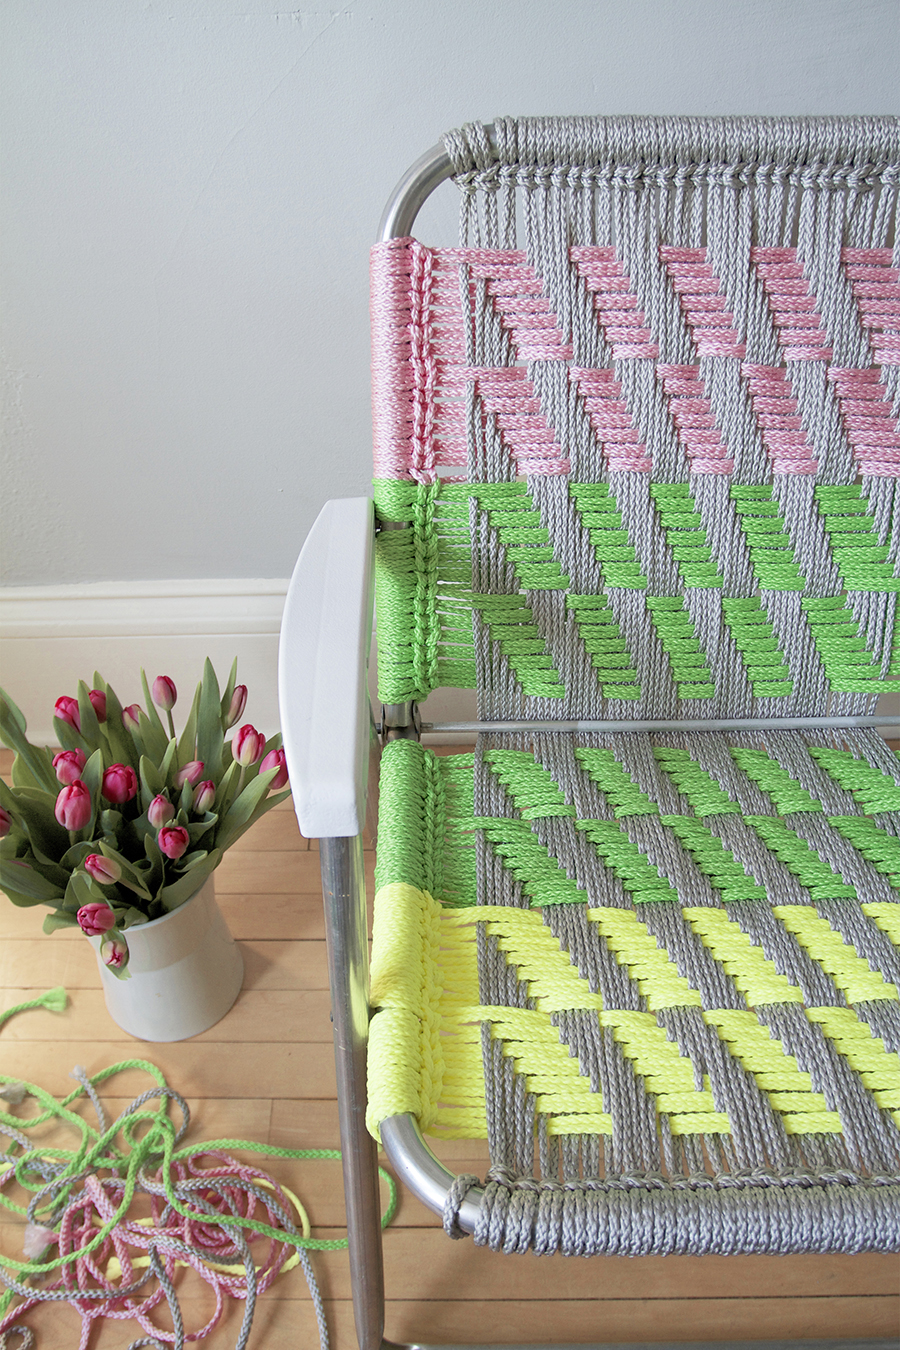
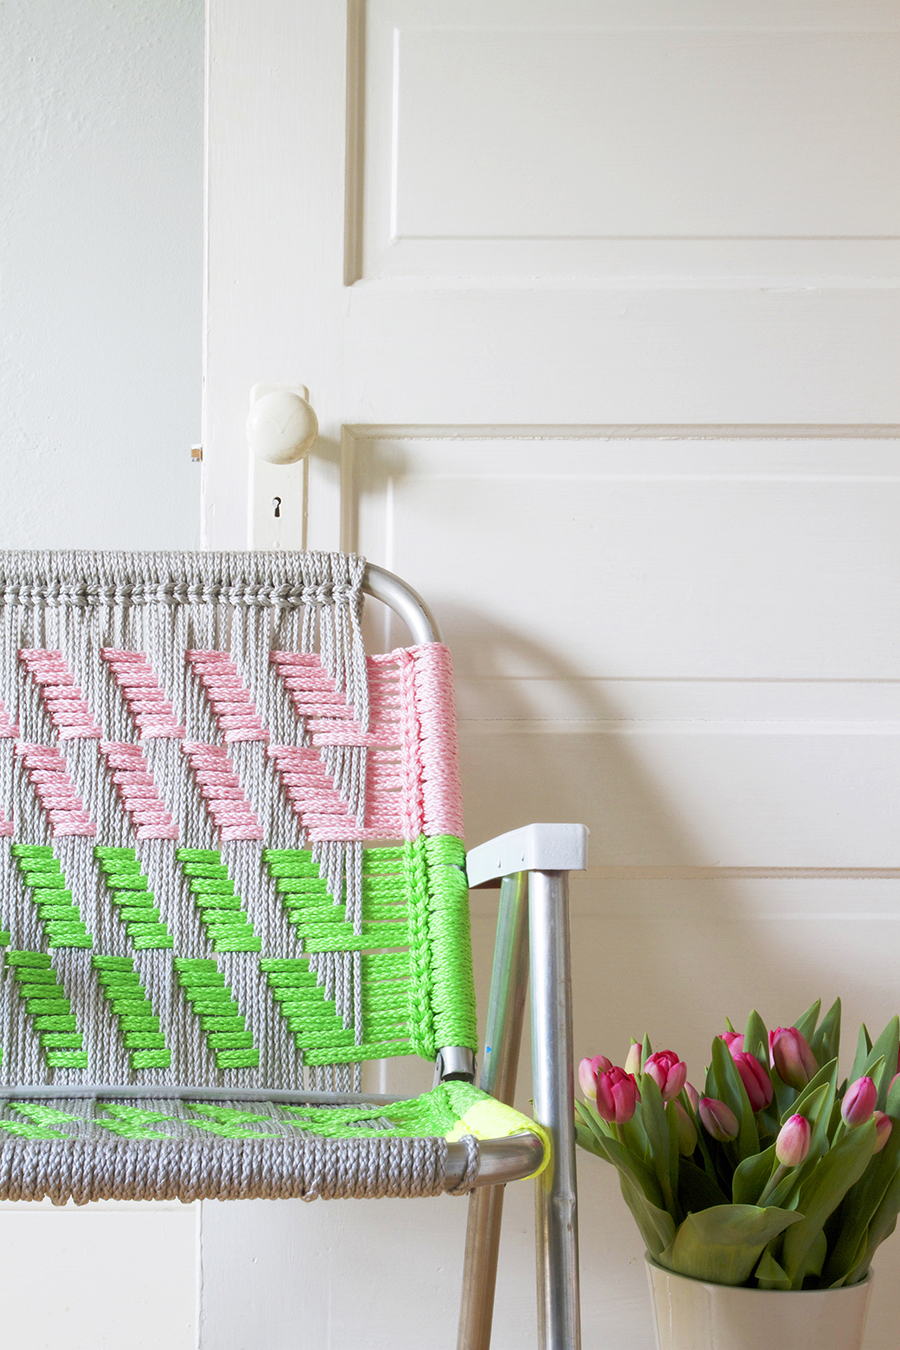
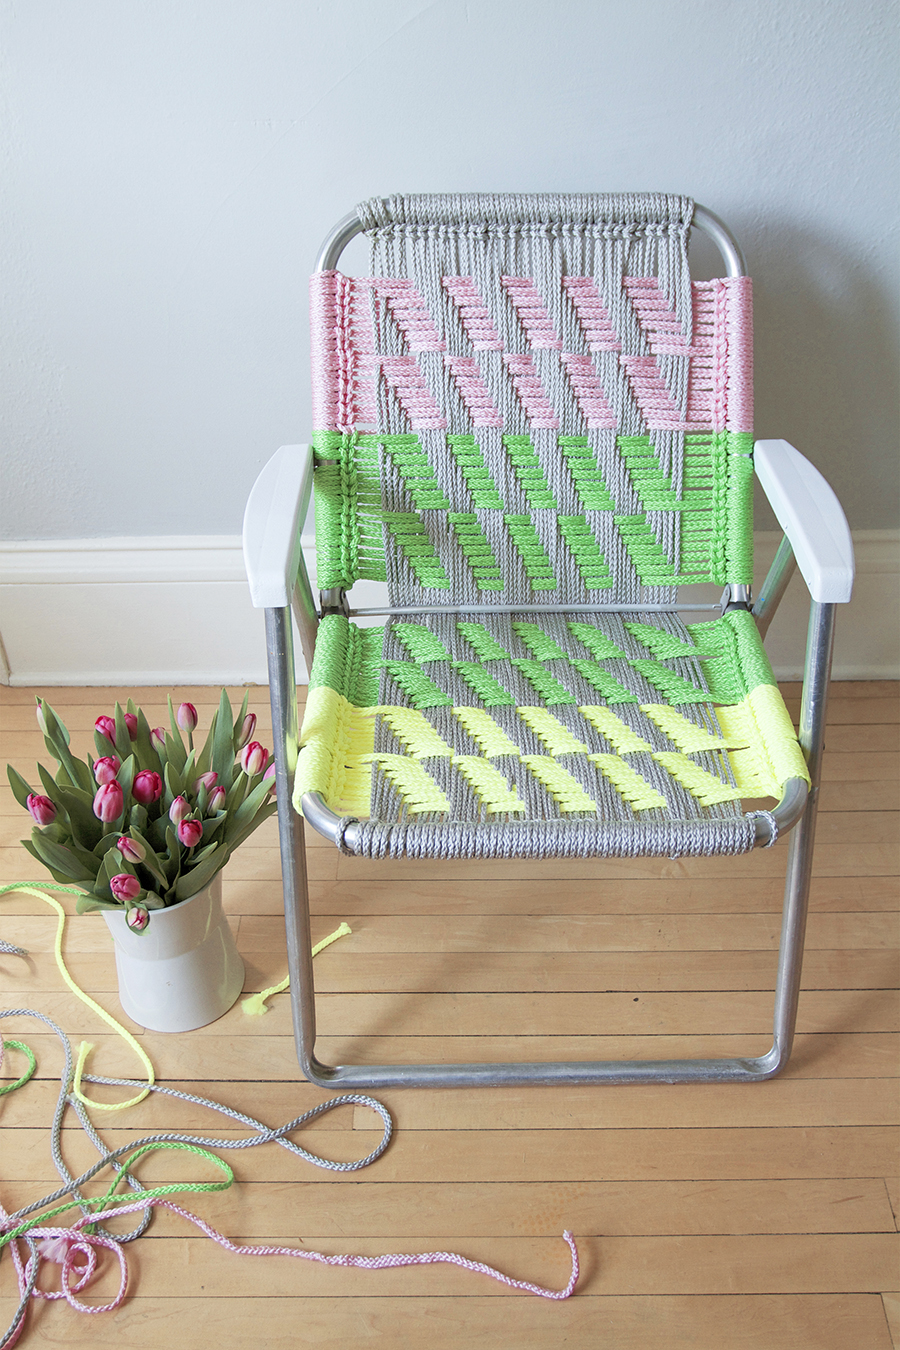
I’m really excited to share with you an updated version of the Macrame Chair Tutorial that I originally posted two summers ago. I was def lacking on details last time I shared this project, I guess I didn’t realize so many of you would be in to learning the ways of my macramé secrets. I thought I’d fill you in, giving you all the details!
While I was planning the tutorial it just so happened that Mollie Makes Magazine asked me to feature the same project. The chair was published in issue #40 last month! It was such a thrill to be in a real deal magazine – cool times.
You can find the pattern I used for the project right here.
|
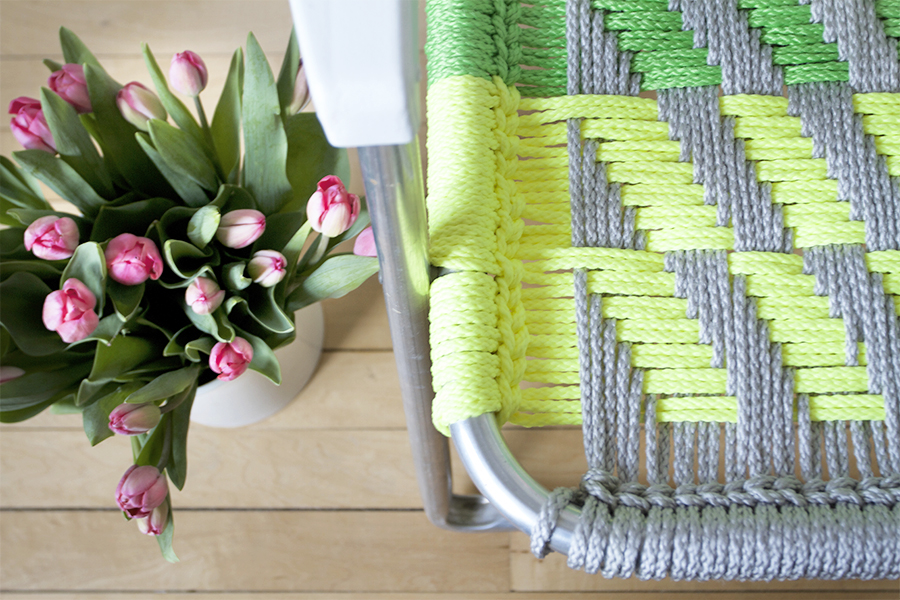
Supply List (Supplies for Woven Macrame Lawn Chair) Aluminum chair frame 200 yards of 6mm Macrame Cord (I used 100 yards grey, 50 yards green, 25 yards pink, 25 yards yellow) 2 Crochet Hooks Size Q |
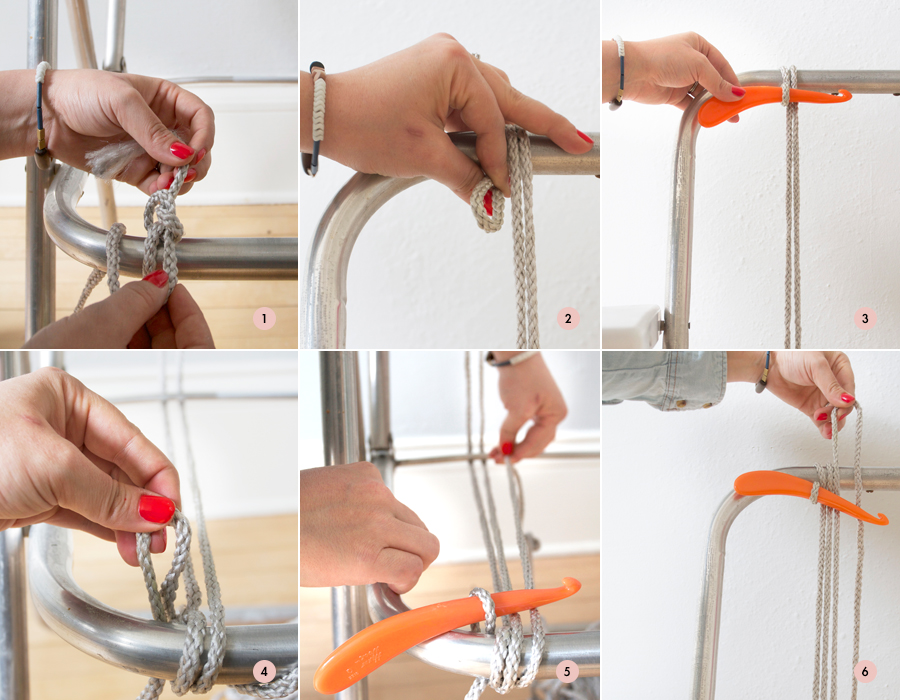
Keep your skein of cord under the chair. It will make weaving much easier.
|
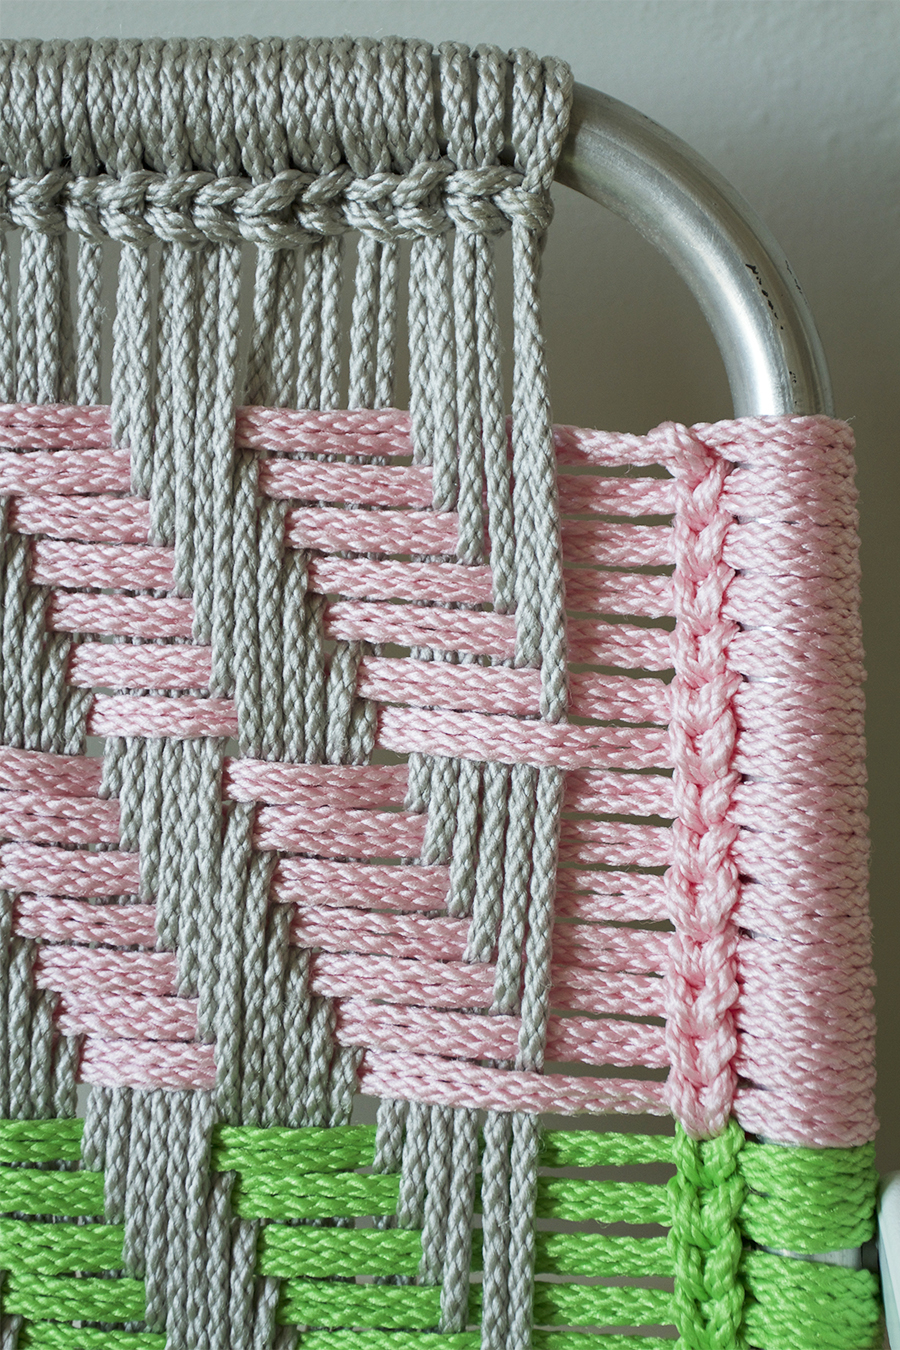
1 Tie Cord in a Square Knot Face the chair from the front left side. Tie a square knot around the left side of the front bar. 2 Create a Loop Pull the cord behind the back brace of the chair and up to the top bar. Create a loop and pull it over the front of the top bar and behind to the left. 3 Pull the Loose End of the Cord Tight Insert crochet hook into the loop and pull the loose end of the cord tight. Have the hook rest on the chair frame. 4 Create a Loop Bring the cord down going behind the back brace. Create a loop, then pull it over the top of the front bar and behind to the left. 5 Pull Loose Cord Taut Insert the crochet hook into the loop. Pull loose cord taut to create tension. Have the hook rest on the chair frame. 6 Behind the Back Brace of the Chair Pull the cord behind the back brace of the chair and up to the top bar. Create a loop. |

Take extra care to make sure the cord doesn’t get twisted. You’ll be happy you did.
|
7 Pull Loop Behind to the Left Pull the loop over the front of the top bar and behind to the left of the last vertical cord you created. 8 Hook the Newly Made Loop Hook the newly made loop. The loop on the crochet hook will overlap the two vertical cords to its right. 9 Create a Chain Stitch Pull the loop taut and pull it through the previous loop from ‘step 2,’ creating a chain stitch. Let the hook rest in the loop. 10 Bring Loose Cord Behind the Back Brace Pull the loose cord down behind the back brace. Create a loop and pull it over the top of the front bar. 11 Pull The Loop Around the Top Bar Pull the loop around the top bar and to the left of the last-created vertical cord. 12 Hook The New Loop Using the crochet hook, hook the new loop. |


Jamz: “Cloud Crawl” from Lazerbeak – used with permission.
|
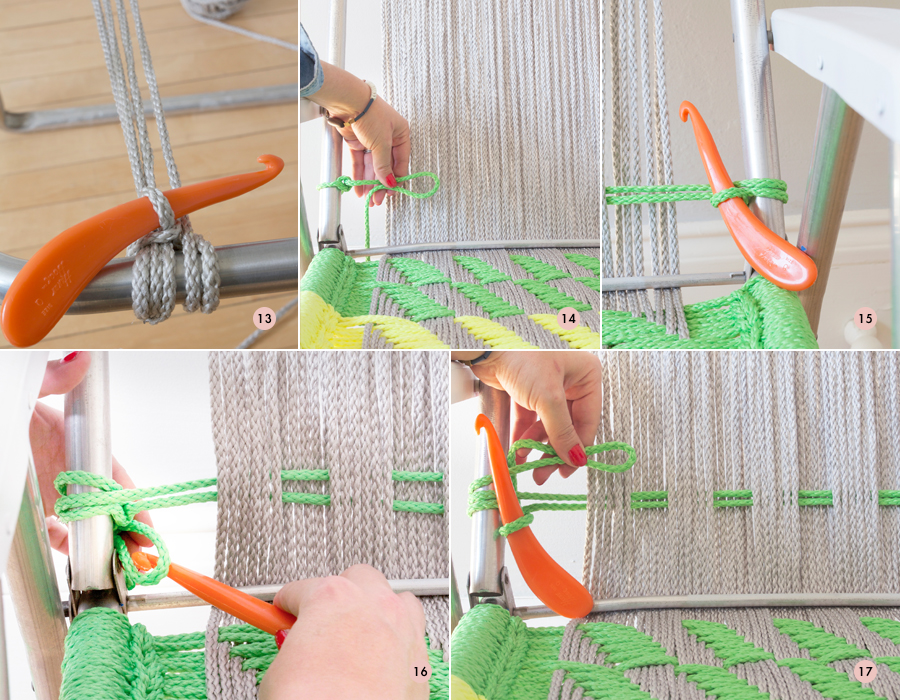
13 Create a Chain Stitch Pull the new loop through the loop created in ‘step 5’ making a chain stitch. Pull the loose cord taut. Let the hook rest in the loop. Repeating Steps 6 – 13 until you have created 59 vertical cords. At that point, you will be on the top right corner of the chair. To finish vertical cording: Cut the cord from the skein, leaving about four feet. Pull the cord through the last loop, removing the crochet hook. Bring the cord down behind the back brace, and over the front bar. Bring the cord through the loop on the crochet hook, pull through. Finish with a square knot. You now have 60 vertical cords. You are now ready to begin horizontal cording the seat and back of the chair! Both will be done in exactly the same way. 14 Create a Square Knot, Make a Loop Create a square knot in the lower left hand area of where you’ll be working (seat or back). Create a loop with your cord and weave it through the vertical cording according to the pattern you are following. 15 Pull the Loop Over the Right Bar Similar to what you did with the vertical cording, pull the loop over the right bar and bring it down and under the newly made horizontal cords. Insert the crochet hook and pull the loose end (now on the left side) taut. Let the hook rest in the loop. 16 Create a Loop Create a loop with the loose cord on the left side of the chair frame. Bring the loop over the top of the left bar and down under the newly created horizontal cord. Insert your crochet hook into the loop and pull the cord taut. Let the hook rest in the loop. 17 Create a Loop and Weave Create a loop and weave it through the vertical cording according to the pattern. Repeat Steps 15-17 pulling the newly created loop through the previously made loop on the crochet hook each pass, until you have come to the the 55th horizontal row of the pattern. Finish the horizontal cording the same way you finished the vertical cording. You’ll now have 56 horizontal cords. |
Jamz: “Cloud Crawl” from Lazerbeak – used with permission.
To finish: Trim cord ends to an inch, use a flame to seal and melt the end of your cord and press it into a discrete location on the underside of your chair.


So super cool & impressive! Great tutorial!
Angela @ Number Fifty-Three
Thanks, Angela!
This looks so fun, and the results are stunning. What made you pick these colors? There are so many to choose from on your source site!
Hey Maeve, I don’t know what made me choose the colors, when I made the chair it was still March so maybe I needed some spring in my life. A lot of the colors on the macrame site are really saturated and primary, so I suppose I was looking for something that wasn’t so much like that. I was also obsessed with the Trendig tableware line at Ikea at the time I made the chair.
Beautifully done as always!!
Thanks so much, Caroline!
This is so cool! A fun alternative to the typical plastic woven chairs. Thanks for the tutorial.
For Sure! Thanks!
My grandfather made me a little chair like this when I was little (it was wooden) but he would do this with old fold up chairs too. He passed away before he could ever teach me and I never knew what it was called and when I saw this post my heart skipped a beat. Thank you! I plan on working on something for my little guy to keep the family tradition :-)
Hey Michelle! That is so awesome to hear! My Grandpa made these same chairs too! He also passed away a few years ago before I could ever ask him how it was done, but my Grandma gave me all of his old supplies and books and that’s how I learned. I think of him every time I make a chair. You should really think about doing it and keeping your Grandpa’s memory alive. Your son would love it!
Love it! Great tutorial. I also love the colors you chose. Beautiful chair!
http://rumisumaq.com/
Thanks, Melanie!
Just purchased a chair to make one of these for my son-in-law. Will try an International Harvester logo! Thanks for posting the pics and tutorial. this should help me remember how to do this. Have made about 20 of these for friends and family (and myself!)
Where did u get the frame of the chair?
Thank you for the video and the directions for the pattern on the chairs. It took me a couple of tries but I got it.
The directions were awesome. Thanks again.
I have been holding on to my old “wicker” porch swing for years. People told me there was nothing I could do to save it… Well, you are going to help me prove them wrong! Thank you!
I made this chairs years ago and they lasted a long time today I am 75 years , and my hands don’t let me
you have a good thing going think you.
How did you get stated in making these chairs? I’m wanting to learn, please help.
I would like to know how did you change to a different color in the rows? I love your work.
It’s as easy as finishing one row with a square knot and then beginning with a new color and knot. Good luck.
Such a GENIUS tutorial–thanks for the thorough steps!
What a beauty! Thanks for sharing <3
Can you please call me? 905-727-7591
My late Husband John used to do the woven chairs for the family. Birthdays, Mothers’ Day etc. He passed away quite suddenly and now I am left with all of his supplies, tools etc.
I was wondering if you can give me a call and perhaps you can come to my home and decide if you want any of it.
Thank you.
Zee Marsden.
Do you have an estimate of how much it costs to make this chair? I love them! Just found you while browsing get through DIY mag.
I LOVE THIS!!!!! Did I miss where you said how long it took you to do a chair? I’m relatively new to macrame so I figure I can double the time. ;-)
Perfect, beautiful.
where can I find that type of cord?
That looks beautiful so cool!
I see you don’t monetize your page, don’t waste your traffic,
you can earn additional bucks every month because you’ve
got hi quality content. If you want to know how to make extra $$$,
search for: best adsense alternative Wrastain’s tools
Great tutorial, thanks for sharing
I just came across your blog through “DIY Urban Farmhouse Makeover.” This is a fantastic tutorial, the chairs are wonderful! Thank you for sharing your expertise! Now, if I can just find some old fold up lawn chairs…
My husband brought home a beat up old swing because he thought I would li ke it. The thought was there but the canvas was so weatherbeaten that it was brittle so I had to explain I would have to fix it before I could use it. I have never done anything like this before and watching other videos has had me take it all apart twice already. Your video has been a great help and I finally have it figured out. Thank you, thank you, thank you.
Do I use 4mm cord or 6mm cord?
Hello Mrs. Alison
I am a carpenter in Iran and I want to work on chair frames, benches, etc. with colorful hemp and silk threads.
How can I learn this art with a variety of designs and materials?
Thanks
Love your pattern. I was given a lot of cord and the colors were all pastels. Looked like an Easter basket. I had no idea what to do with them until I saw your chair. I found the gray I needed which wasn’t easy after covid. I have one question. I printed your pattern out. My chair is a little wider so I added two rows on each end. I did not change any other counts. There is one section that has 5 under, 6 over and 7 under. Mine are toward the left side of the chair. But now I noticed one cord that is not used. Do not want to start over but probably will. In your video you say it is all 6 over and 6 under.
where do you purchase the chair frames? Would love to try this
Hello, Thank you for the tutorial. I was wondering where you purchased your Q hooks from?
The lady above asked the same question I was wanting to ask but the answer was cancelled. I have Q hooks but they are straight and keep falling out of my work before I even get started, So frustrating!! I thought if I could find the type you had with the wider and flat sides I could solve that problem.. Please help me.. The joy of macrame is fast fading!!
Dottie Cummings 606-306-1313 fdcummings42@yahoo,com
I really don’t see any point of asking a question.. Seems you are only interested in generic comments. None of which help a person trying to develop an interest in the craft, One has NO trouble finding regular Q size hooks. I am specifically asking about the kind YOU use as I believe it would help wit5h my arthritic hands. What is so terribly difficult about sharing that information??
Just curious if it will be strong enough if I only go under the bar? I see this in a lot of patterns and it seems like it would be stronger and not as likely to sag if I go around it or over and under? What do you think?
How do you change colors?
How do I finish when the cord only goes halfway……. Knot and restart? Connect ends?
Looks great! Any tips for knotting the two different colours together seamlessly when you are changing up the horizontal colours?
How long does a chair take?