


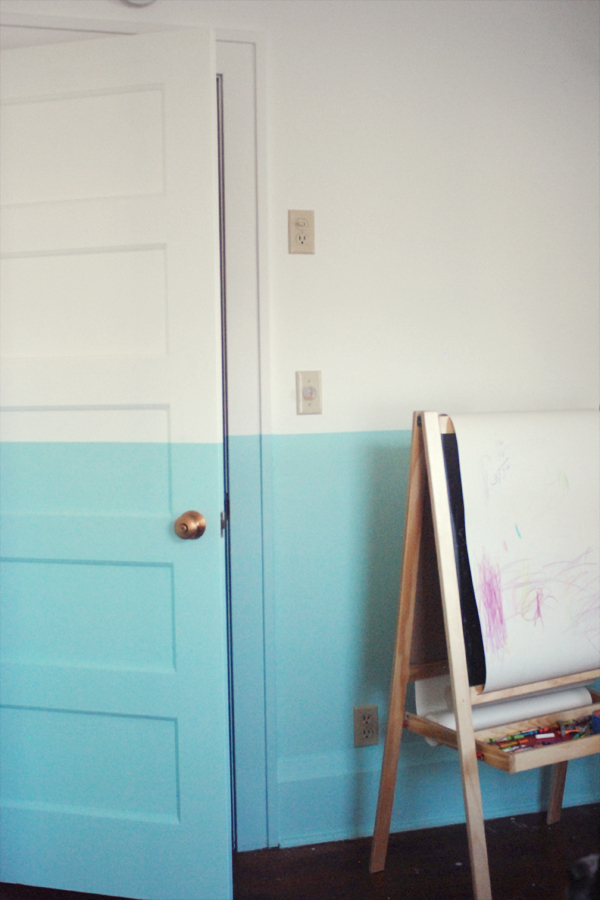
Us Ripplinger’s moved into our house close to a year-and-a-half ago. My plan for our new place was to take care of all the common areas first. You know, the ones that company would use the most and see the most and judge us by. Mission accomplished, we have done just that. However, it has become insanely obvious to me that I have been neglectful of the rest of my home. Most importantly, Elsa’s bedroom. Ugh, sorry Sweetie! You see, when we moved into our new place it was in a whirlwind to remove any representation of the previous inhabitants, whom had been here for 90+ years, and with intention to immediately put our finger print on our new space. This led to hasty paint color selections and half-hearted attempts to make the place ‘ours’. I immediately painted Elsa’s bedroom the same color that I had painted her nursery at the old place, Balmy Seas (Behr 490C-3), and then stopped. There it sat, a pretty color teal with weird brown moulding and a mattress on the floor. A few weeks ago I walked into her room and thought to myself, “Nicole, this bedroom sucks!” Then I got out a roll of painters tape and a huge ass bucket of white paint and went for it. I wasn’t ready to rid the walls of that Balmy Seas paint color entirely. I opted to paint the top half of the room, molding ‘n all, white. Not off white, which some folks swear by, but regular old pure-as-the-driven-snow, white. (Side note-white is totes my new obsession. I would paint every wall in my house white if I knew I could keep it clean.) This girl’s room was getting a make over.
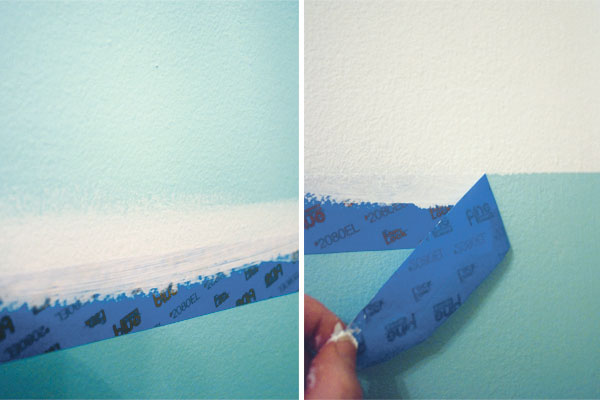
I am by no means a professional painter but I used to spend a fair amount of time helping a paint crew paint gallery walls all sorts a crazy and managed to pick up a few tips on how to get a good crisp paint line.
Key items for making this happen: laser level and painters tape. Once your painters tape is in place be sure that your tape is stuck down real good. Now, if your anything like me, you’ll want to jump in there with your paint roller and just go for it. Don’t. Take your paint brush and paint along that tape line. I’d give it two coats, depending on the kind of coverage you are getting, and then move on to painting the rest of the wall with your roller. Be sure to peel that tape off before the paint dries and presto chango-you got yourself a crisp little line!
Now that I’ve got the tough stuff done the finishing touches can be added. I’m tossing around the idea of painting the edges of the two doors in the room a pretty pink color. Thoughts?
Also, those switch plates and outlet covers are not doin’ it for me. I could easily get white ones but then I’d be left with bone colored switches and outlets. (Aaron isn’t interested in doing any electrical work for me as the wiring in our house isn’t exactly new and makes for difficult updates. I don’t blame him. Electricity is scary!) Has anyone ever painted these things successfully? Until I have proof that this is possible I am just going to have to deal with them.

I’m pretty happy with the way the paint job turned out. This duvet cover from IKEA will be fine until I can pick out something else. I’ve got my eye on some pretty vintage embroidered pillowcases off of Etsy. I’m just having a hard time narrowing down which ones I want!
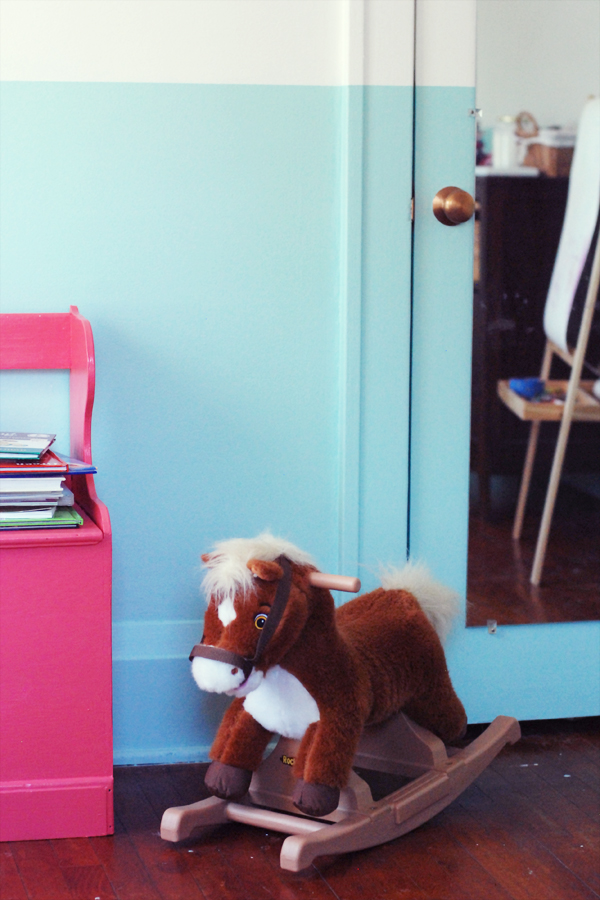
The toy box in this photo used to be mine when I was a kid. It has gone through a few different incarnations during its lifetime and mine. It was once stained a really really dark walnutty color. Then it was bright blue for a time while I let my baby brother use it. Right before I left to go to college my mom rag painted it red and black. I brought it with me to my first apartment in Minneapolis where I kept my shoes and boots in it in the entryway. Now, it’s back to bein’ a toy box.
So that’s that. I’m feeling like less of a failure and more like a mom who cares about where her little chicky sleeps!

Nicole Ripplinger (aka Colz) co-founded Deuce Cities Henhouse with Alison in 2009. These days she’s better known as the “#1 Contributor in Crime”. She makes her home in South Minneapolis with her husband, Aaron, and their two girls, Elsa & Faye.


WOW! what a great idea! I’m all about exclamation marks today! But seriously, it’s beautiful especially with the pink accents.
Thanks Jessica! I sometimes get so stoked about exclamation marks too! It’s hard to hold back when things are awesome and you want everyone to know about it.
Eff yes dude, you need to paint the sides of that door pink.
Love it, and love that you’re back in the saddle.
Good to be back, Friend!
My little girl’s room is also painted Balmy Seas!! I bought a bright pink paint for her closet called Raspberry Fizzy. It’s my weekend project :)
Don’t you just love that Balmy Seas color, Hannah! I thought it was a great alternative to purple or pink for a little girls room. I hope your weekend project goes off without a hitch!
OK, ADORABLE. I love the half-blue-half-white thing—the moldings and doors really make it.
White is great! And when they do scuff, MR. CLEAN MAGIC ERASERS. Seriously the most amazing invention. We have matte white walls in narrow high-traffic areas and Mr. Clean makes it possible.
Oh yeah Dan! I almost forgot about those magic erasers! The idea of all white in my living and dining areas sounds so awesome to me. I’m afraid I’d have to MARRY Mr.Clean in order to keep up with the marks my kid, dog, cat and husband would bring. I do have an adult bedroom update on the horizon. Believe me, I WILL be sleeping in the Matrix shortly.
LOVE. Paint the sides of the door and I will DIE.
Thanks Amanda. I’ve got a date with a can of paint this weekend. I’ll keep you posted!
Do not fear the idea of switching out your switches/sockets. The sockets costs something like 50¢ each and all you have to do is turn of your electricity and make the switch. Inside you will find wires attached to screws and all you have to do is memorize what is attached to what and match that when you move the wires to your newly purchased white socket… shove it back in the wall, turn electricity back on for a test, and put the faceplate back on. It should not even be considered “electrical work.”*
*Please do not let this comment serve as reason to come back and blame me for any shocks (shocks you will not get)!
I’m glad for the vote of confidence. Don’t worry, we won’t blame anyone but this old wiring for shocks! Those switches will eventually get swapped out. They are making me CRAZY!
Yes, I wanted to comment and say the exact same thing! I was under the impression that this kind of thing was complicated but it’s actually dead easy. We’ve been slowly replacing all the beige ones in our house with new white ones. I’ve probably replaced 30 myself. Piece of cake! Do it! Plus, the paint will never stay on these things, you’ll end up with it half scraped off after using the plugs a few times. (I’ve lived in sooo many apartments with painted sockets.)
The blue looks really amazing. Dan is right, it wouldn’t be nearly so awesome if it wasn’t over the moldings and door – it gives it a really modern look. I’m going to add this to my mental list of future ideas…
I agree, painting those sockets is not the way to go. I don’t think there is enough sweet talkin’ in the world that would convince my husband to make the outlet and switch swaps for me. We had a real set back during a bathroom remodel involving the wiring in this old house of ours and he has vowed to tackle anything related to electricity on an as needed basis. Our opinions as to what is NEEDED varies greatly. I’m going to have to go it alone on this one! Wish me luck, I hope this old wiring doesn’t bite. ;)
What a creative idea! I love how the color wrapped around the room gives it a sense of coziness but yet it still feels ligth & open with the upper walls in white. I really wanna do this when I have my own home… maybe in my future craft room. Thank you for the inspiration!
Excellent work! This can be a type of information that should be discussed around the net. Shame for the search engines because of not positioning this particular post larger! Come on above and check out my site . Thanks =)
Get over it! Outlets take about two minutes to swap out. Watch a video on YouTube with your husband and if he still won’t do it, do it yourself. If you are capable of turning off the power at the circuit box and you can use a screwdriver the you are all set! And, it will only cost about $3 per outlet including new plate covers. You can do it!
WoW! I saw the photo of that door some time ago and loved it, I searched for the source but didn’t find it. Now I’ve finally found whose great idea this was! Congratulations, it looks awesome!
Thanks, and I’m glad you found the post! Stop by again!
Genuinely no matter if someone doesn’t be aware of afterward its up to other users that they will assist, so
here it happens.