


Hey Guys! If you follow me on instagram you already know that I’ve been chugging away at my big fall kitchen project for a few weeks. I got really into it this weekend, and it felt SO great! I’ve been working on my kitchen in chunks and I am estimating that I should be done with it around Thanksgiving. And since everything I do takes longer than planned, I’m allowing another month after that for the unexpected thangs, and hope to be wrapping it all up around Christmas time.
My plan is to move around the kitchen, removing old hardware and restoring it, while at the same time repairing and painting all the cabinetry. I have to do it this way.. ain’t no way my kitchen is going to be out of commission for months. First I’m starting in the “pantry” area with all the old cabinetry, I figured this would be the toughest spot, so why not get it out of the way. Also, I imagine I’ll have all the kinks of my painting process figured out by the time I move onto the nicer, newer cabinets in the rest of the kitchen and mud room.
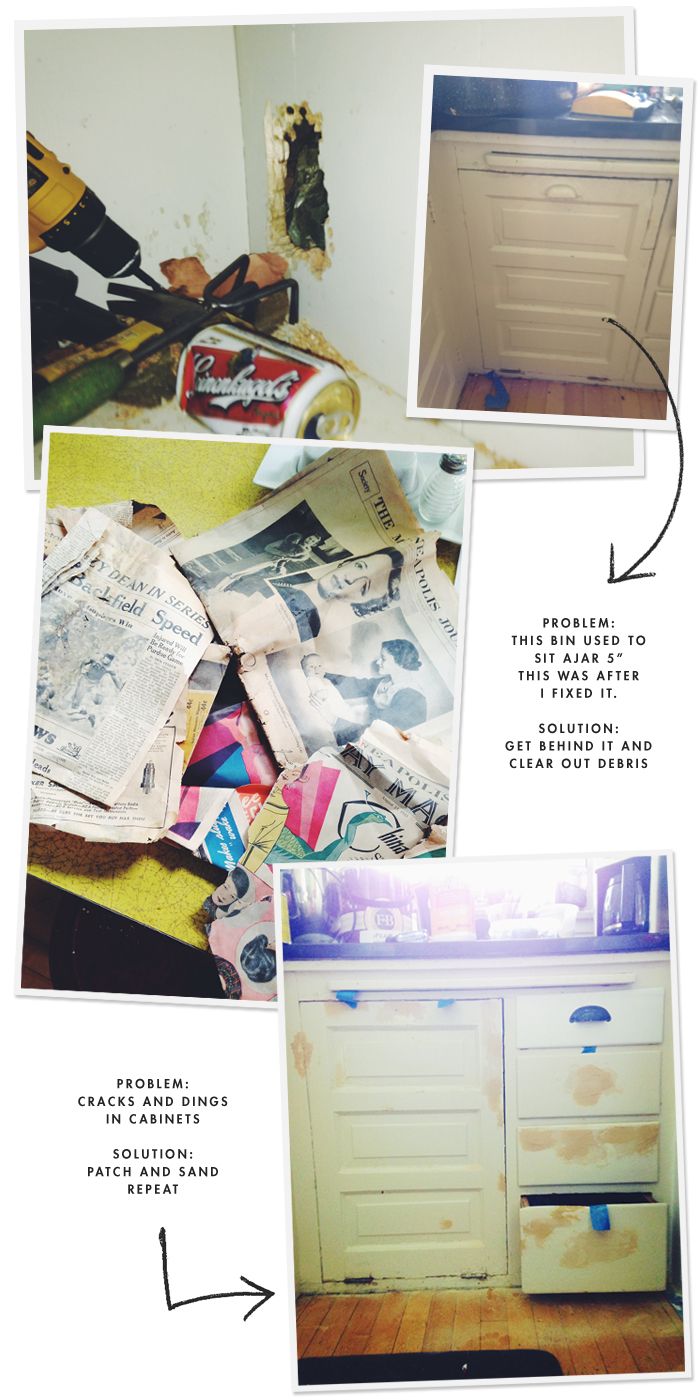
I so wish I had a good before photo to share with you of these base bins and cabinets in the back of the pantry. The bin cabinet (the one on the left) had been sitting ajar about 5″ for over a year. We had been using it as a recycling bin, and had lost a few cans back behind it, oops. Those cans were causing the bin not to close all the way, and were driving me crazy on a daily basis.
So why not just remove the bin? I had tried previously to remove the hinges. I got one hinge pin out, but the other was in such a precarious spot that there was just no way of getting at it. Even after stripping the hinges of layers of paint, the pin would still no budge and I was unable to get at it with a hammer and chisel. Enter plan B.
As I was standing their one Tuesday morning (in a skirt) staring at the cabinet wishing it would just close all the way, I realized that I could possibly access the back of the bin if I created a hole in the adjoining base cabinet. I didn’t have any reasonable way of making this hole though, but it was such a great idea (only a genius would think of it), I just had to figure something out. The neighbors didn’t have any jigsaws to offer me, and I was left to my own devices. I crawled to the back of the adjoining cabinet (which was longer than me), I took the biggest drill bit I could find and I started poking holes through wood that was at least an inch thick.
Over and over I made holes until finally I could start to pry off sections with the back end of a hammer. This really wasn’t such a good idea to be prying splintery old wood in such a tight space. It was the only way this bin was going to close, and I was determined, well being and safety be damned. It took nearly two hours before I had a hole that was big enough to access the back of the bin, but I had a hole and my arm could fit through it. My idea totally worked, I was in business, I was the greatest human ever.
It was at about this point that I decided that maybe I should change into something more suitable for this type of work rather than the skirt I had now ruined (so worth it though). I put on some cut offs, grabbed a hand garden rake and crawled back into my hole to start digging. I pulled out 2 garbage bags full of other people’s junk. Most of it was circa 1935 based on a stack of newspapers I pulled from behind the bin. I also found the culprit beer can too! It didn’t take too long until I felt comfortable crawling out of the cabinet and checking to see if my hard (hot) work was successful. That bin totally closed, it closed so good, and it closed all the way! I did it, I did it so hard!
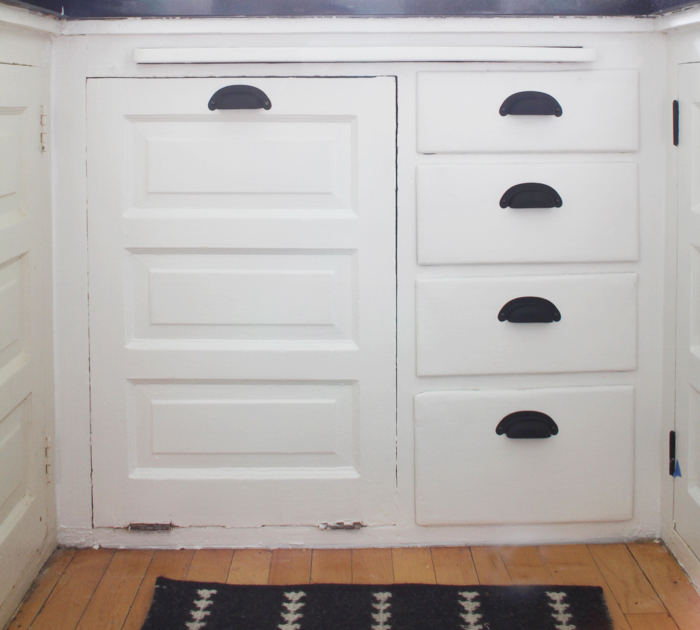
A few days later I jumped into the second part of the base cabinet project. That bin and those drawers were badly beat up. Everything was chipped and cracked, the bin had a ginormous crack about 7″ long near the top right hand side – I wasn’t sure I could fix it. Everything needed to be filled and sanded, and filled and sanded, and filled and sanded. Plastic Wood is my jam, these cabinets totally looks great now, I won!
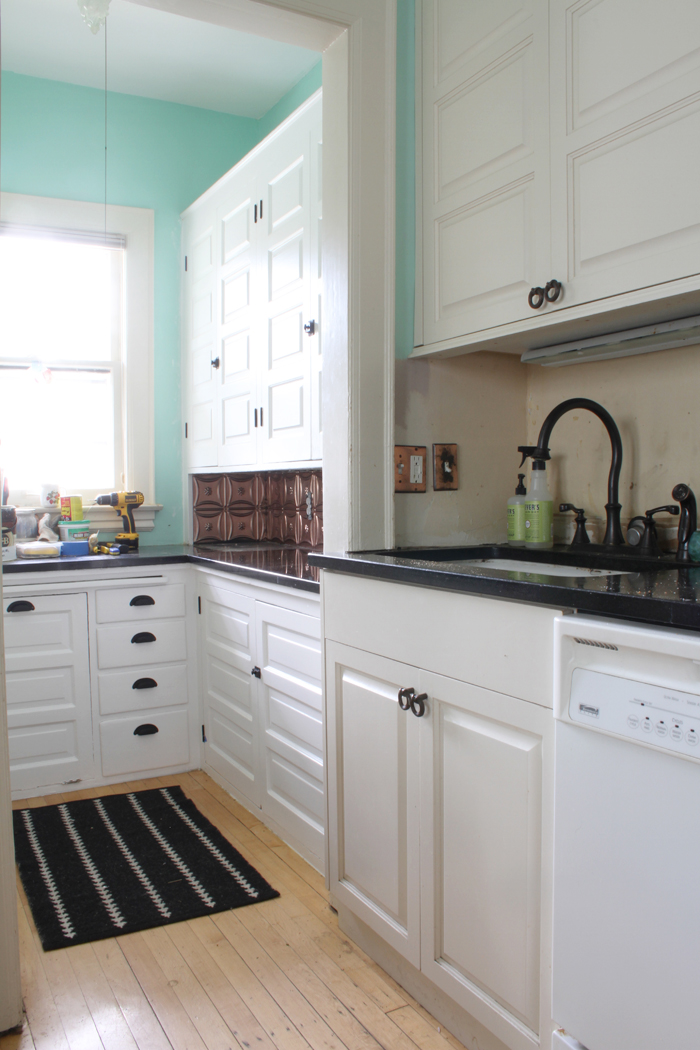
The whole point of updating this kitchen is to restore the vintage classic elements that are already there, while at the same time making it fresh and new. All of the vintage hardware needed to be restored, it was begging me to save it. I was happy to help.
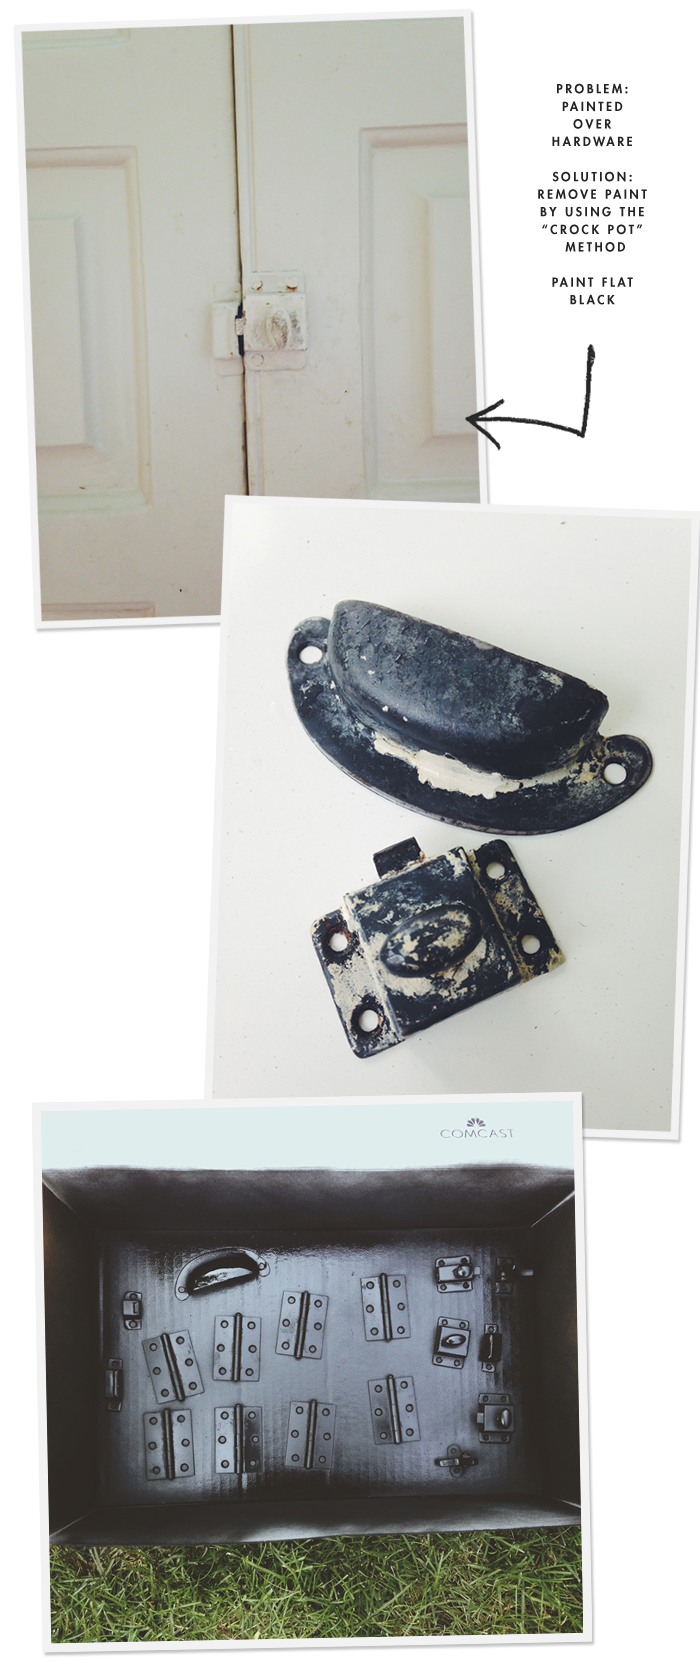
After my experience with restoring the door hardware upstairs, I knew it would be no problem to restore all the old kitchen hardware that was covered under layers and layers of paint. The hardest part is always getting the screws off without stripping them in the process. So far I’ve gotten all the hardware removed successfully from the cabinets and into my “hardware stew pot”.
I use a little enamel pot that I picked up at the hardware store for stripping all things hardware. It’s so easy, I just throw all the paint covered hardware into the pot, add a little dish soap, turn the stove to low and let it sit for hours and hours. After the hardware is done stewing I rinse it in cold water with a brush and the paint usually just slides off. There is always a few instances of having to resoak a few pieces, but the paint always comes off in the end.
My intentions were to just replace the hardware after the paint had been removed. The hinges had a different plan for me. Although the paint came off of those bad boys really easily, they soon rusted after drying. I felt that putting the hinges back on the cabinetry all rusty and gross would be a disservice to all the time and hard work I had put into them. So, I got myself a can of black flat Rustoleum and I went to town on those hinges. Guess what? They looked so good I did the rest of the hardware too. Honestly, I really love the hardware painted black even more than the original finish, it looks so good. It’s nice, and even, and pretty, and there’s no more gunky paint layers! I feel like I did good by this old hardware, and I’m proud of how great they look back up on the cabinets!
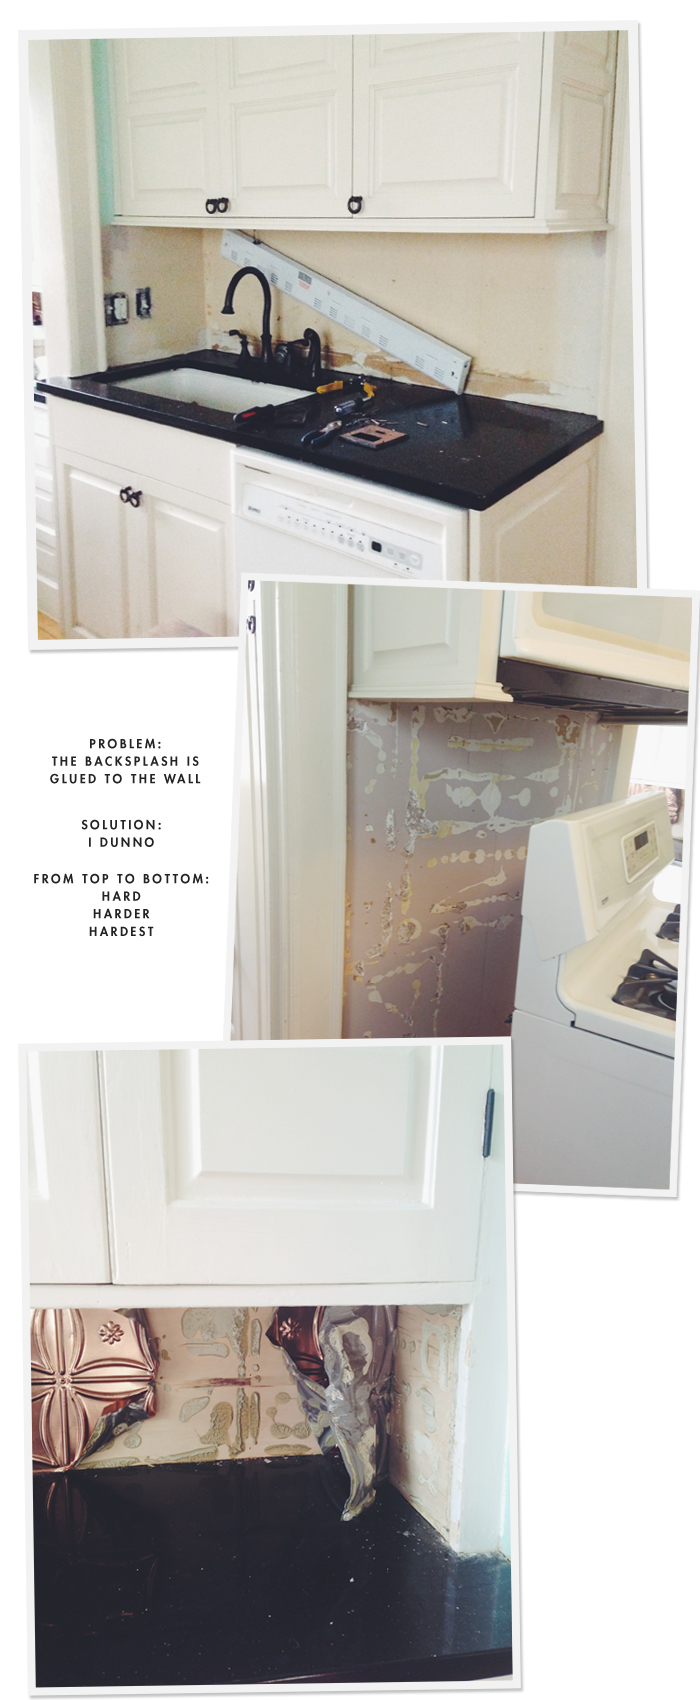
As of today, I’ve finished 2/3’s of the pantry and have recently started demo on the backsplash.. I hadn’t planned on starting the backsplash so soon, but in a moment of curiosity I stated to peel up a piece from the back of the pantry. It didn’t come up easily, and I quickly realized the copper backsplash that I thought was tacked down with nails, was really glued down to plywood. I totally panicked, I had no idea what I was going to do. This backsplash was not coming off, and I didn’t account for having to remove plywood and replace it with drywall. I was scared, really, really scared.
I slept on it hoping for a fresh perspective in the morning. By morning I had decided some further investigative research was required to fully assess the situation. I started with the backsplash behind the sink, and to my surprise the entire backsplash was only tacked down with copper brads! Hooray, I had it removed within a matter of 10 minutes, and the drywall backing needs minimal repair.
Then I moved on to the backsplash behind the stove. This too was coming off quickly, but the situation was a bit more sticky. This stuff was glued on. Fortunately and not fortunately it was glued on to plaster, and the damage (unfortunate) is fairly minimal (fortunate). I figure with a quick skim coat and some primer it should be good-to-go for tiling.
Then I made my was back to the pantry, this time I had a few more removal skills up my sleeve. Namely a plyers, some gloves and a pair of tin snips. This stuff is stuck on, it’s splintering the plywood as it comes off, and when I say comes off, I mean gets ripped off in small 2″ by 2″ sections. This will take me awhile.
I do think over time I’ll be able to get it off, but then what do I do with the plywood when I get there. I’m considering sanding down the glue and priming, or drywalling over the plywood and glue. Leave a comment if you have advice for me on this problem, as I have no clue, please!
Onward! This week I will finish up the pantry and hopefully will begin work on the mudroom cabinets by the weekend. I’m hoping I’ll be ready to start tiling in about 3 weeks. Cross your fingers for me. Also, I have some cool plans in the works for the other, forgotten side of the kitchen, and I think I’ll share with you my method for repairing these old, old cabinets in an upcoming post.


This. Looks. AWESOME. So awesome that you made that bin your biotch and discovered some fun hidden treasures (trash) in the process. Your kitchen is already pretty dang lovely, so I can’t wait to see the process as it goes!
Yes I did tell that bin who was boss, didn’t I? The newspapers are really great. I keep meaning to look through them all and see what was happening back in 1935, but I’ve only had time to skim through them so far. The kitchen is being nice to me, it’s easy to stay motivated when it looks so good so quickly. I think that’s why I have to work in chunks around the room. I need to have some sort of gratification for the hardwork, and having the pantry cabinets done will give me that glimpse into the future, I can imagine how good the rest of the kitchen will look.
Looks awesome already! Love the dark hardware. For the backsplash, do you have room for a putty knife and hammer combo? When I tackled the remainder of the stuff in our kitchen, I ended up using a dremel with a flat blade attachment to cut the glue and backsplash away from the wall. Still took a lot of time, but it was definitely much faster then what I did on the first wall.
Roonz! You wanna borrow me your dremel and fill me in on your tiling story sometime? Maybe we might have to meet up for some Saturday afternoon bingo in “the kins”??
That dremel seriously sounds like it might solve all my problems, wish I would’ve wised up sooner.
Really look great! The transformation and the fixing of the kitchen has a good result. Amazing job!
Thanks!
Drywall over plywood is completely acceptable. I think it would make tiling much less of a nightmare if you start with a fresh, clean surface.
The hardware looks amazing and it brings back memories of doing the same thing to an apartment kitchen I had once. I would drink a glass of red wine and then I’d be ready for the mess!
You should totally frame one of those old newspapers and hang it somewhere near the bin. So fun finding old stuff/garbage/treasure.
Good luck with the copper stuff…looks like you should be wearing puncture proof gloves!
Thanks for the encouragement, I think I will probably drywall in that pantry area. They make 1/4″ drywall, the thinner the better, as I don’t want it encroaching on my couter space.
That’s a good idea about the newspapers. I am excited about finding this stuff. I’ve only discovered a few things that were hidden in the house so far. A couple of mirrors, a photograph and now the newspaper. I also had a friend pass on 50 years of census data for the house earlier this week. It’s exciting getting a glimpse into the history of the house. It blows my mind when I think of other people living here for decades.
Don’t worry about me, I’ve been wearing my heavy duty leather work gloves. Your a good mom :)