


Hello my friends! I didn’t mean for my absence to be so long, but the summer just got away from me! Things have finally started to settle down and we are having some chill time. Chill time for me usually comes with some sort of project, because I like projects and they make me feel good. I call it chill time because I can have a glass of champ while I do it and I don’t have to drive kids anywhere. We’re spending the next few weeks off and on at the cabin. This is our first time actually having an extended stay here, and I’m really excited to experience what it’s like to wake up everyday with a lake out our front door. That being said, there are lots of little projects that need to be done at the cabin.
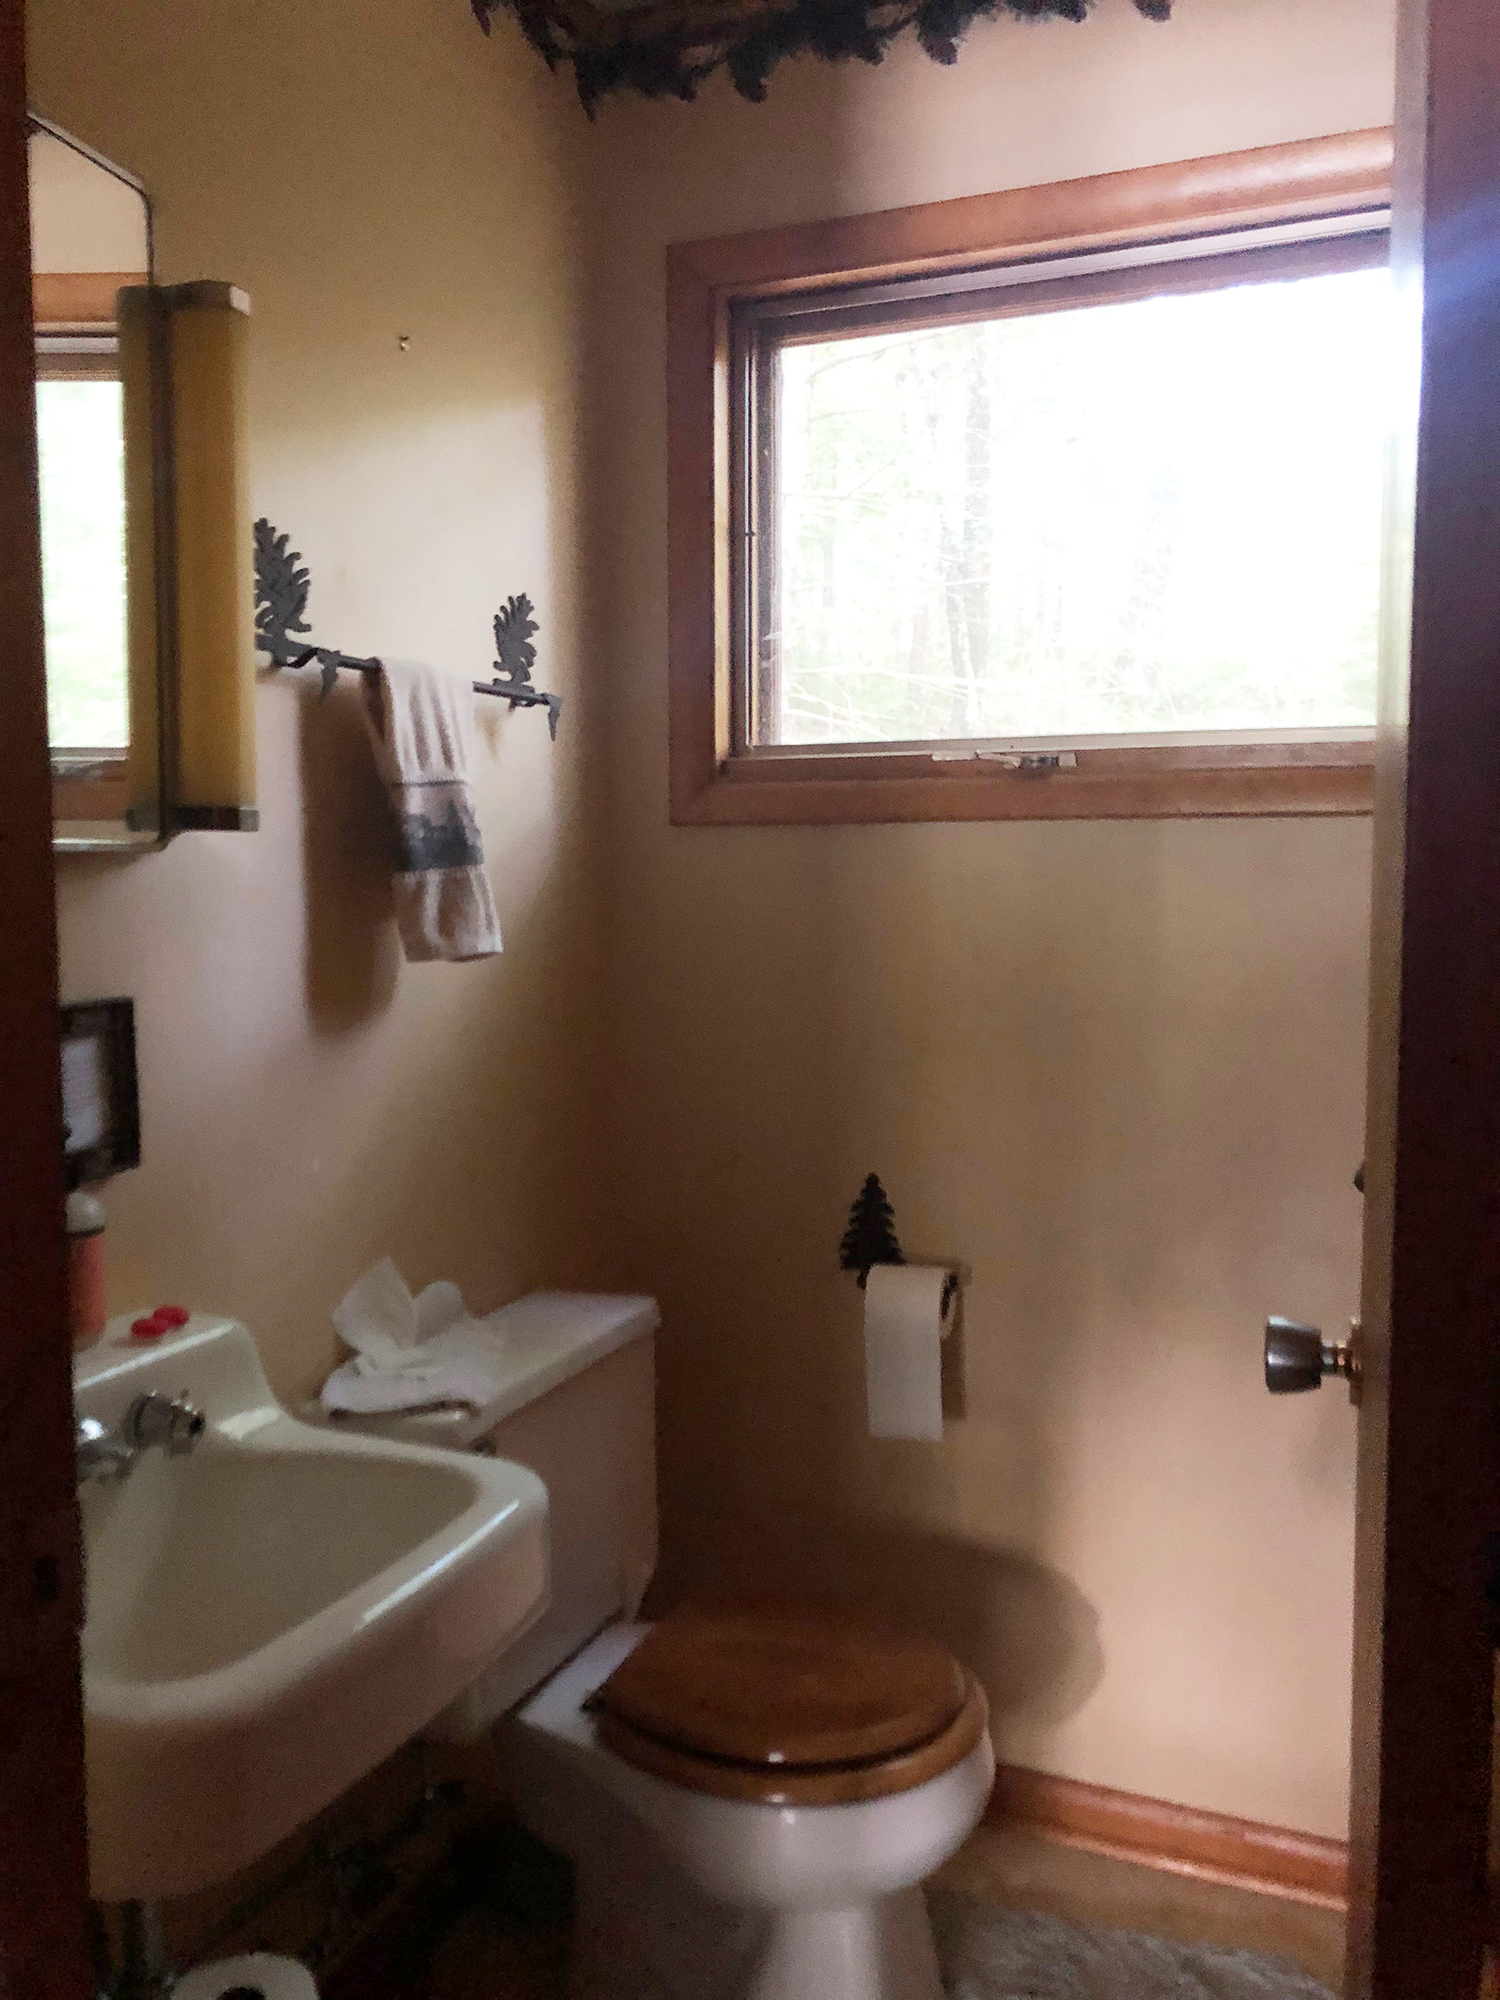
The biggest project that I’d like to take on is updating the upstairs 2-piece-bathroom and getting phase 1 completed in our main floor 4-piece-bathroom. As you can see (below) the bathrooms are needing some love. One can only live with a moose towel bar for so long.
What I Like
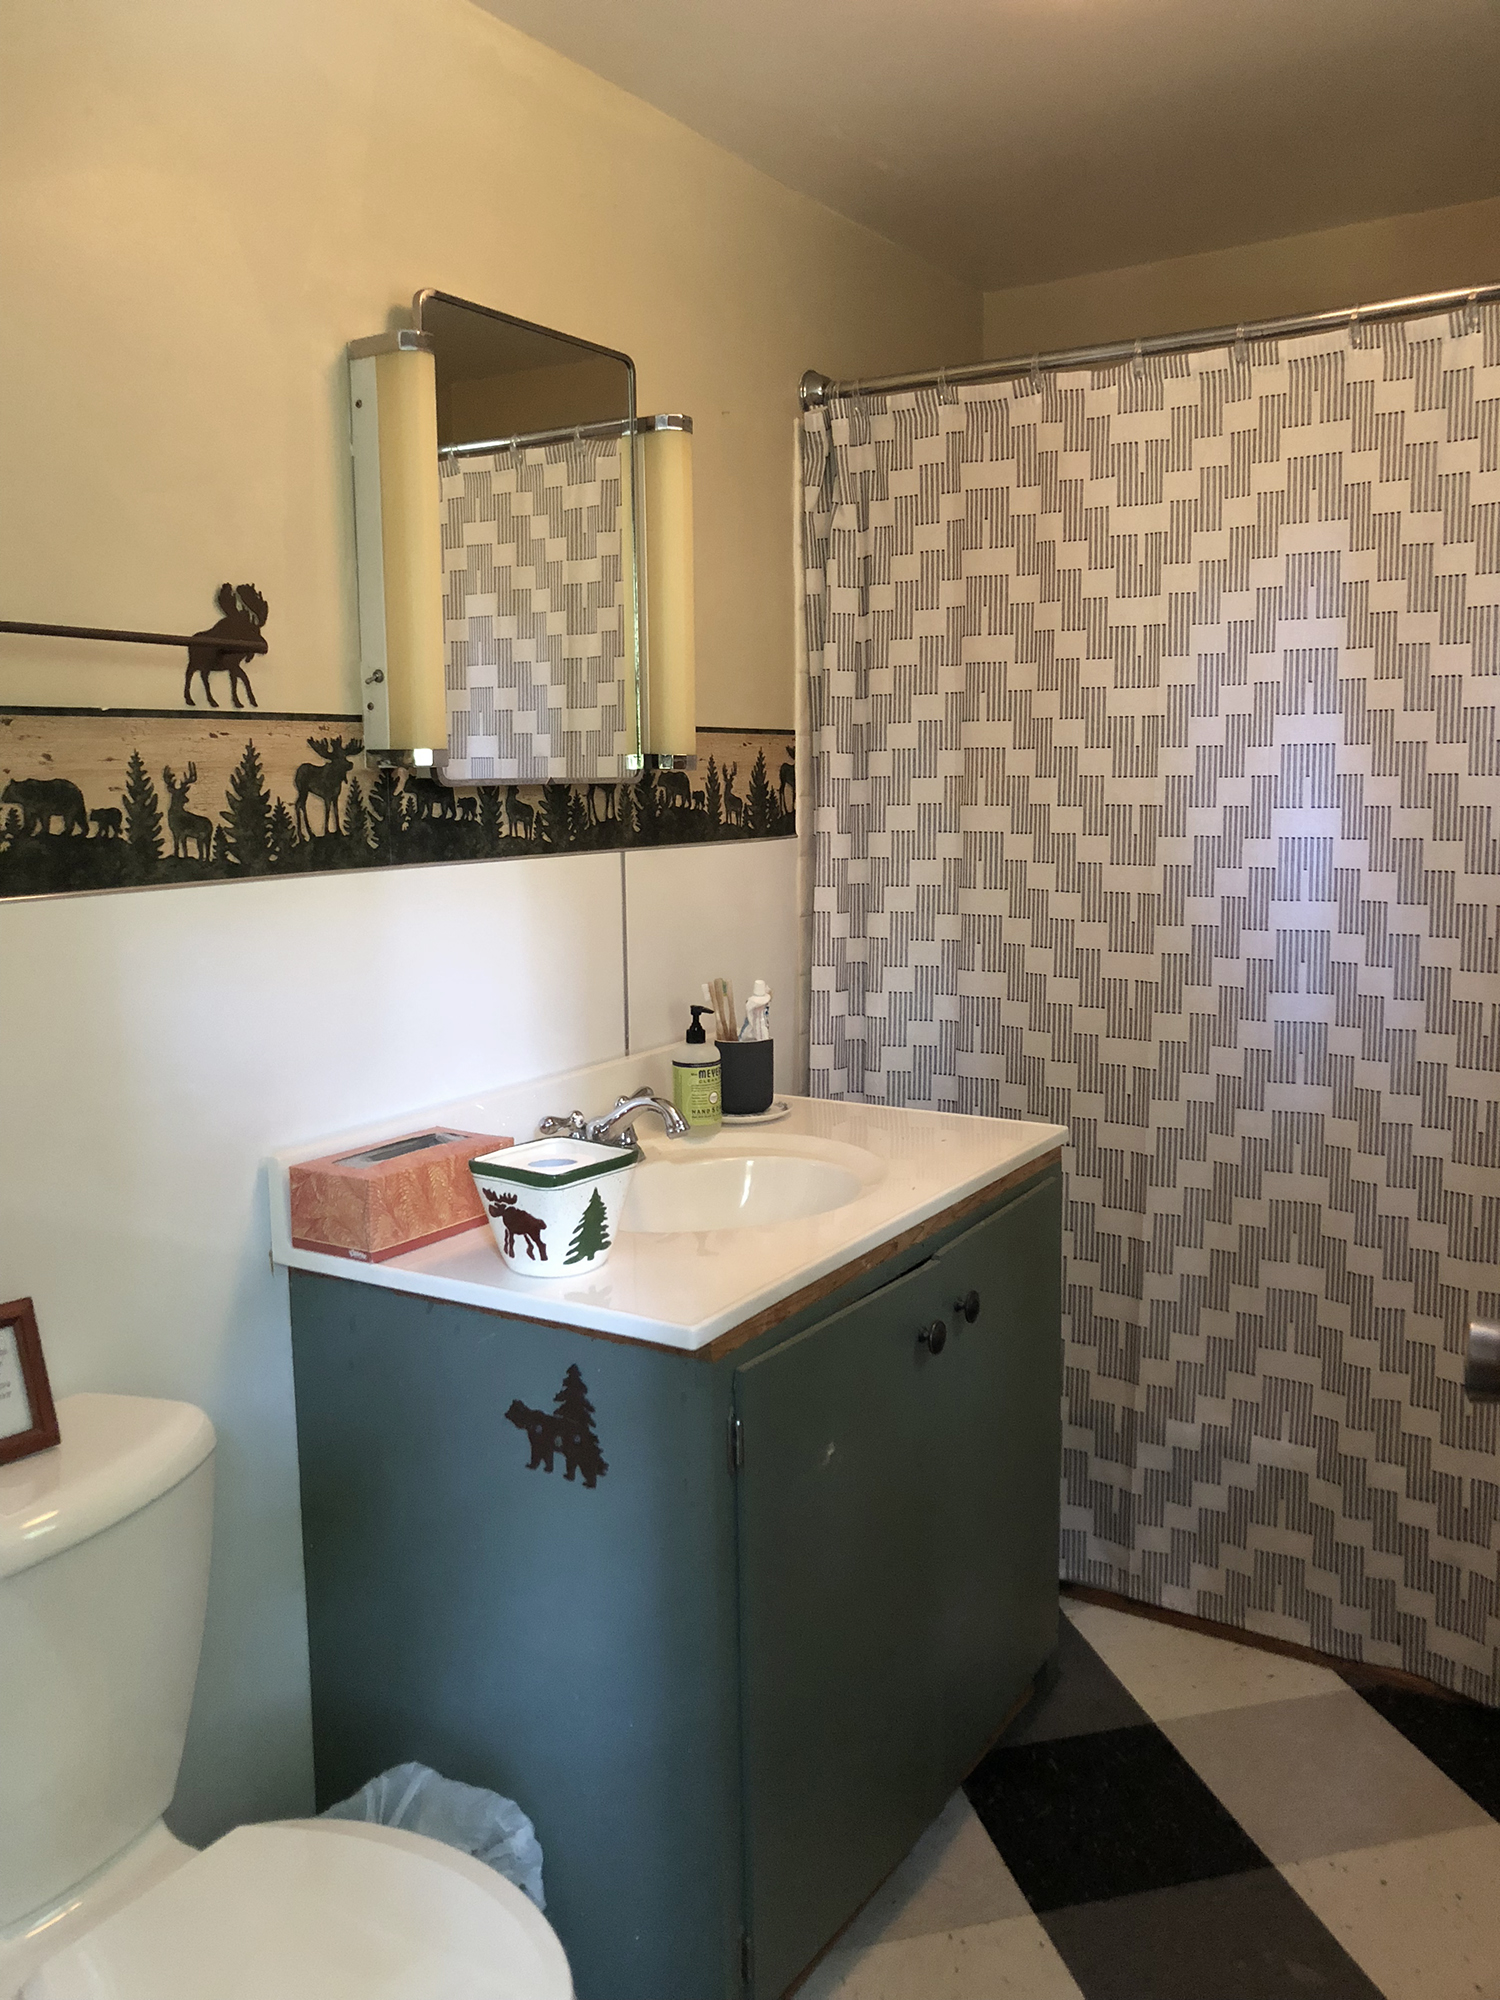
There are some good things though, I love our vintage sink in the upstairs 2-piece-bathroom and I want to keep it. I also have this weird crush on the medicine cabinet, it has these two fluorescent lights flanking the mirror and I’d like to figure out a way to keep at least part of this. I like the pine trim around the window and will try and keep it without painting it.
What I don’t like
I do not like the flooring and am planning on replacing it with black Vinyl Composite Tile (VCT) – the same that I used on our kitchen floor. Obviously the wallpaper, towel bars and coordinating accessories have got to go.
The Plan
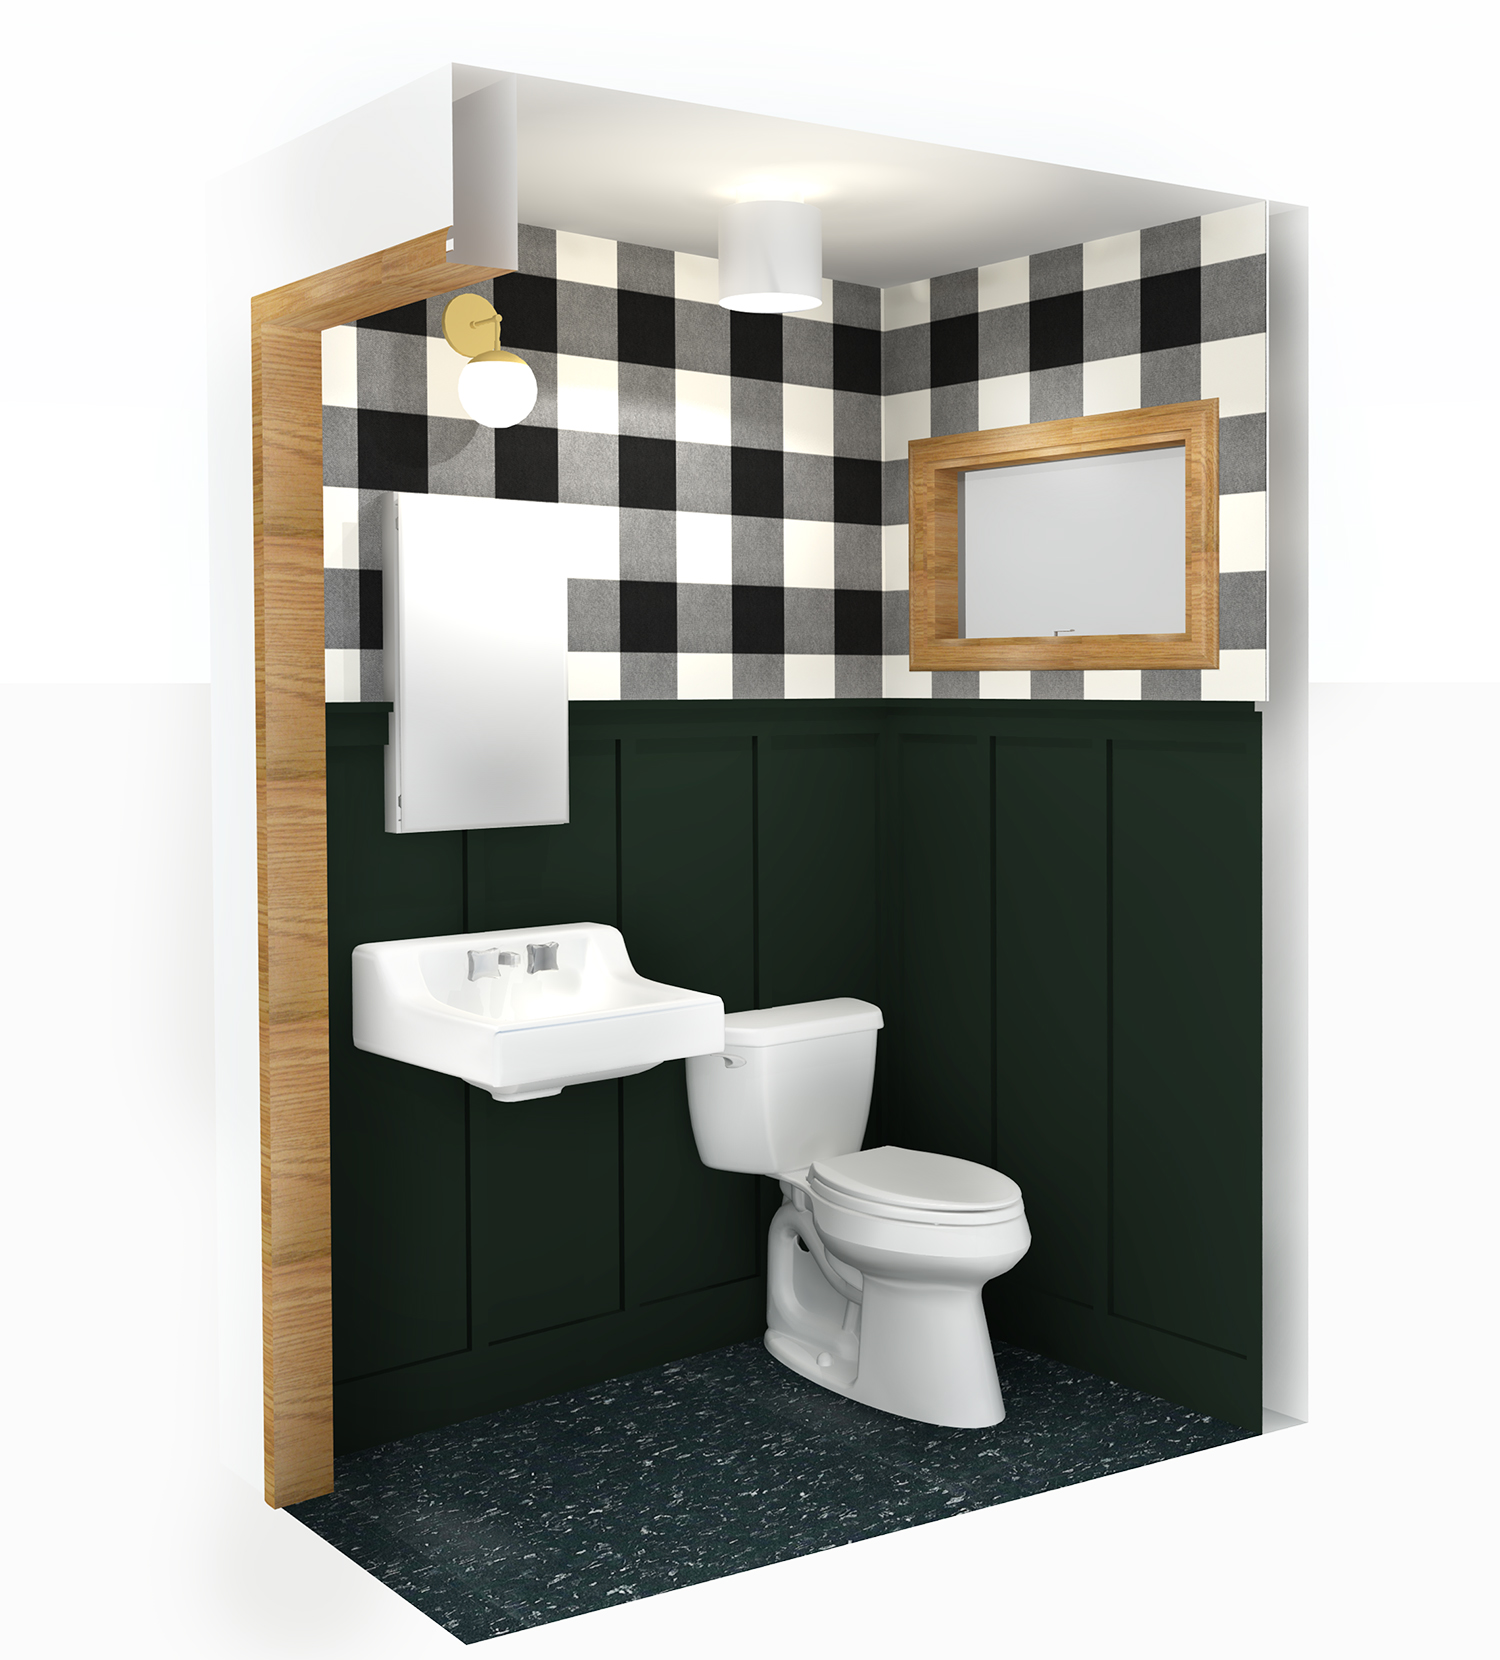
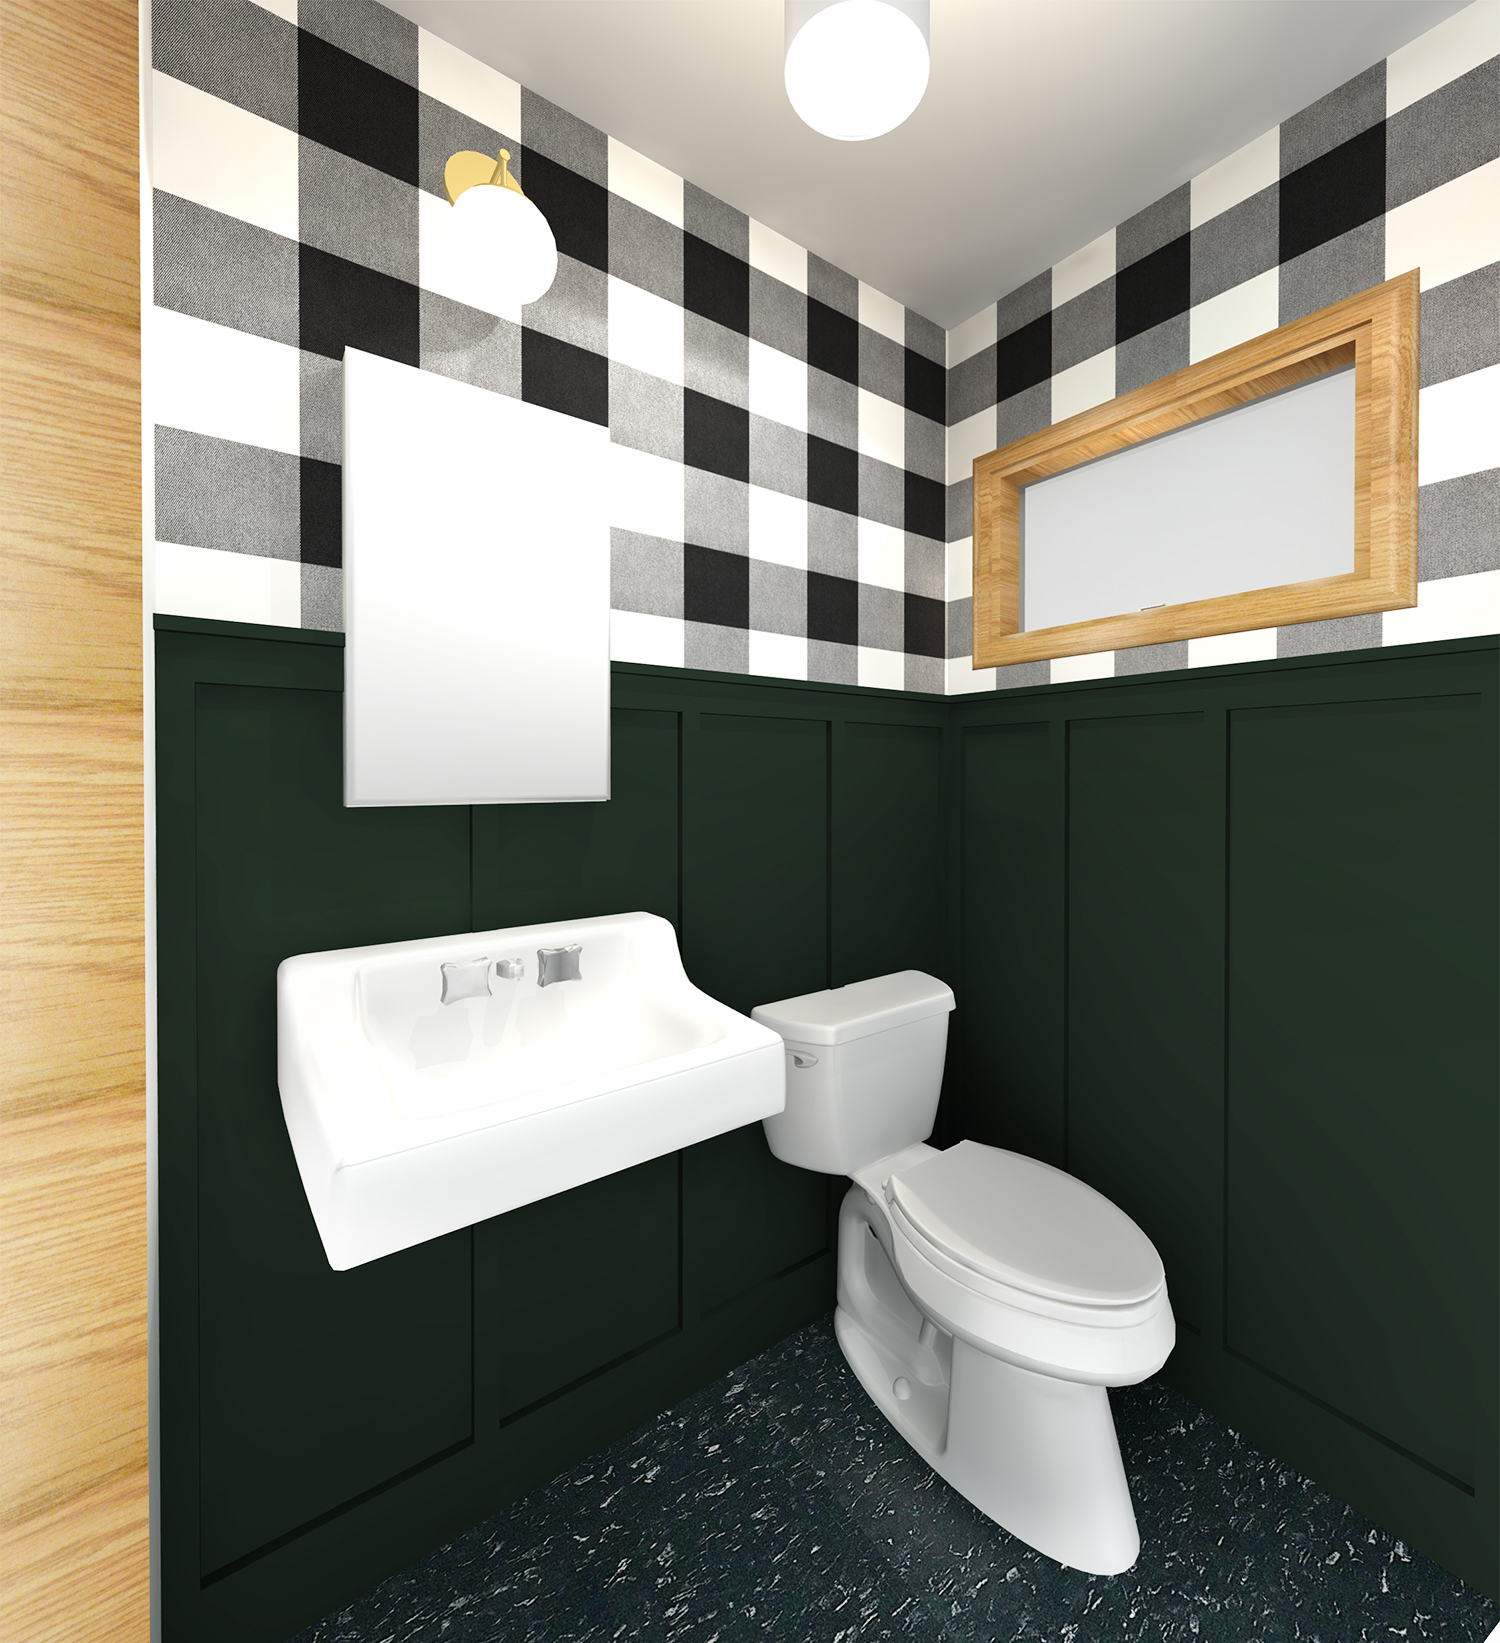
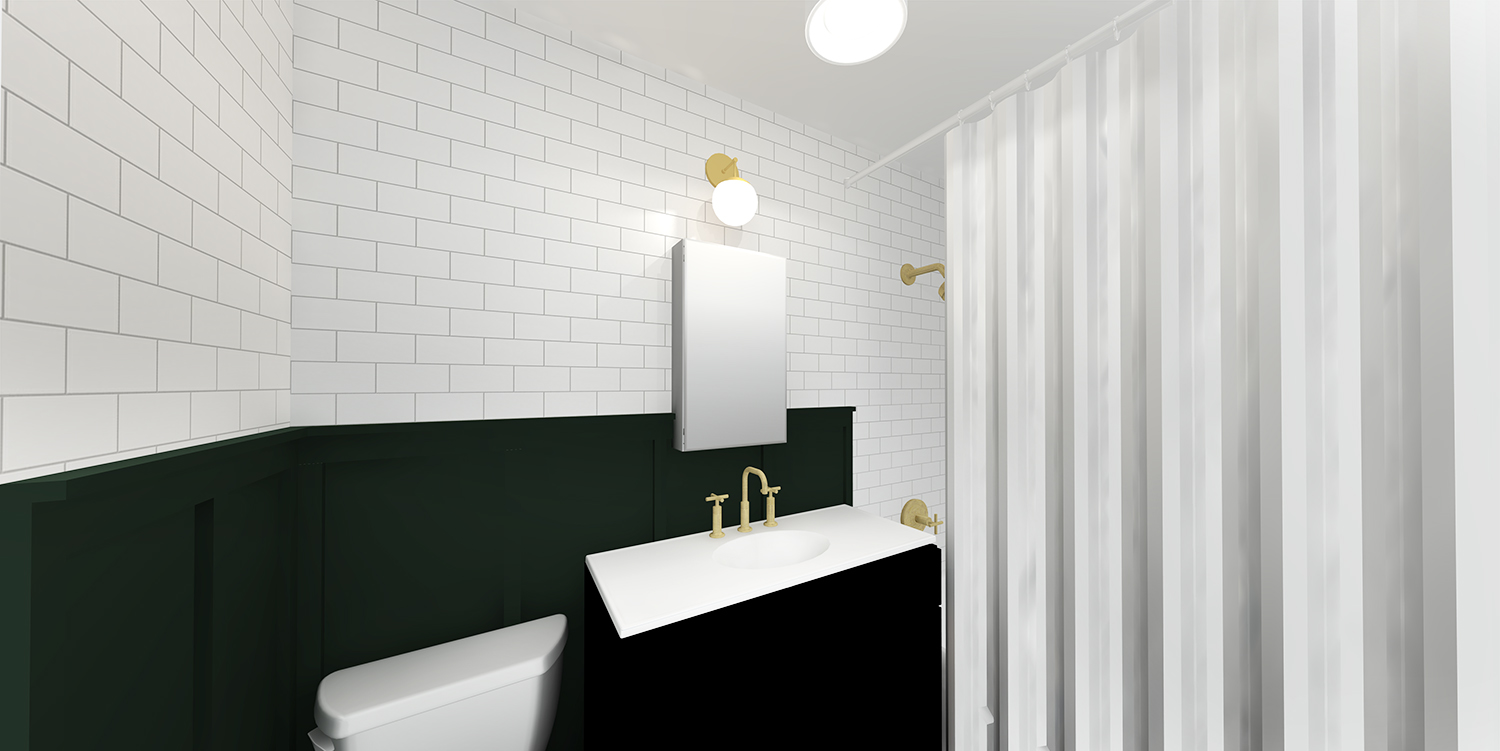
I need to remove the baseboards and then re-tile the floor in the black VCT tile. Once that is complete I’ll replace the toilet (for the time-being we’ll live with the toilet that is there). I am going to paint any exposed plumbing that isn’t already chrome a flat black. The lower half of the walls will receive a board and batten treatment using standard lumber. The B&B will be painted a deep dark green – very much inspired by Ashley’s den/guest bedroom color. The upper half of the walls will be wallpapered in a large buffalo check print. The medicine chest will be updated and a new sconce will be hung over the mirror and a flush mount on the ceiling. Sounds cool right? I am chomping at the bit to get started!
As you can probably tell, my plans for the main floor bathroom are a little more time intensive. There’s a lot more that needs to be done in the way of demo and rebuilding and that’s why I’d like to do it in a few different phases.
What I Like
As you might be able to see, I’ve already finished the flooring in this bathroom. The bathroom sits right behind our kitchen, so when I was tiling the kitchen, I just continued the flooring right into the bathroom. I also like the vanity because it’s done in the same simple style as the kitchen cabinets. The cabinets are made of plywood and are original to the cabin, so I’d like to keep them but spiff them up with a new coat of paint, and vanity top. I also like the tub. The tub is a simple cast iron tub, is original to the cabin, and is perfectly good at being a tub.
What I don’t like
There’s a lot I don’t like about this bathroom. Let’s start with the wallpaper border and moose towel bars. There is also this plastic trim around the entire lower half of the room on the walls. I have no idea why it was installed, or if it’s covering up other issues, but it has to be removed. What I really hate is the faux tile surround in the bathtub area. It’s disgusting, and it still has the essence of past renters on it. Blauuuugha. I hate it and it gives me the heebeejeeeeeeebeeees.
The Plan
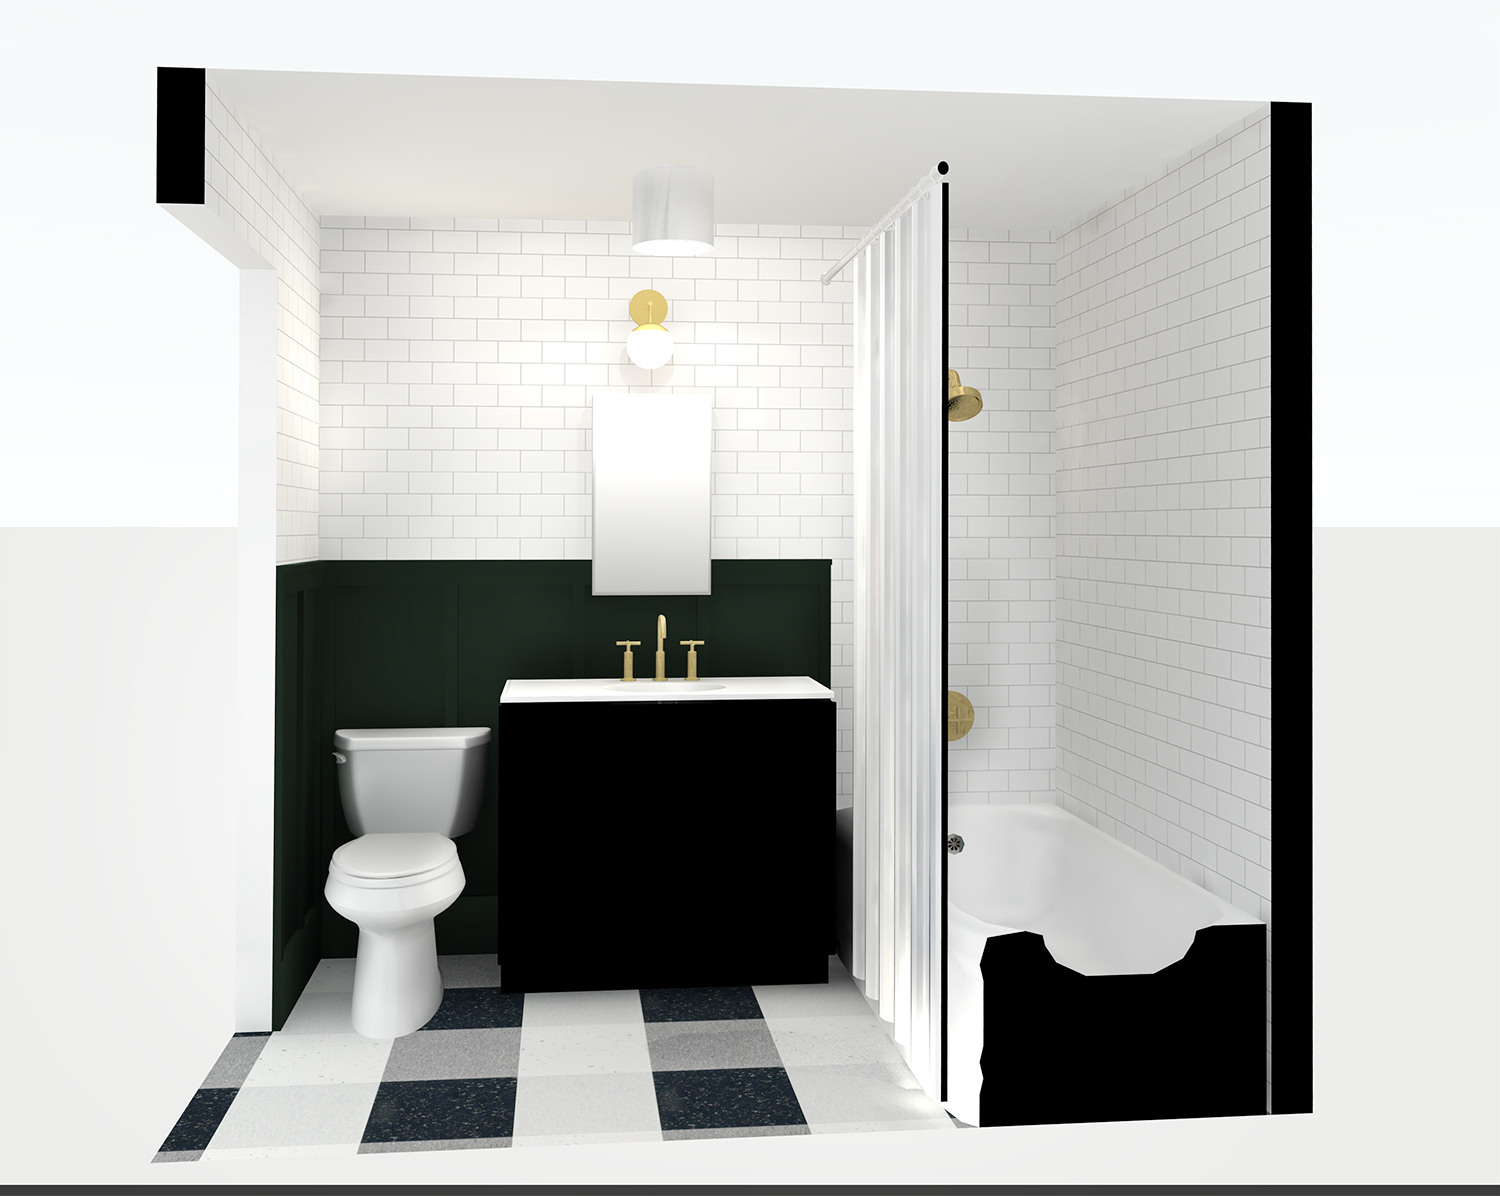
Phase 1. Again, I’ll start with removing the baseboard. Next up, will be tossing the plastic-lined wall in the main part of the bathroom. Just like the upstairs bathroom I will replace the plastic with board and batten and do repairs if necessary. I’ll remove the wallpaper from the upper part of the bathroom and paint the bathroom walls a crisp white. The vanity will be painted black.
Phase 2. I’ll start with subway tile in the upper section of the main part of the bathroom on all three walls. I’ll replace the vanity top with a new vanity and faucet. Replace old light fixtures.
Phase 3. Remove the shower surround, replace drywall with cement board, install new valves for showerhead. Tile the shower surround with subway tile, replace shower head, and bath tub faucet with new fixtures.
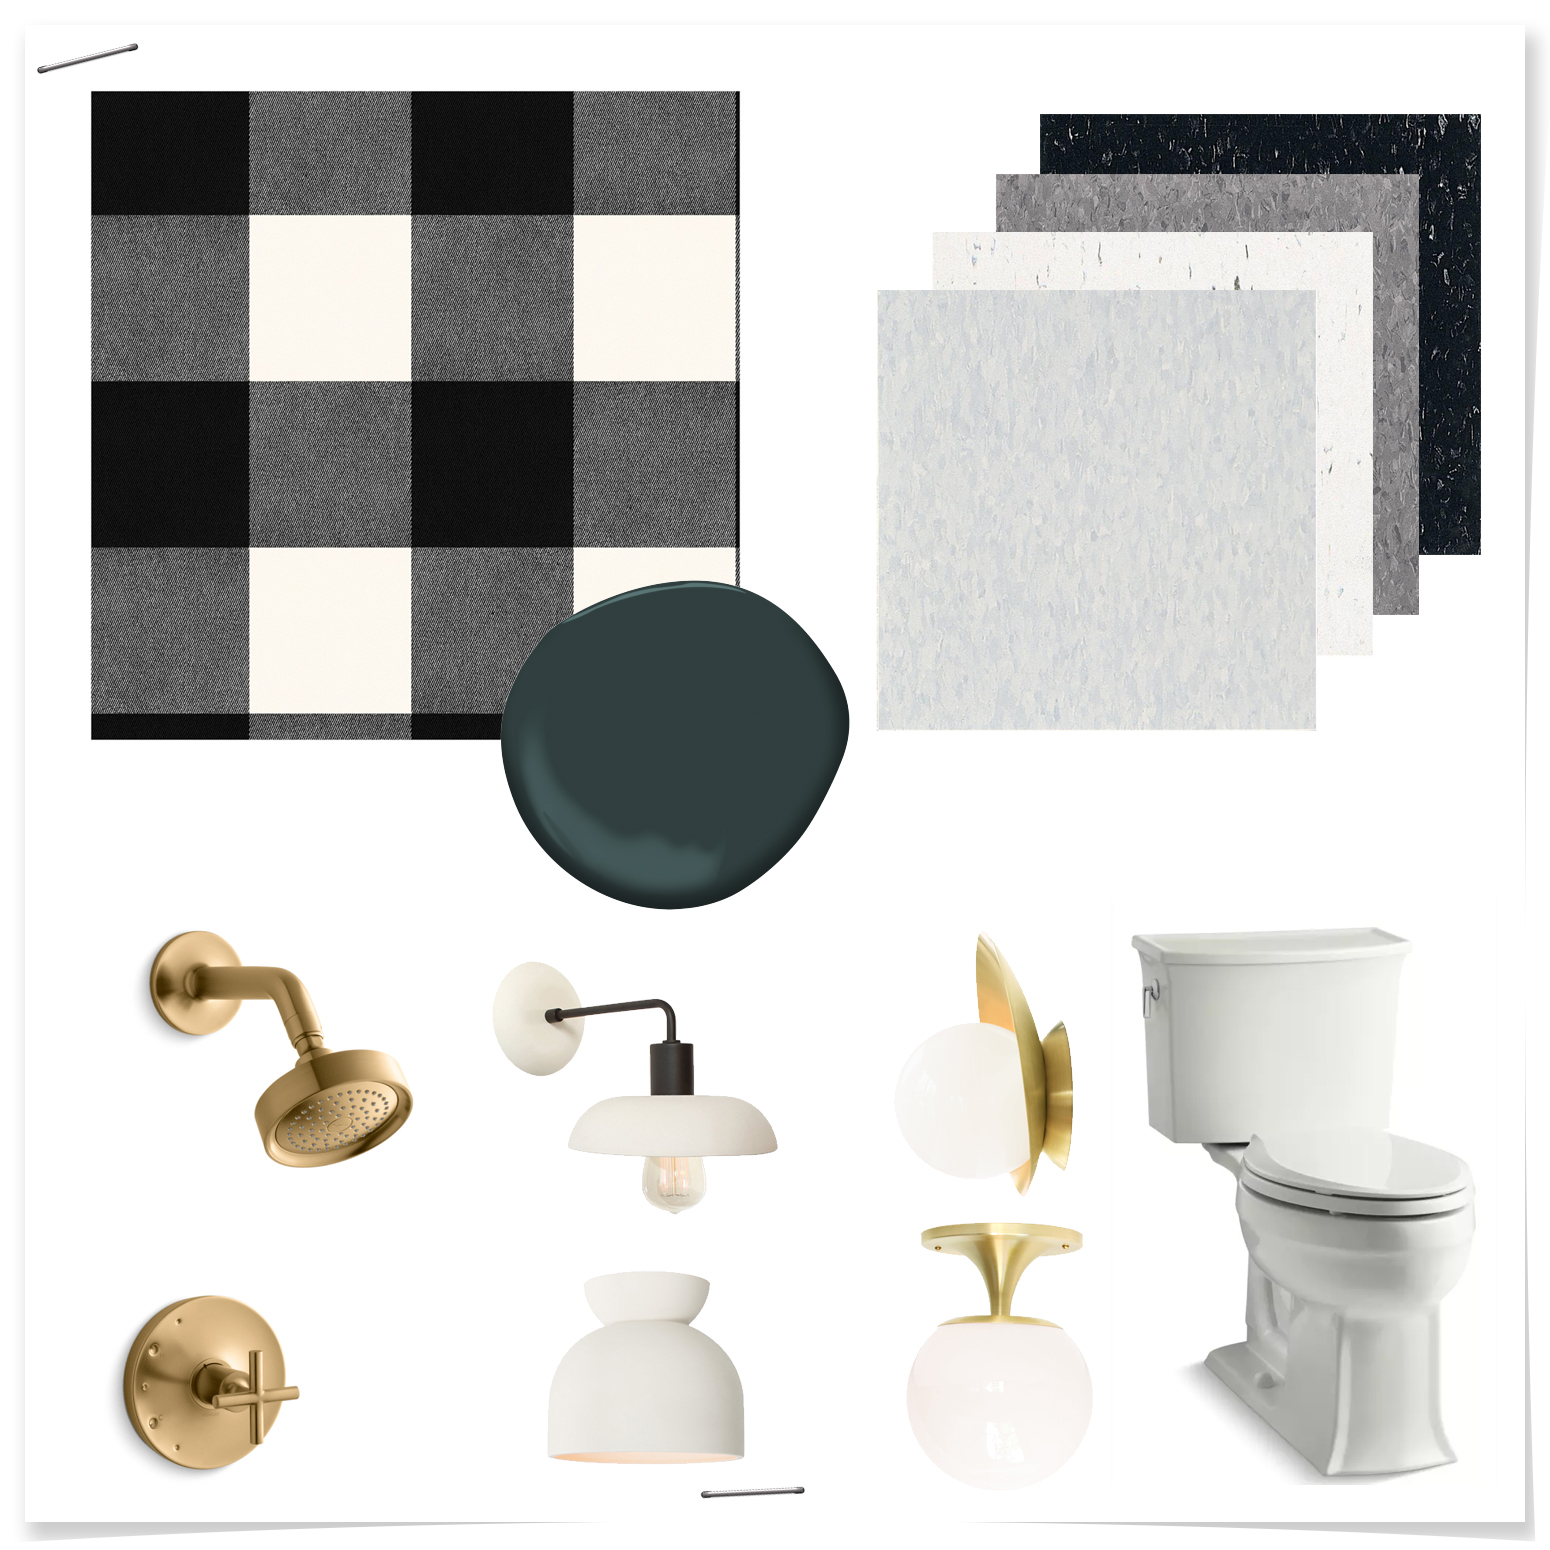
wallpaper | paint | VCT floor tile | brass shower/bath fixture | light fixtures | toilet


Looks awesome. Can’t wait to see it come to life.
Me too! I’m excited to get started. Those bathrooms are an eye sore!
Those medicine cabs are BOTH kinda cool actually. Wonder if you could find replacement light covers on Amazon to update them? They TOTALLY have that awesome cabin vibe going on! Can’t wait to see what you do.
Hi Jeanne! I know, I was wondering the same thing. Both of the cabinets are the same – as you might have noticed the plastic light covers have become very yellowed. It will definetley take some detective work to see what I can do with them. They are cute though :)
I love a plan and seeing the afters, can’t wait! You forgot to add back in the moose towel bar tho ;)
Haha! I’m sure some northwoods cabin person is dying to get their hands on those towel bars – I’ll have to craigslist them to make sure they have a next life.
They are both going to look amazing! Love the sink in the smaller bathroom, good call on keeping it. What paint will you use on the exposed pipes? I’m replacing my super old super brown wall mounted sink and it’s been a total expensive pain to find a matte black ptrap, matte black extension pipe and drain that has a black not silver tailpiece. I don’t think I have it in me to find matte black shutoff valves, so I’m thinking painting them may be the way to go.
Hey Ellen, you are a bad influence. I just googled matte black p-trap, holy crap – so pretty! Yours will look so awesome, mine will just look like I’m doing my best with what I have. I think I’ll use rustoleum universal flat black because it’s a paint and primer in one and I have had good luck with it adhering to brass door hardware – I’ll do some extensive masking work and make sure not to overspray any valves or other important connections. PS. I just googled matte black shut-off valve…
Oooh, for the second bathroom, I would try to switch the toilet and the vanity… since it’s just going to be a shower curtain, you don’t want water constantly splashing on the vanity! I’m horrible with a shower curtain (once got so fed up with the liner that I pushed it to be on the outside of the tub… forgetting that that would mean that the water that collects on the liner will fall outside of the tub as well…) so that would be my main concern. But I love your color choices and everything! Black, white, brass… always feels so nice!
Love your plans! That hunter green color is great.
I’d also be interested to see if you can save those mirror/light combos. They’re fun! Maybe retrofit with an LED and do some magic on the side panels?
I love both of your plans! Add me to the merry wagon of people hoping you can save those cool medicine cab/light combos!
Love your plans. It’s going to look so gooooood, and be 100% squick -free with fresh tile. The Canadian cottager in me, though, wants to see those towel bars get a second chance. Mostly because they made me laugh out loud in conjunction with what appears to be a Bear on the TP holder (and snickering at the thought of a beaver TP holder). Moose all the things!
What program did you use to do the design?