


Hello, Budz! I’m excited about this post, like more excited than I knew I would be. I got the chance to work with an amazing line of products, something that was a real game changer for me.
Do you know about Amy Howard? I have to admit that I didn’t going into this, but have discovered a bit about her and a lot about her line of products, Amy Howard at Home. “I know”, I’m getting tired of myself starting these posts with “I didn’t know about this thing, but now I do, and it’s pretty cool”, but what am I supposed to do when that’s really true, and that really happened. Maybe I need to become a better story teller, or something.
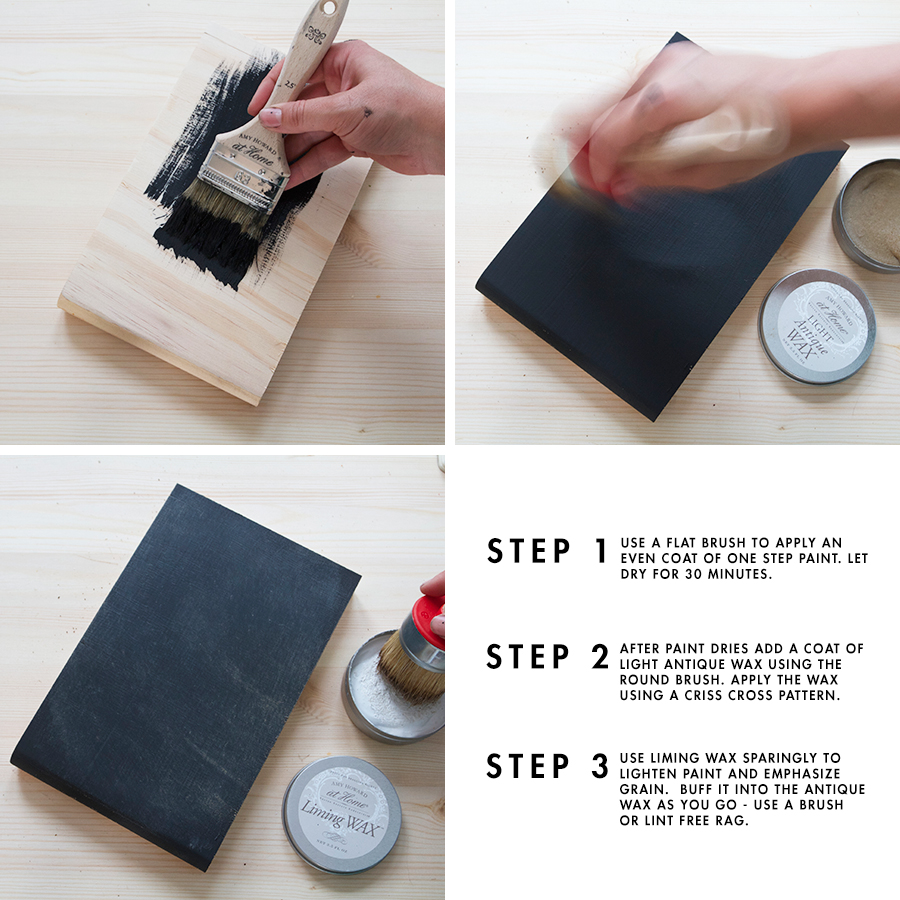
How do you feel about antiquing furniture and faux finishes? If you’re like me you’d say “meh”. However, once I got the Amy Howard at Home paints and waxes in my hands it was a different story. I was excited to use the chalk based One Step paint, and I was even more amped up after the first few strokes. This stuff went on like no paint I had ever used before. Can I say that it almost felt fool proof? It was nice and thick and smooth, it was easy to apply with a flat China Bristle brush (I was definitely doubting how well this would work) and within seconds I began to realize so many things that could be possible with this paint. I’m a real sucker for spray painted finishes when I want that flat matte look, but this One Step paint achieved that rich matte feel way better than my favorite can of spray paint could have. From now on I will have a can of black and white One Step on hand at all times.
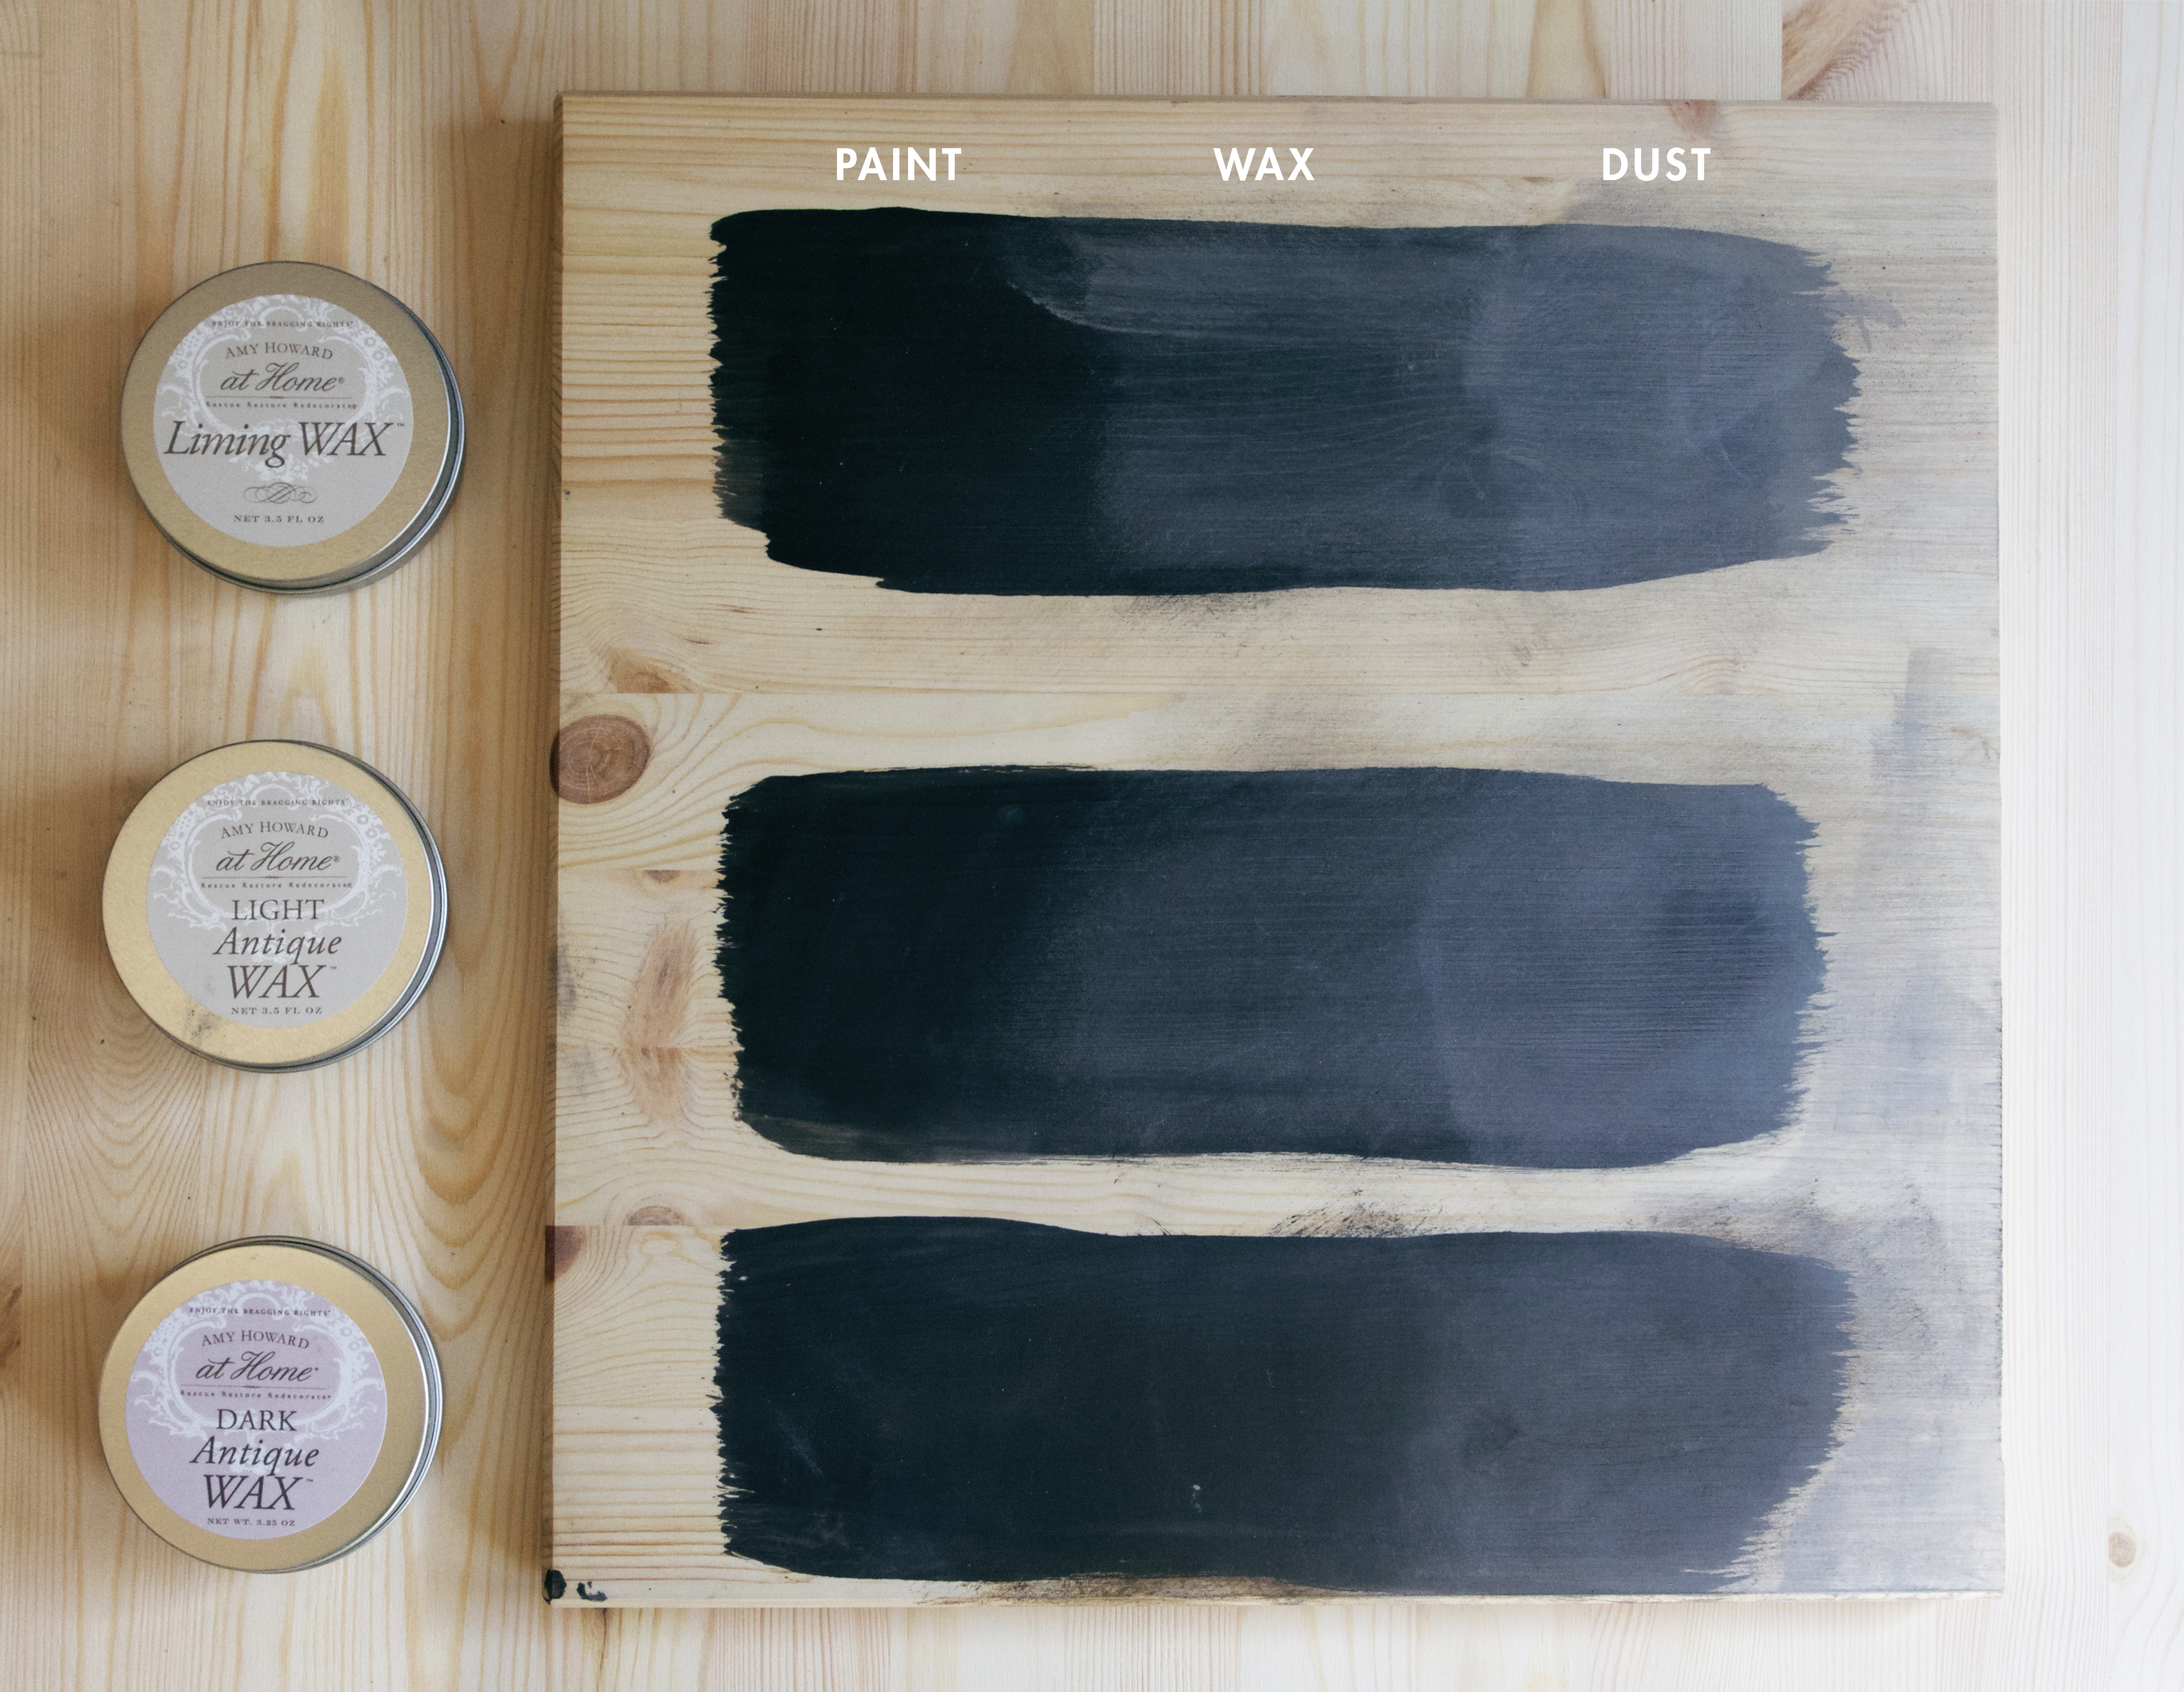
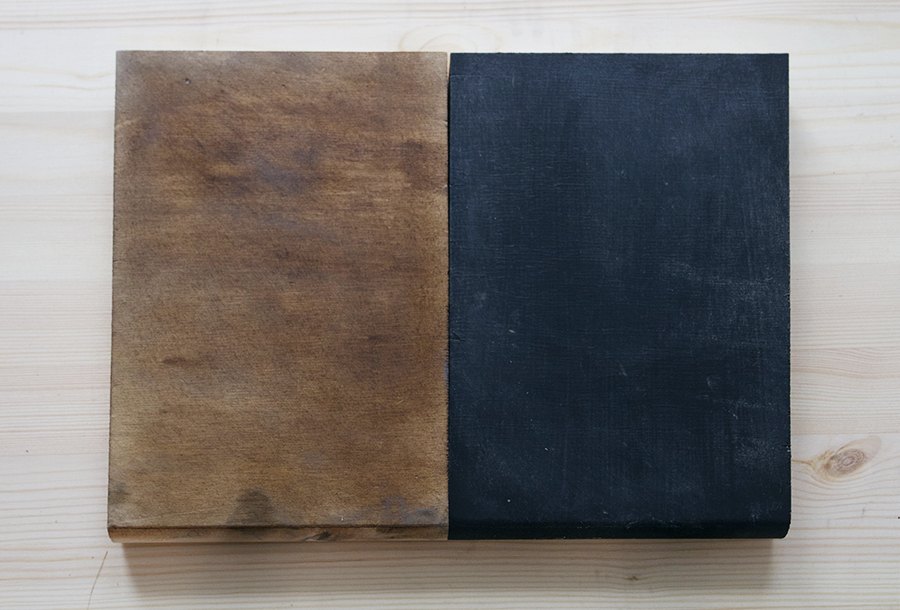
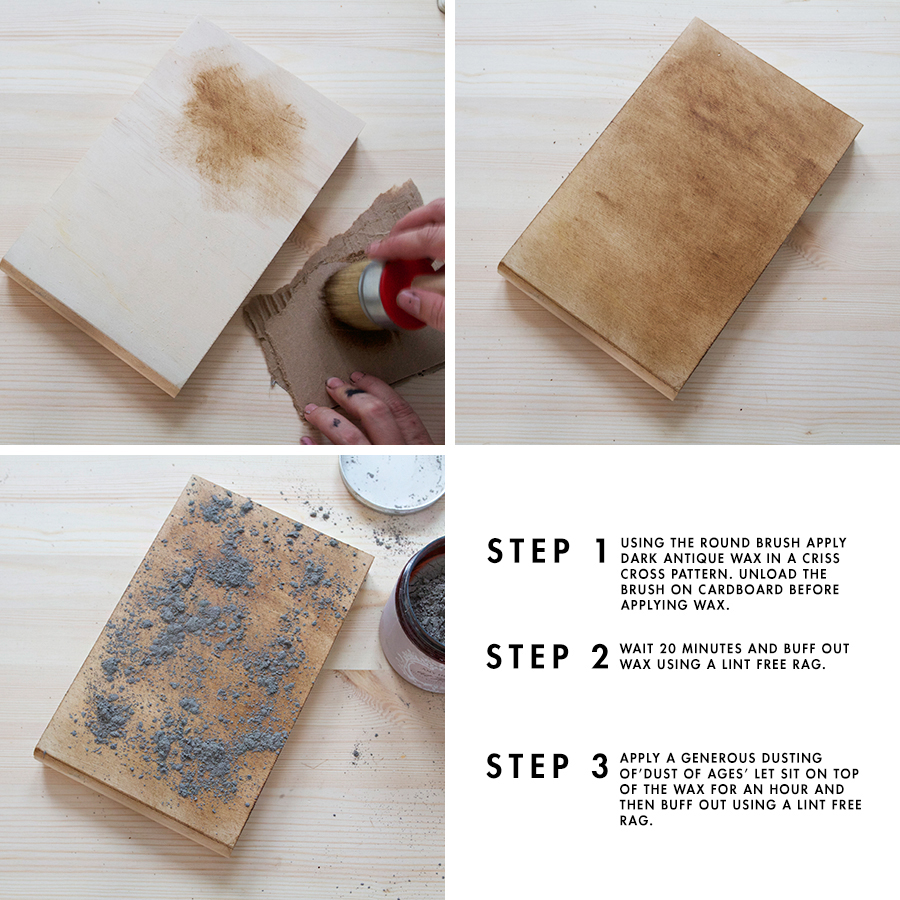
Discovering this paint was just the tip of the iceberg. I started by doing a little experimenting by using swatches of the flat black as the base. I then began to add different waxes and even the ‘Dust of Ages‘ powder to see what other sort of finishes I could achieve. Two things happened during this process, I realized that antique-ish finish and textures that actually pass for old might change the way I felt about “faux” finished furniture. Secondly, I was amazed by how easy, creative and relaxing the whole process was. Like, I haven’t been so into painting something in a really long time, over the years it has become such a chore, but this time it was a real pleasure – don’t laugh at me, it was.
I spent the better part of an afternoon finding just the finishes I desired for our new/old kitchen table. Whut? Hold the phone! I forgot to tell you about the actual project – more proof that I totally blow at trying to convey a story using words and stuff.
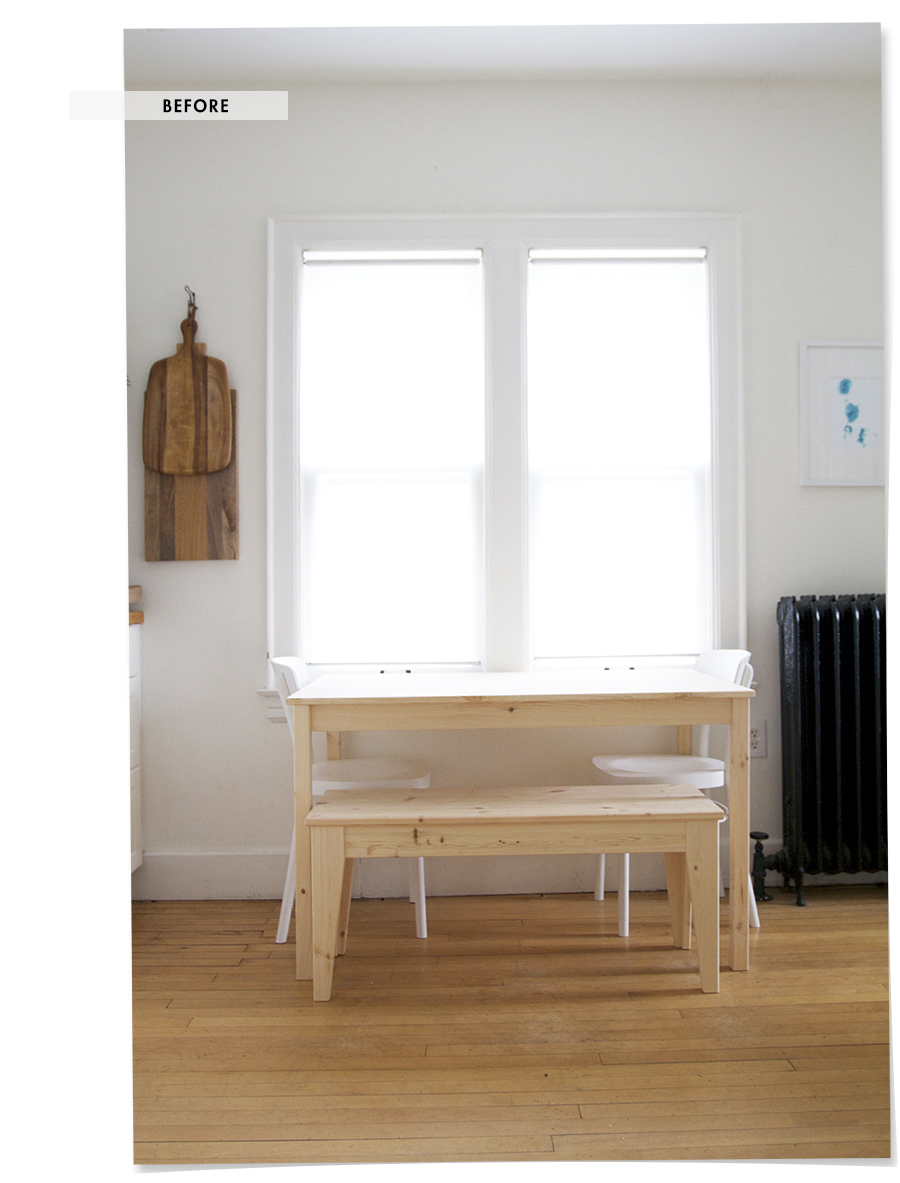
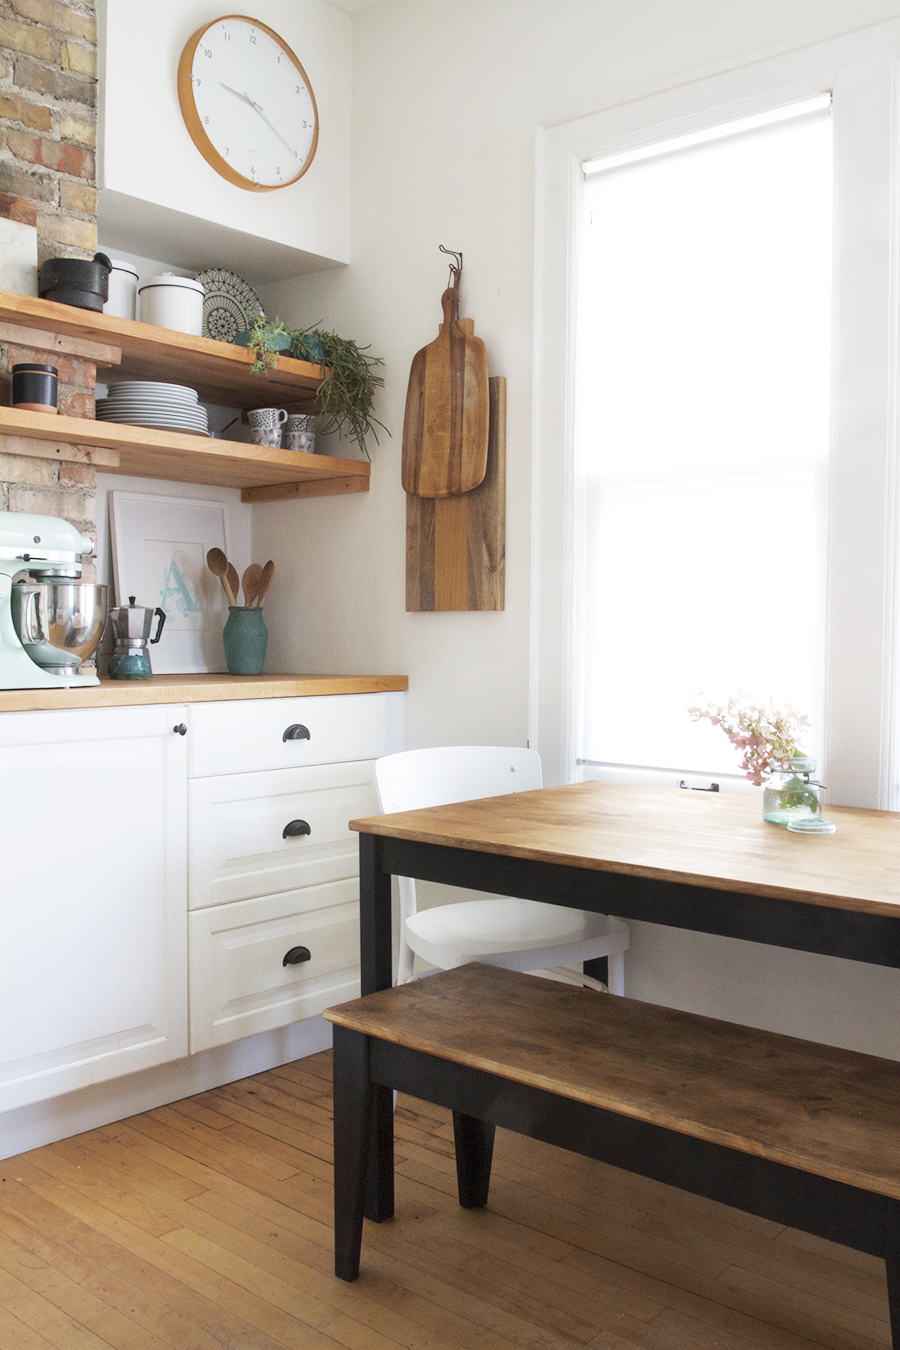
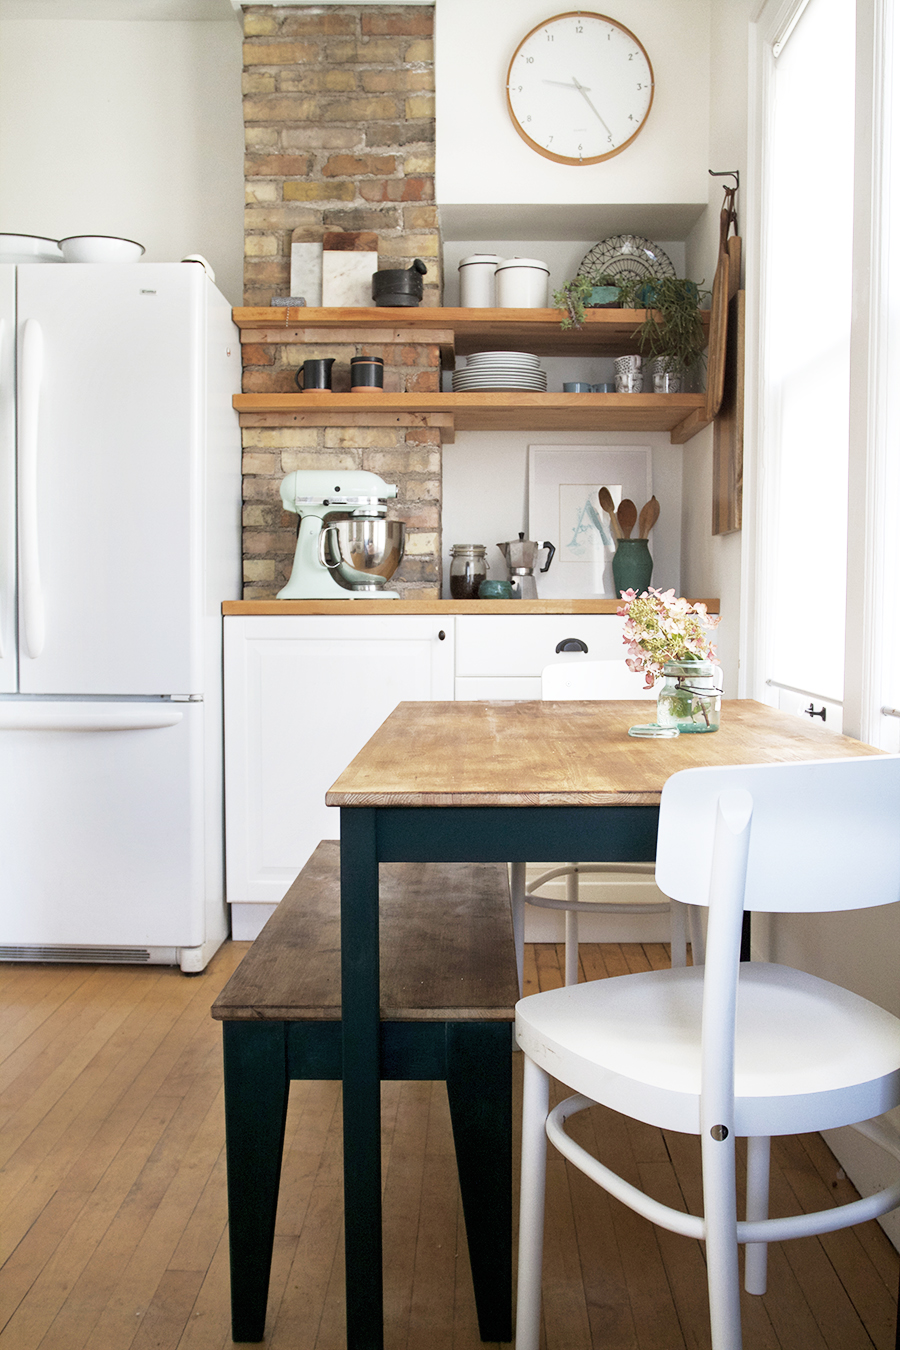
Okay, Let me get you up to speed. I madeover, refinished and updated our mostly original century-old-kitchen two years ago. The whole makeover was a success and I invested a lot of time into refinishing and repairing cabinets for not a whole lot of money. I really wanted a new table for our kitchen but funds were limited so I made the most of the old formica table (with chrome legs) that I had been carting around with me for the last ten years. It was a good stop gap but it just didn’t fit with the style of the kitchen.
Recently, I was able to purchase a new/old Ikea Ingo table off the craigslist. I especially like looking for Ikea stuff on craigslist because there is such an abundance of it, and often the Ikea furniture is only slightly used and the cost is a fraction of what you’d pay at the store. I’ve also found our round Ikea Docksta table, as well as covers for the Karlstad sofa all on the old CL. I had to purchase the bench from Ikea, but it was pretty inexpensive. The bench was much longer than the table. I chopped it down so it would tuck in nicely but would still be large enough to accommodate two boy butts. If you’re interested in how I modified the Nornäs bench – you can find some photos I shot with instructions right here :)
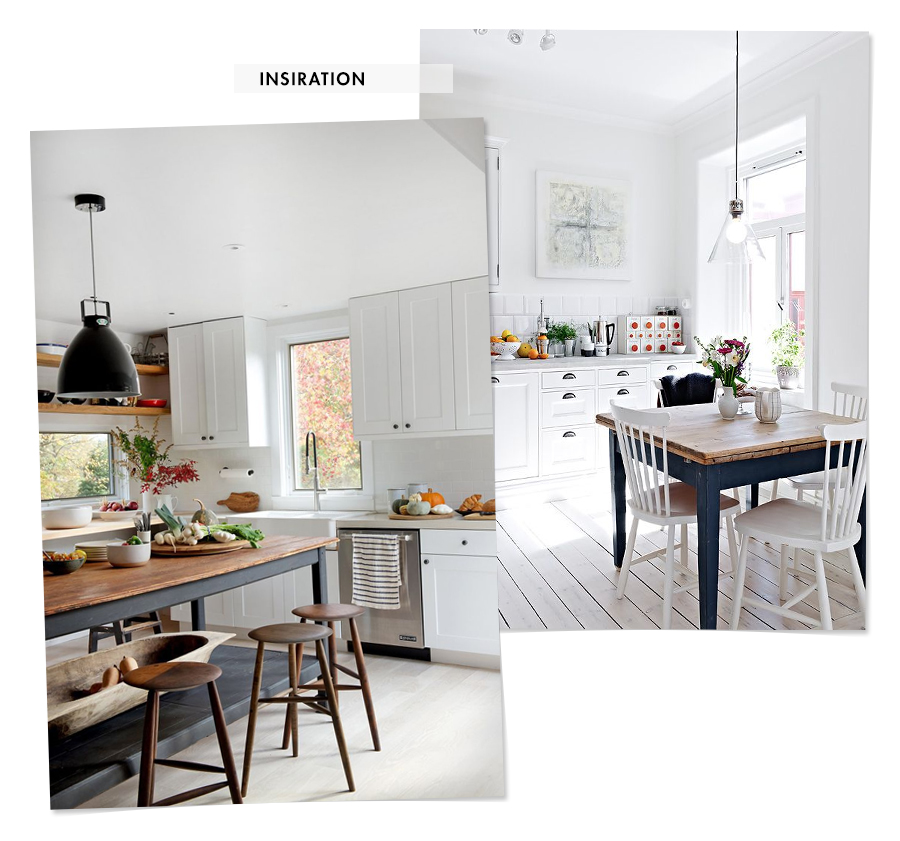
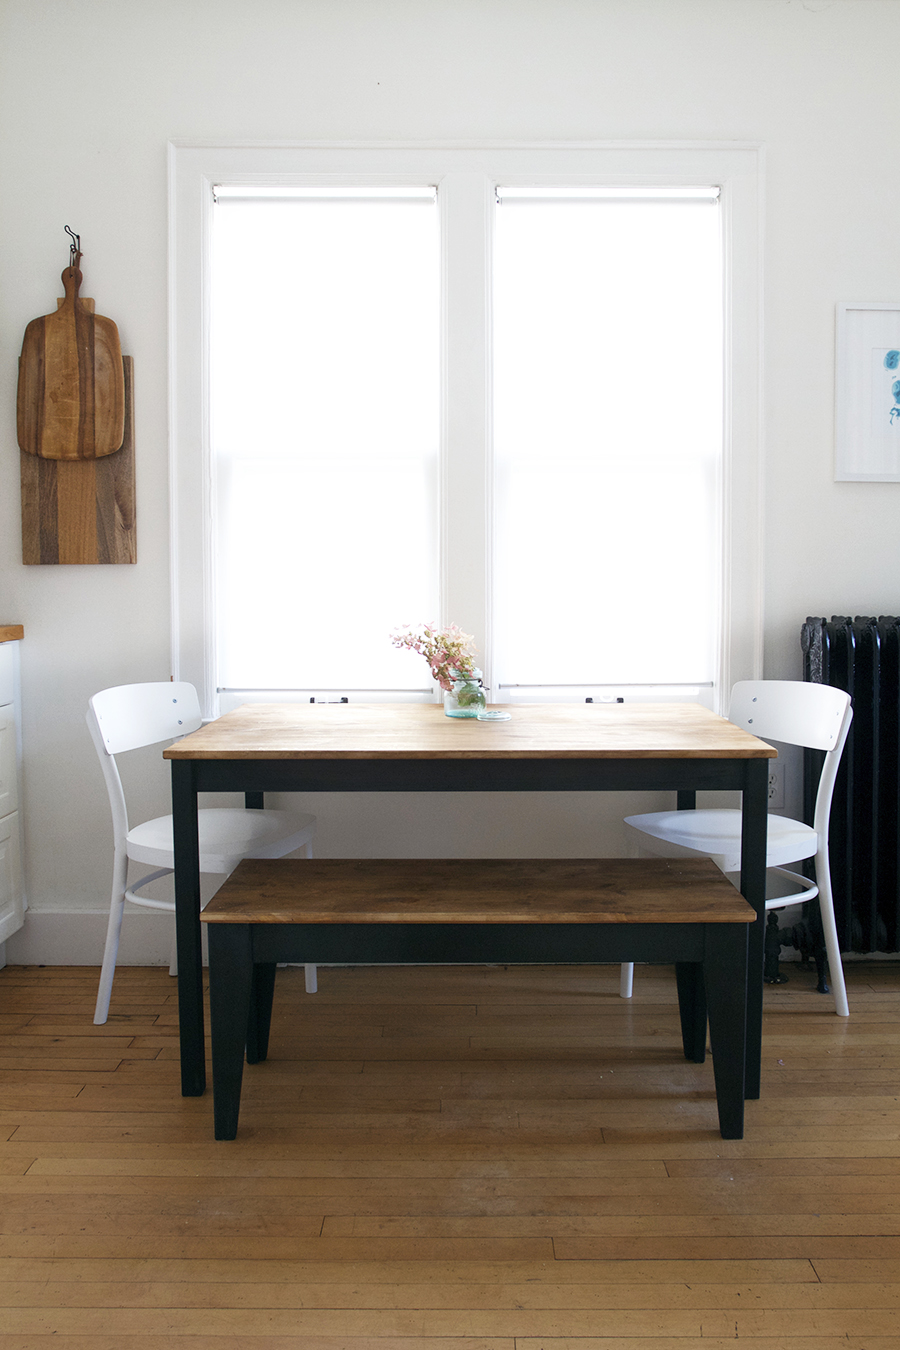
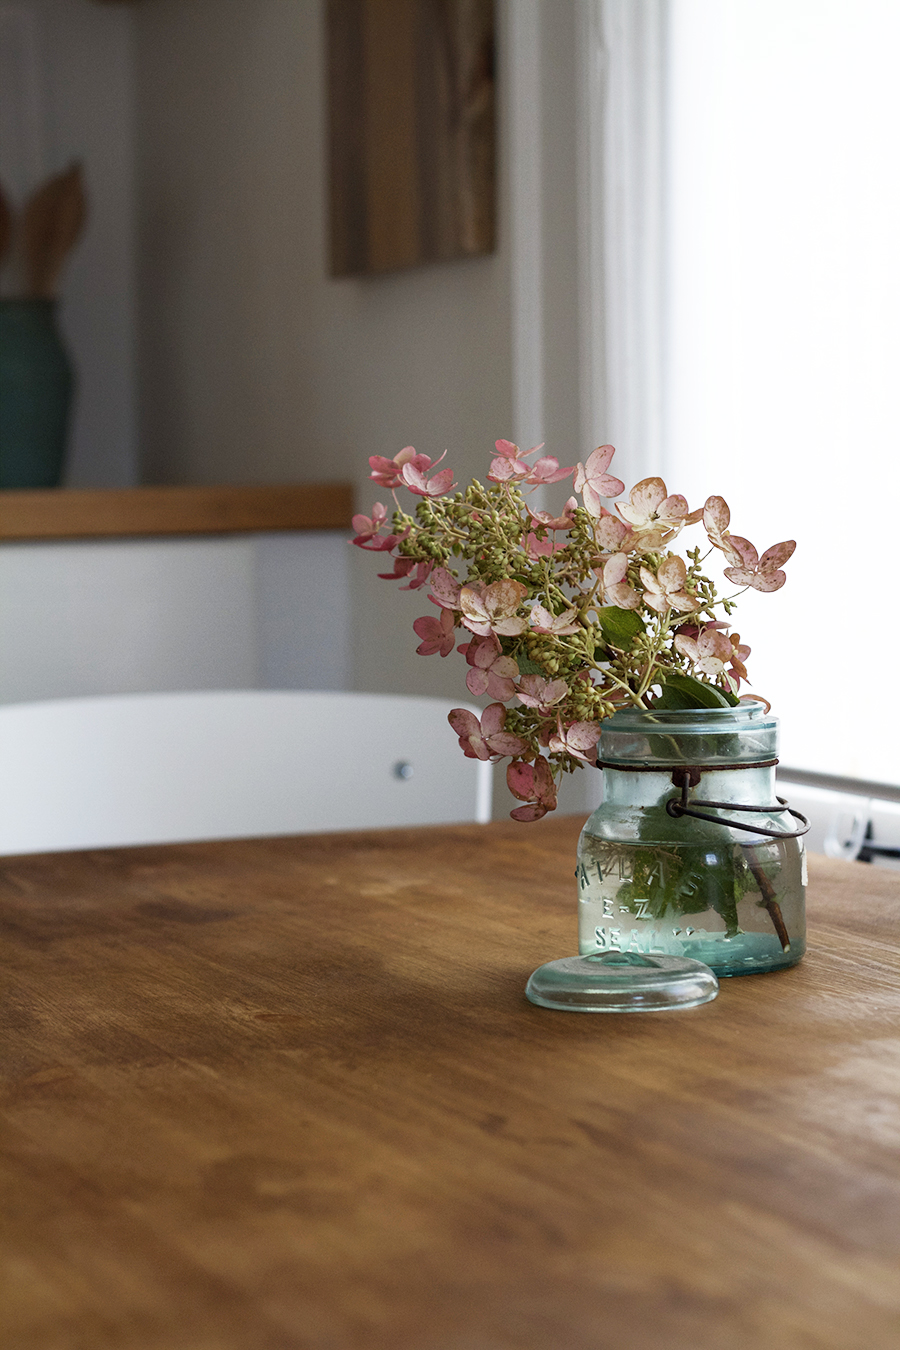
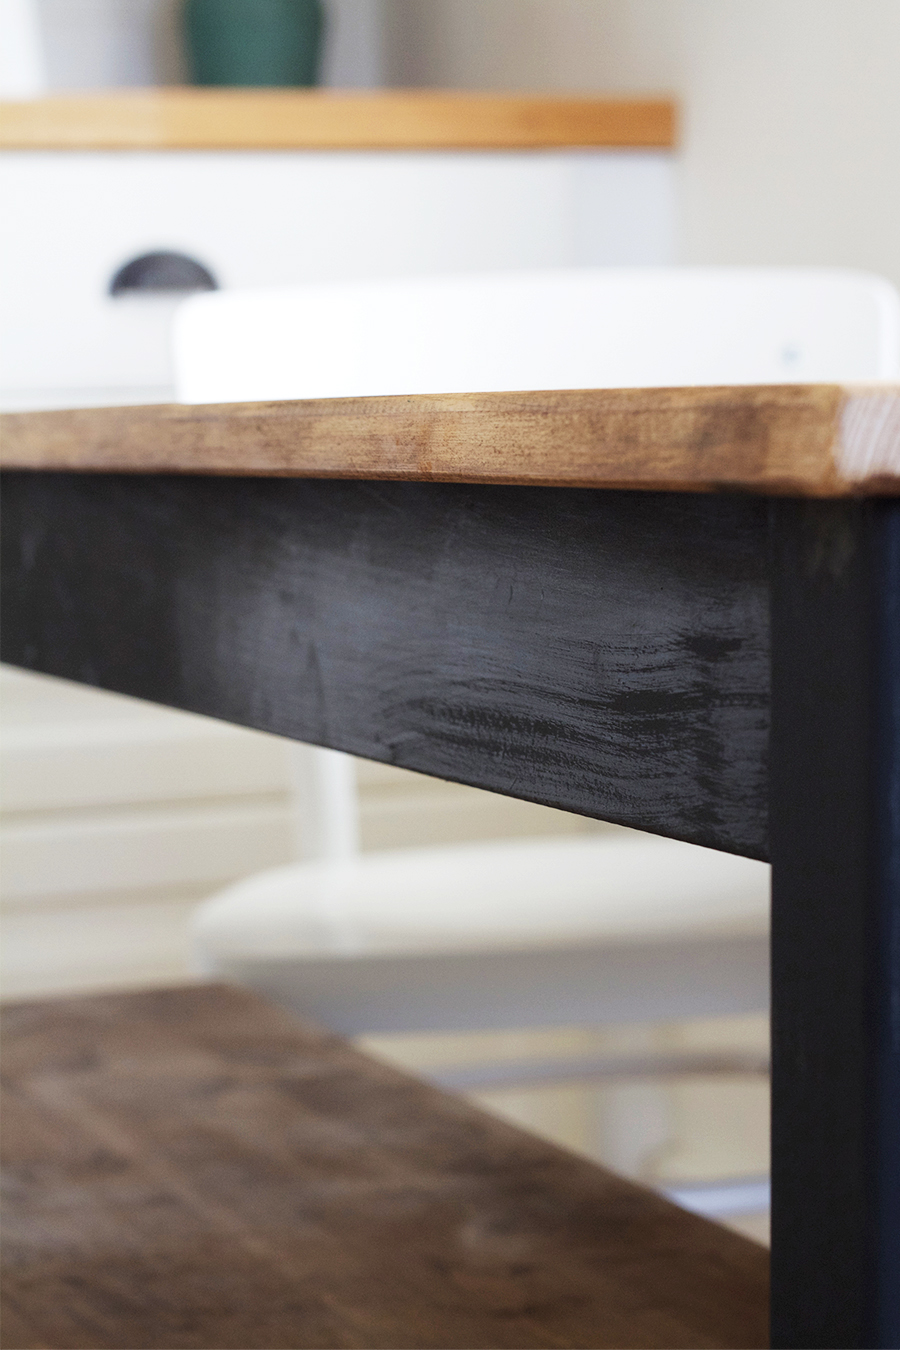
The goal was to take this unfinished pine table and bench and transform it into a modern farmhouse table. Adding texture and depth to the top would give it the look of age, and painting the legs and skirt a flat black would give a nod to modern aesthetic.
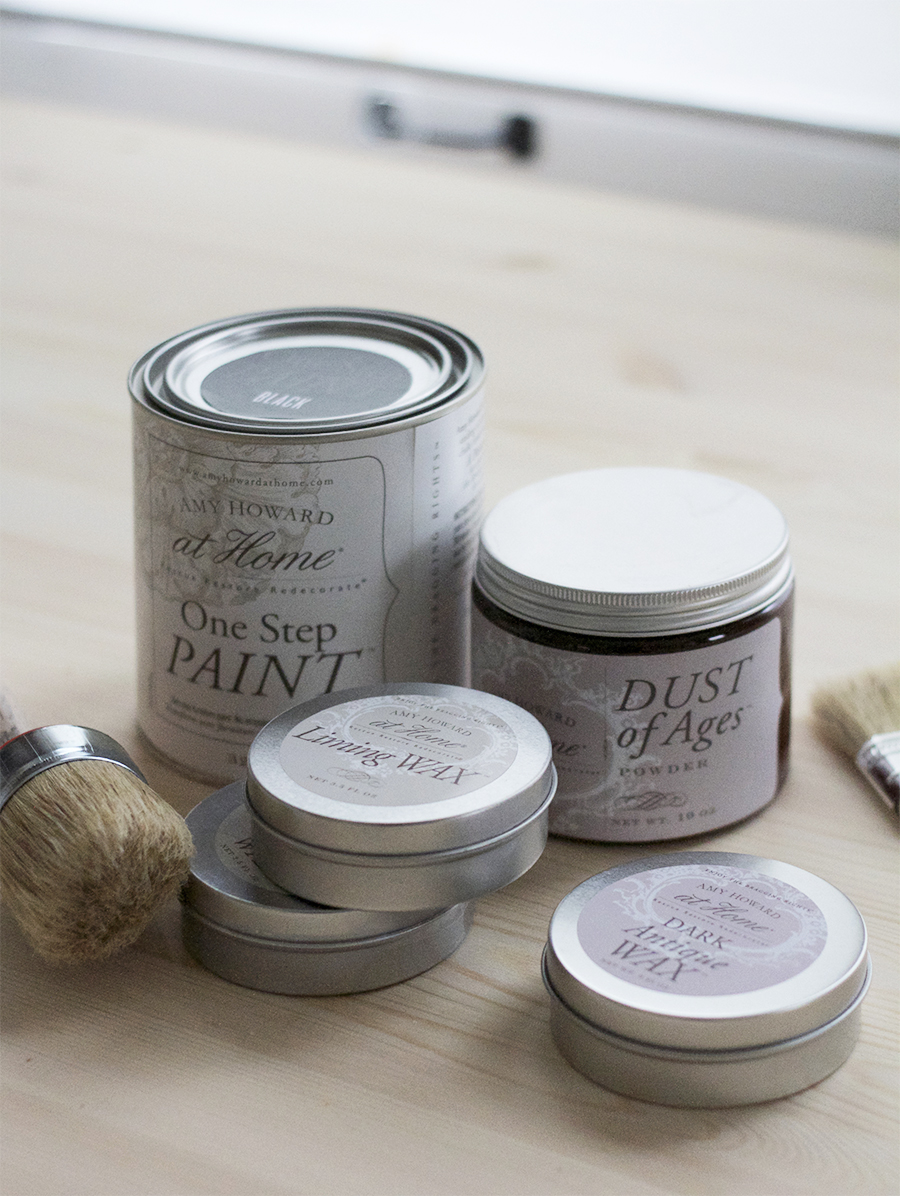
One Step Paint in Black
Liming Wax
Amy Howard Dark Antique Wax
Light Antique Wax
Dust of Ages
Round Brush
2.5″ Flat China Brush
So here is the cool thing, Amy Howard at Home has teamed up with Ace Hardware (aka the best place in the world) and you can now try out the Amy Howard line for yourself next time you stop in at Ace. Please, if you love matte neutrals, then at the very least you’ve gotta check out the black and white paints. I’m not kidding this paint is insane, I can’t image touching another project again with a can of spray paint. It goes on like butta, and there is no redudnant priming or prepping involved. The paint seriously only does good, I swear even drips will look great.
If you’re a little more adventurous the line also features furniture lacquer, antiqued paint, metal and glass effects, and custom brushes (which I totally got into). I wish I knew about this stuff earlier because I would’ve definitely used it on some of my previous furniture makeovers – so many possibilities with this stuff!

So, you’re interested? Good. Amy Howard is hosting a free live online workshop later this week (Thursday, October 22 at 12pm CST) at acehardware.com. Learn how to rescue and restore your old or (new/old) furniture using Amy’s signature One Step Paint™, You can pre-register over here.
The party doesn’t end there, people. In addition, you can also enter Ace’s Hardware’s Rescue. Restore. Redecorate. Amy Howard at Home Sweepstakes for the chance to win a trip for two to Memphis to attend an Amy Howard workshop plus a $500 Ace gift card.
Ace is also giving you the chance to win a $100 buck-a-roos over here on the blog too! Follow the link below (nestled in the pink) to enter – you can enter multiple times if you choose to follow along on with me on instagram or facebook. Good luck!


SO good! love it- and did you change the look of the blog or is it my imagination? i LOVE it!
Hey Cassie! Thanks so much. Yeah, I’m always messing with the blog, I added a background image a month or two ago and have played around with the colors, so you’re not imagining things ;)
LOVE this finish! I have a similar Ikea table – but it has layers of finish on top which is why i’ve avoided refinishing. Did you take some of the finish off first? I can understand the legs taking the black paint but how did the top of it?
Hey Melanie! The finish was raw pine, so I didn’t have to do anything but wipe it down to remove dust. The dark antique wax went on easily and it was really easy to achieve the finish. It’s all very forgiving. I did add a coat of poly to the top of the table and bench after I gave the coat of wax a good chance to dry – I’m anticipating it will see a lot of wear and tear.
Oh man, I love Ace. I saw this paint when I was there a few weeks ago and I was super curious about it. Thanks for the tutorial and the swatches. Now I have some ideas!
If you’re curious you have to give it a try. I really enjoyed the experience of using the product, it was really creative which isn’t usually something I feel when I’m painting much of anything. I think I might try it on the baseboard radiator in our basement next. The radiator is pretty run of the mill and I’d like to see if I can give it some industrial age using the paint and wax finishes.
This turned out really well!
Thanks so much, Marlys!
This turned out so well! And you only used the wax for the parts of the table you left unpainted? I thought for sure you’d stained it! (Well, and the coat of poly you mentioned in the comment above, but still.) I’ve never tried any kind of paint that wasn’t mass-marketed, though I’ve always been curious about milk paint and chalk paint and so forth. I like that the finish here isn’t exactly uniform – it helps it look a little more “lived in”, which I love. But maybe that’s the wax and not the paint itself? I would love to see more projects using this stuff if/when you do them, no matter how small!
Thank you! Sorry if it wasn’t clear where I used wax and paint. The legs and skirt are painted black, and then I added a layer of light colored wax, followed up with the liming wax which accentuates the brush strokes and gives it that “lived in” look. I think the waxes give the paint a lot of depth and dimension, which looks completely amazing with the matte black base. The table top was just a layer of dark wax followed up with a light dusting (and buffing) of dust of ages. The photos were all taken before I poly’d the top, so what you see is the actual look of the table with wax on it.
I’ll for sure let you guys know the next time I get carried away with the Amy Howard paints and waxes. The applications seem endless!
You’re a genius! I have been in search of a dining table bench and the Nornas was at the top of the list, but I had to cross it off after i discovered it was too wide for our table. Totally going to chop it down per your instructions. Thank you!!
Yeah! Do it. It wasn’t very hard and just required a little math (subtraction) and a bit of common sense. Use some sort of straight edge and a square to line up the “little drill holes” (so technical), and then use those new “little drill holes as a guide to place the hardware bracket. I used a mouse sander to soften the edges after I had assembled it all. I cut my bench top down to 40″ (originally 54″ and a fraction) and trimmed off 14” from the top and long skirt pieces FYI.
This looks great! I’ve been thinking about painting my kitchen cabinets black with a chalk paint and then finishing with a wax. I figured it would be easy to do the inevitable touchups that come with having kids and pets and husbands. ;) Do you think this paint would be okay for that kind of application?
I’ve seen other people (on the internet) use the Amy Howard brand for this exact application. Is there a way you could test it out on one cabinet first? It seems pretty durable and touch ups seem like they would be super easy. I’d just finish it with either a wax, or a coat of poly, or something. It might not be a bad idea to e-mail the folks at Amy Howard at Home to see what they recommend.
I repainted my cabinets with regular paint and just had to touch up a few corners this fall (two years deep). I think touch ups are probably inevitable no matter what the paint.
Following instagram as https://instagram.com/lisalubrown/
Thanks for the chance :)
Oh I love how that turned out! So pretty! I have an old wooden corner hutch that I would love to do that too!
Love how it looks! I follow on instagram as pokergrl8
I have just loved this tutorial so much that I bought and applied the same product/treatment of your tabletop to my bare wood table. It looks NOTHING like this. It just mostly looks gray stained pine after the Dust of Ages. I have no idea what I did differently, but I’m going to bed with a home full of dust and crumbled dreams. I’ll watch more and more videos tomorrow and hopefully be able to salvage it. I love the concept of the product – I just can’t seem to get it to work properly!
Kari! Nuts! Sorry to hear that. I have a few questions for you: Did you like the finish of just the dark wax prior to the Dust of Ages? If so, you can always sand down the finish and just do the wax. When applying the wax did you offload onto cardboard first, as to not apply too much wax – this could be why so much dust of ages adhered to the surface? Did you buff out the wax after 20 minutes – before applying dust of ages? Did you thoroughly buff the dust of ages into the wax?
For me, there was a lot of wiggle room when working with the Amy Howard products, so I am very confident that you too can achieve the look you’re after. I would try and do a little more buffing today, maybe even try reapplying another layer of the wax, and see what you think. It’s not a lost cause so don’t worry too much.
One other suggestion is to take a scrap piece of wood like I did, and play around with a few of the effects you can get, maybe doing that will take a bit of the guess work out of how you proceed from here.
I’m here to help, so let me know what other suggestions I can offer.
Also, that dust of ages is messy stuff, I had my vacuum on hand to clean up the floors and other surfaces while I worked.
Thank you for your suggestions! I’m going to sand it down today and try the wax again. I followed all of the buffing and curing instruction really well, but the wax was never dark enough for my taste in the first place. I’m going to work hard on getting it darker… did you find that warming the wax helped it to adhere to your brush? Part of my problem was the even the Dark Antique Wax was almost translucent on my pine. How did you get yours so dark?
Kari – Are you using the dark antique wax, there are a few different color options available, so I just want to make sure. It looks like this:
Thanks again for your responses. That is the stuff I’m using! :)
Update: all is better now! Wow, what amazing stuff. My table is gorgeous and I couldn’t be happier. :) I think my issue before what that the wax was too cold to load onto my brush properly. After a few days of softening, it was like butter to use. I ended up leaving the Dust of Ages off the second time around, but that’s just because things look SO good after the wax.
Thanks again for your advice!
Yeah! I was just going to get back to you the other day when I saw this comment come through, so glad it worked for you, I was really trying to figure out where the discrepancy could have been. Do you love it? I highly recommend two coats of satin poly if you haven’t already done so.
I hadn’t realized the wax was compatible with poly. I will do that!
Loans designed for Bad credit No Broker agents are furthermore there to category these headache out.
Find playing what classification of borrowing you phone. But alternatives are all alternatives? http://www.wikipedia.org
Hi there, what stain colour did you use on the top of the table and bench? I love the look!
Just wanted to say thank you for making the swatches of the black paint with the different waxes – I’m going to paint a bed this weekend and you saved me a LOT of trial and error!