


It’s like clockwork, every spring the e-mails about my fence start to trickle in. I never knew when we first built the fence that it would attract so much attention, but it has! It has been very well documented but the info is scattered around the blog and I thought I’d put it together in one tidy post for ya so you didn’t have to look any harder.
The question I get the most is about the construction. It was designed to NOT have an ugly side. In Minneapolis and many other cities if you decide to build a fence it is required that the ugly side face inward and the pretty side face out to the public. That’s a sad situation if you invest in a fence, plan on spending time in your backyard or garden, and then have to enjoy the junky side. Our fence is sandwiched in between two sets of vertical boards so there is NO UGLY SIDE! In the short video below, I call the inside side the “frame” and the outside of the fence the “backing” but ultimately both look nearly identical front to back. The slats get sandwiched and toe-nailed in between the “frame” and the “backing” boards.
This post isn’t about how to build and install fencing in your backyard, it’s just about how to construct a fence that looks like mine.


Subscribe to my youtube Channel! Music by LAZERBEAK
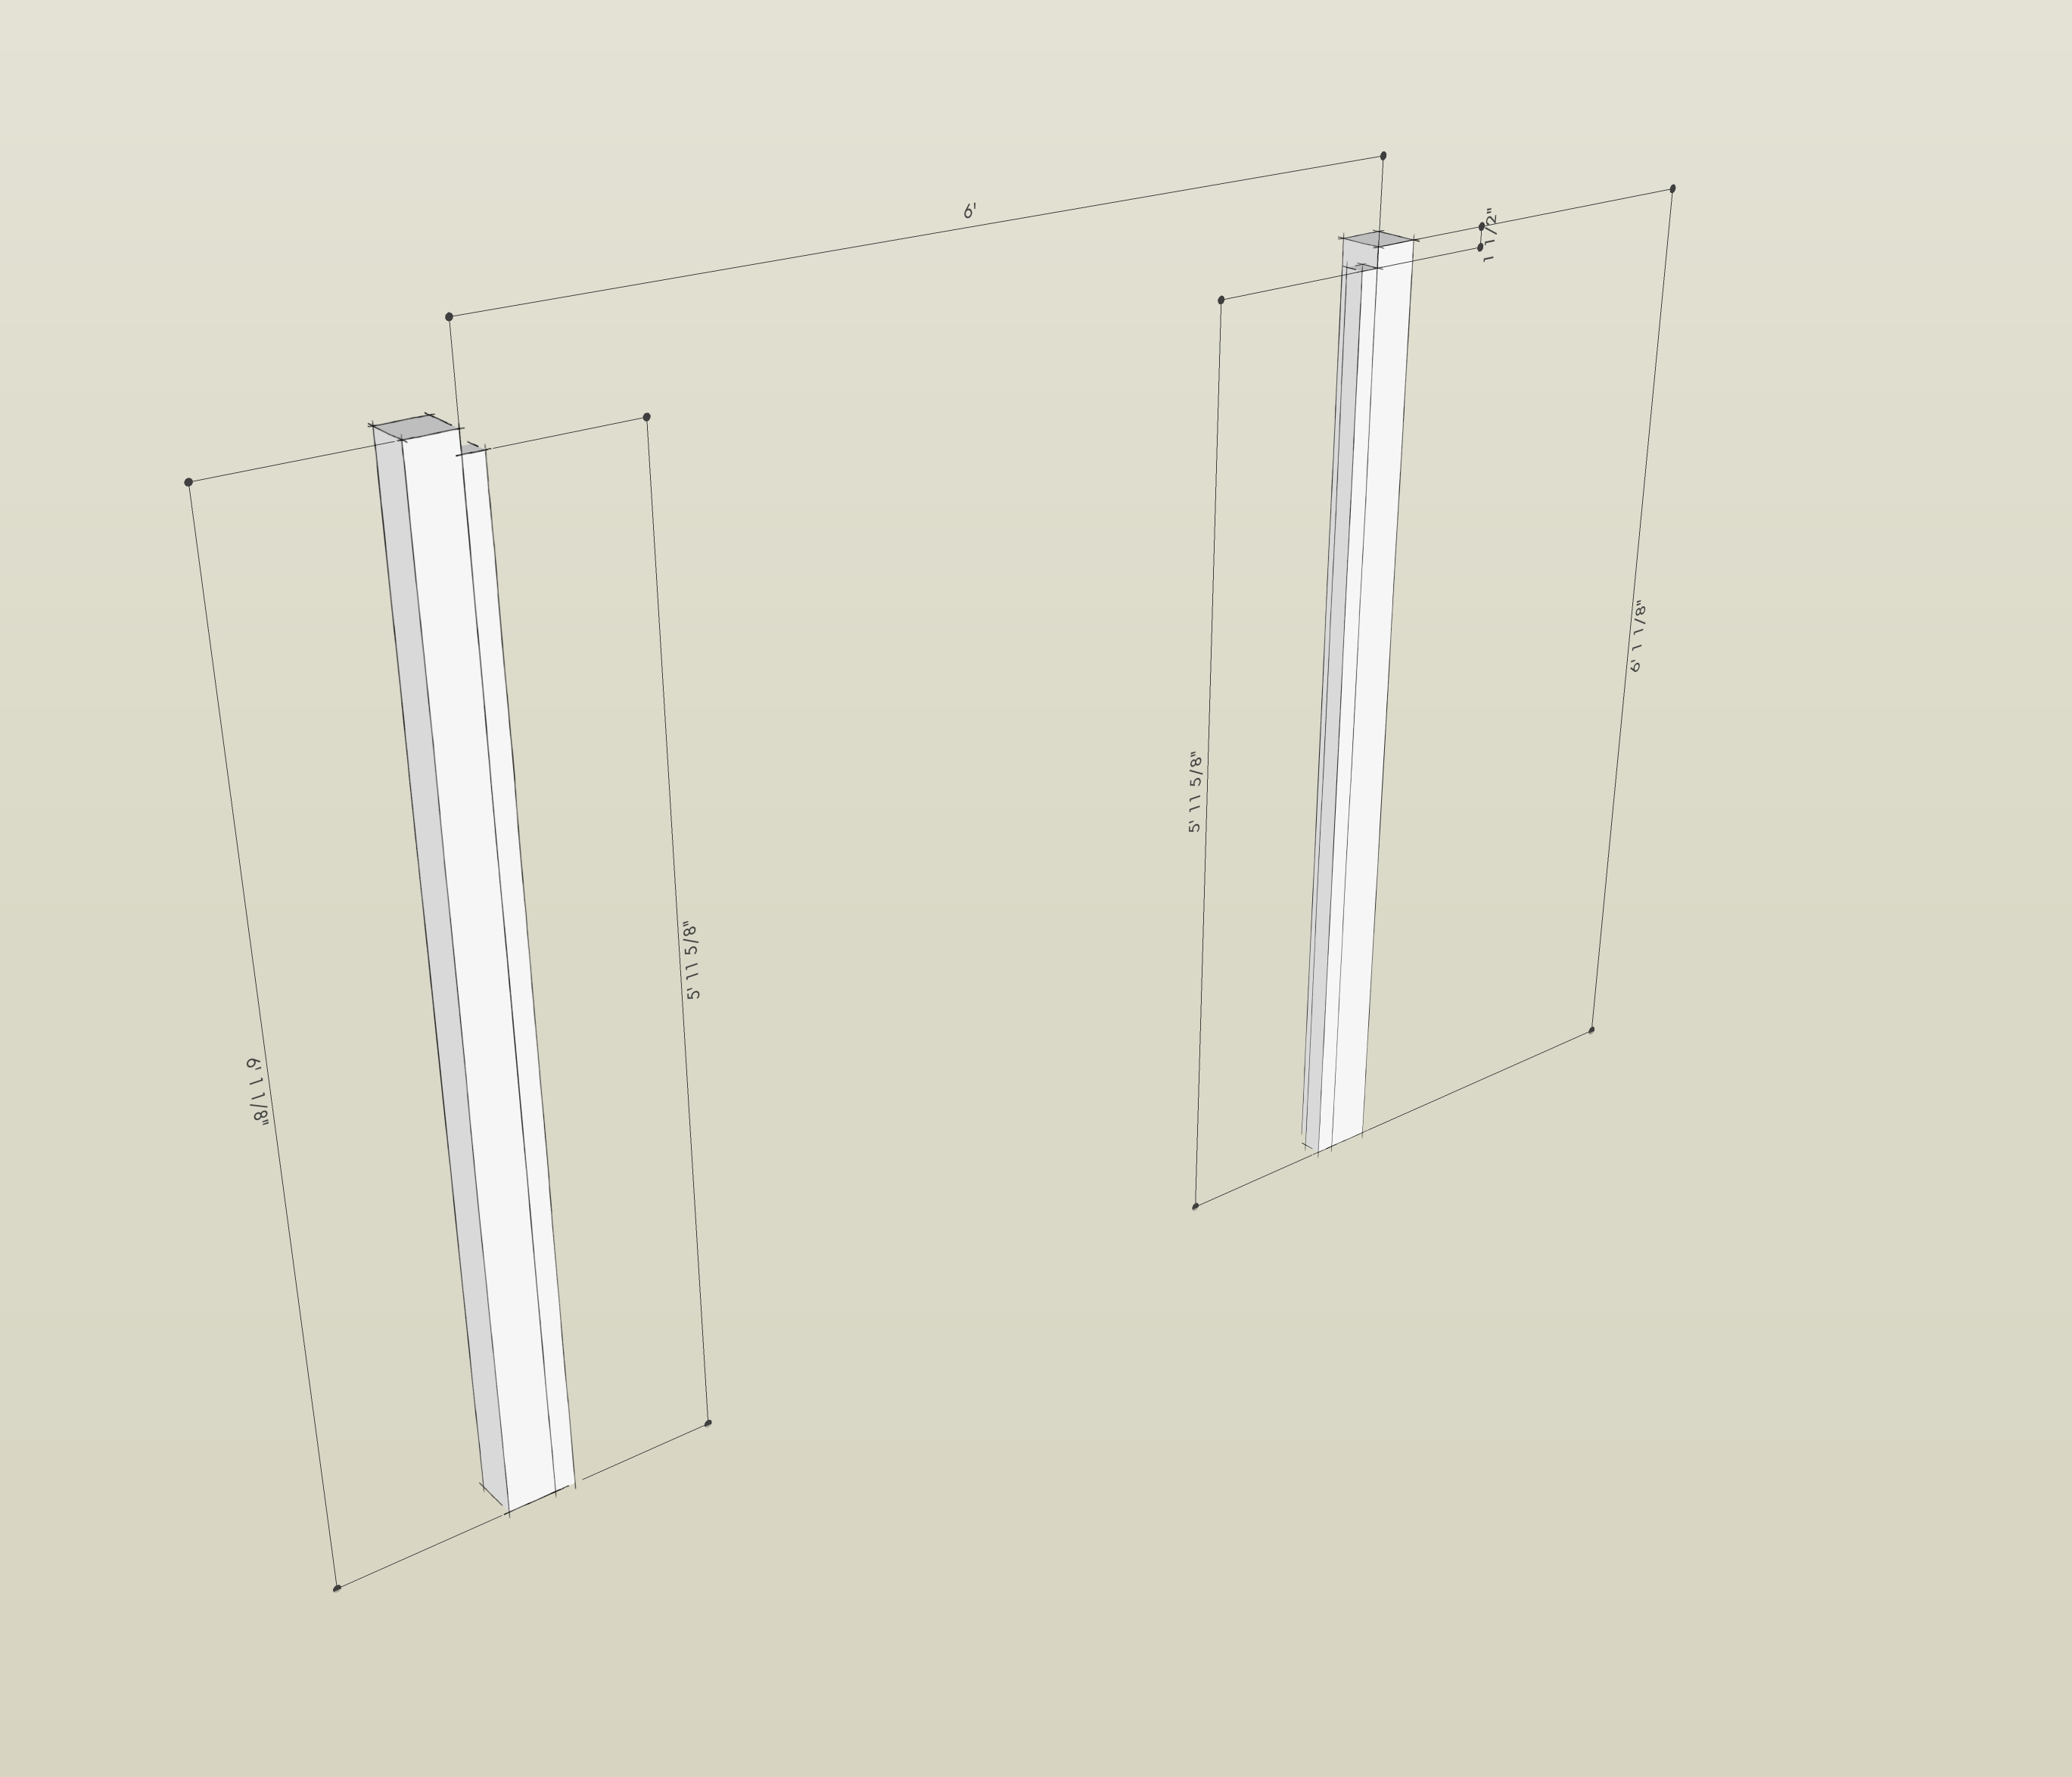
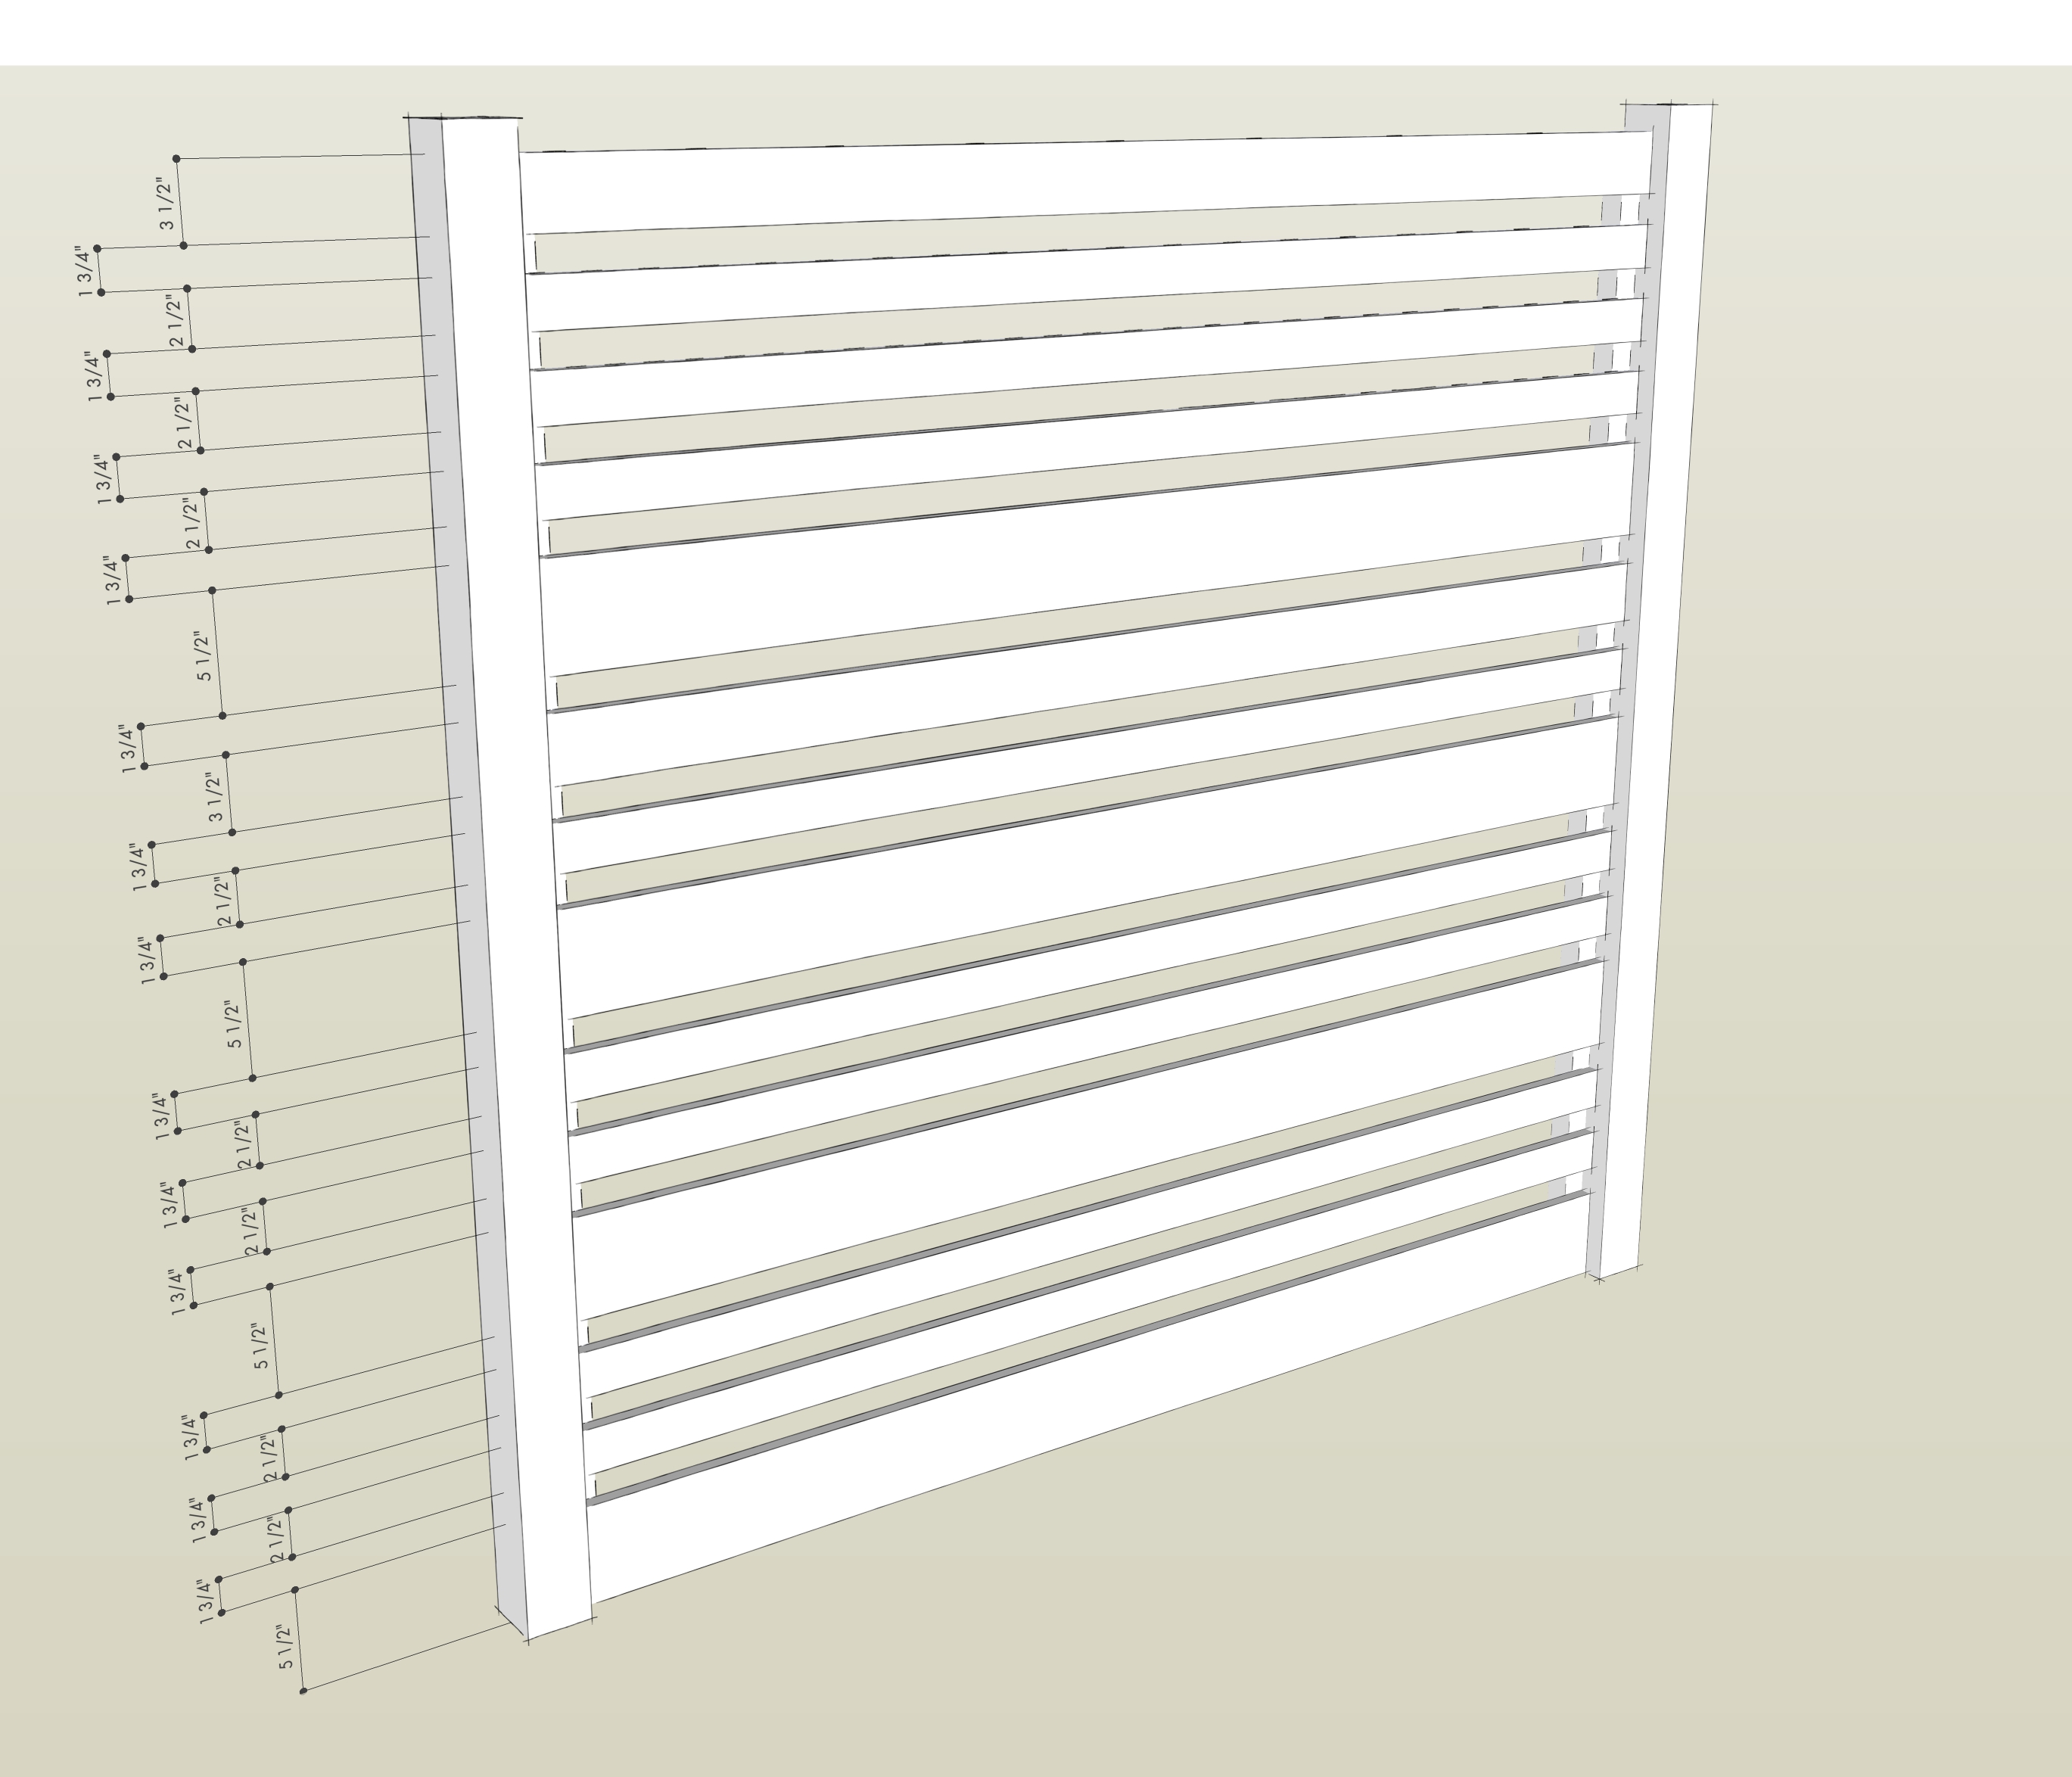
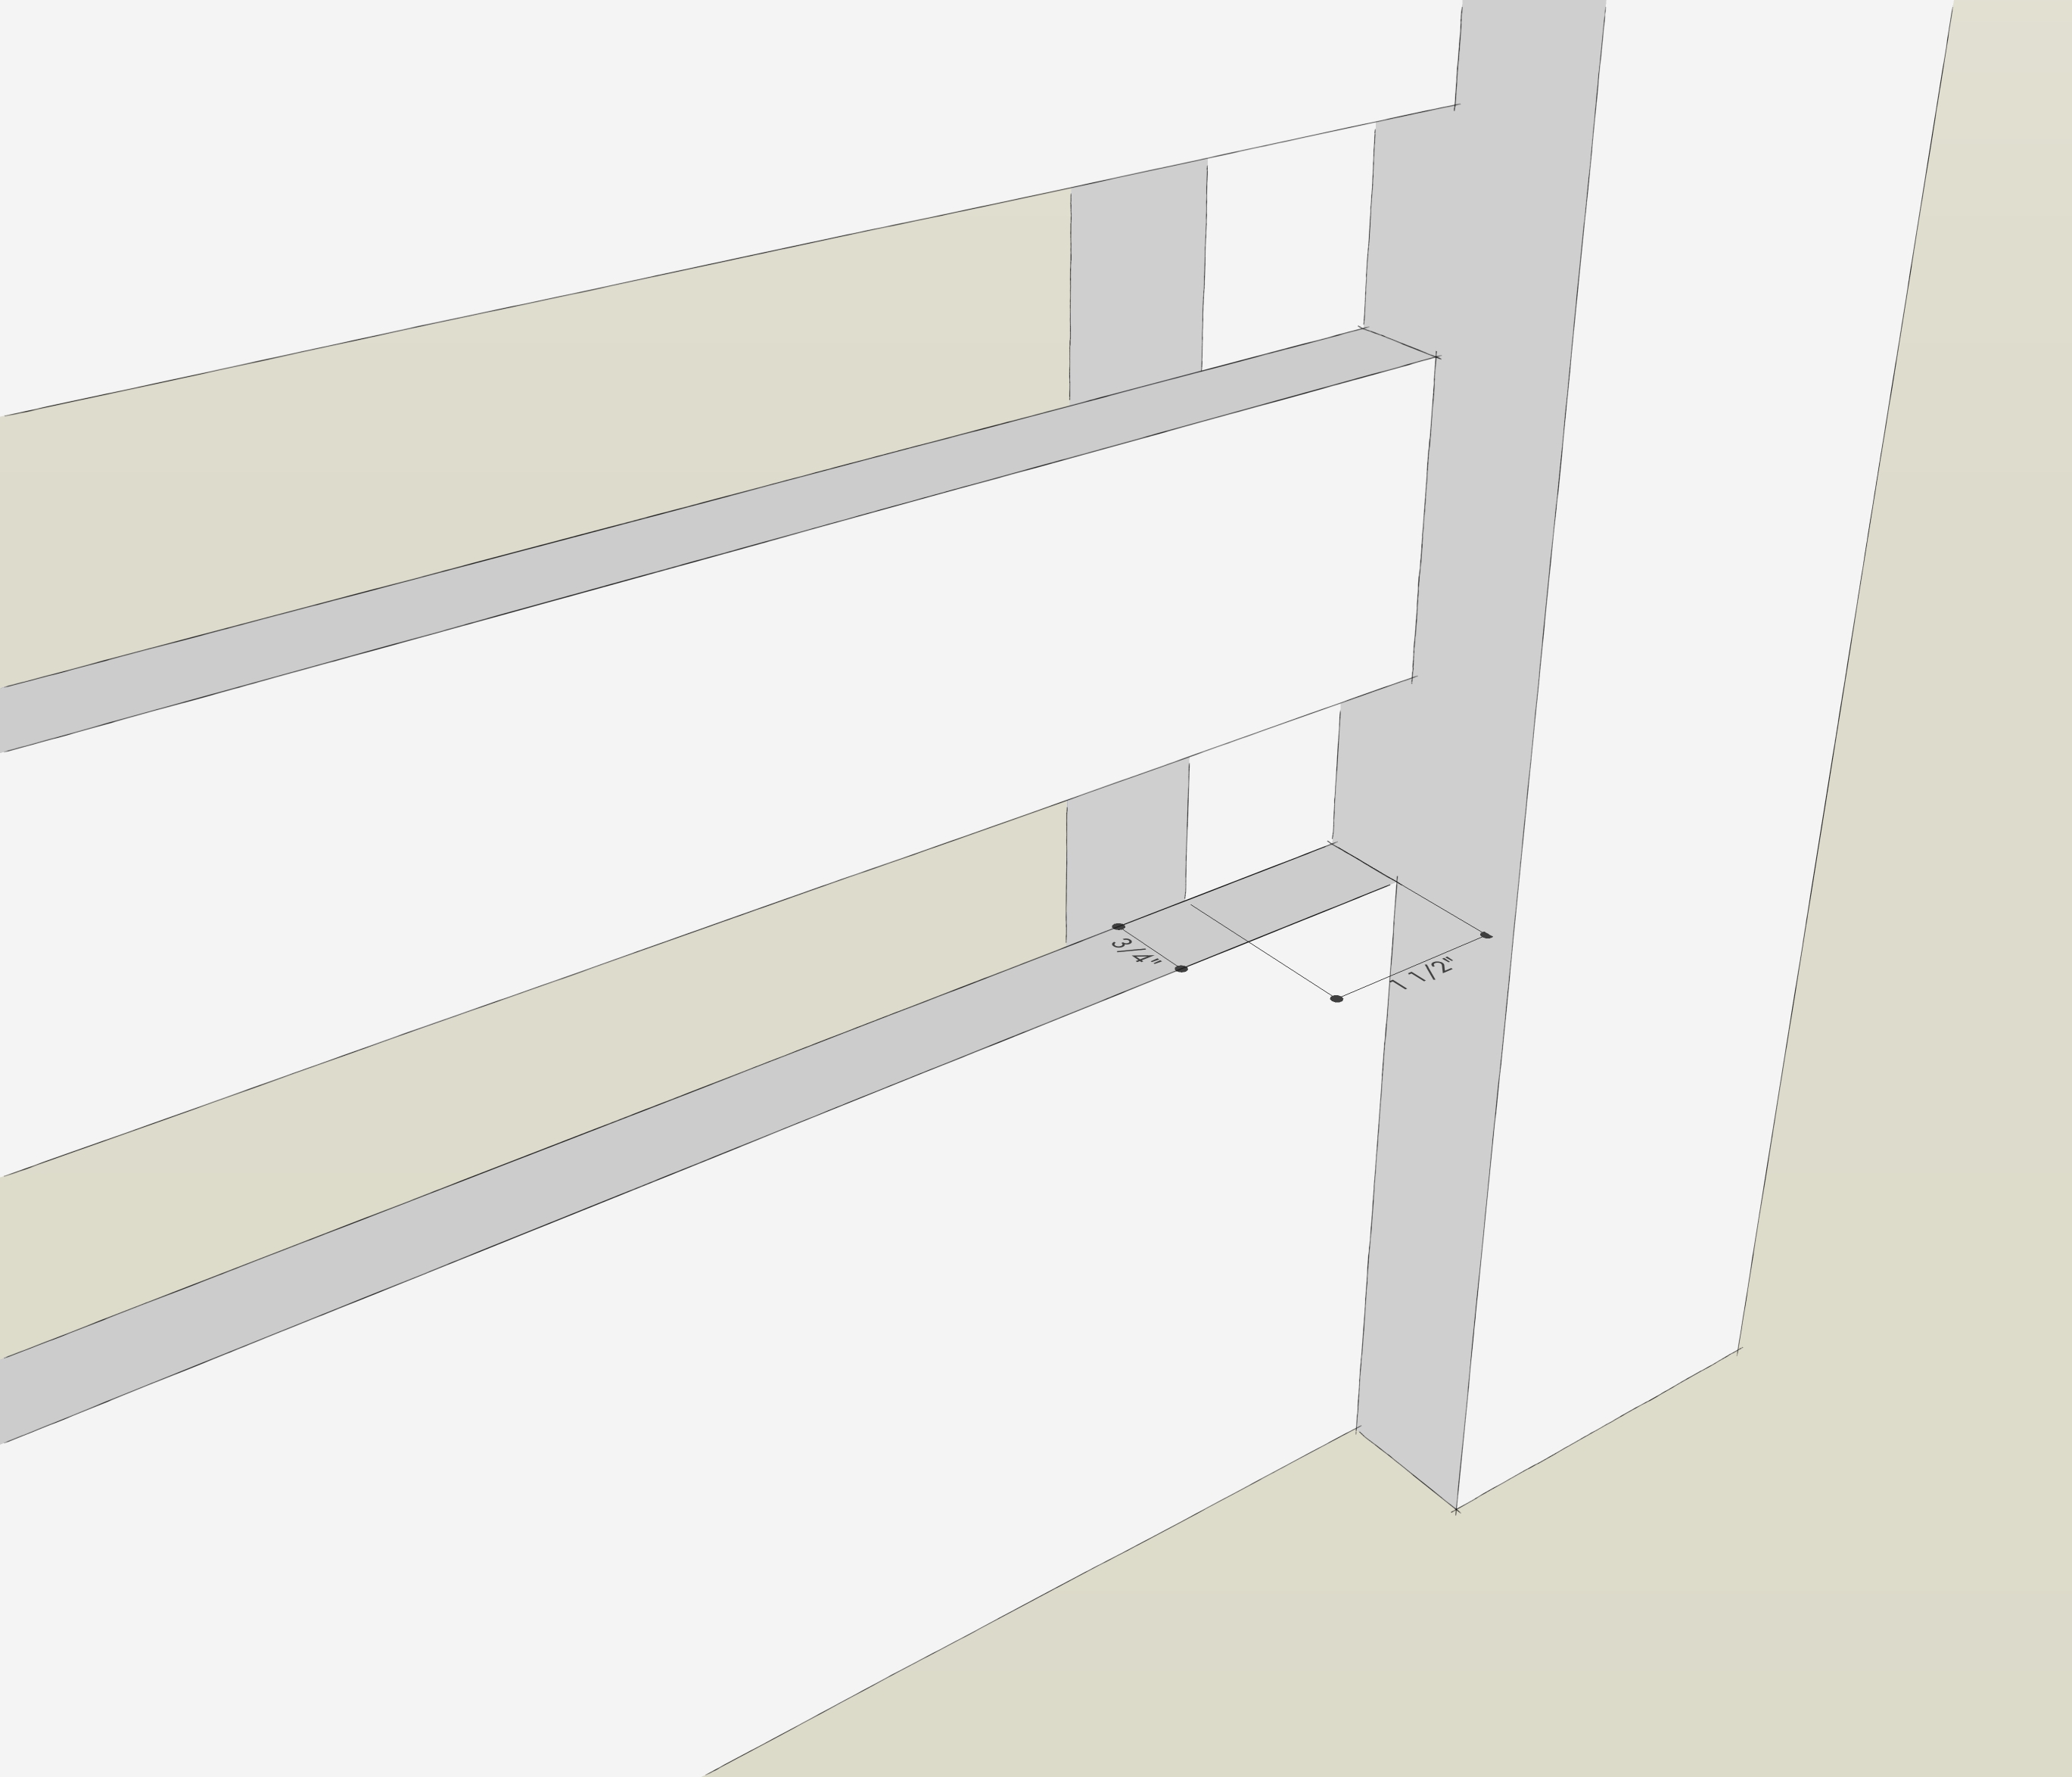
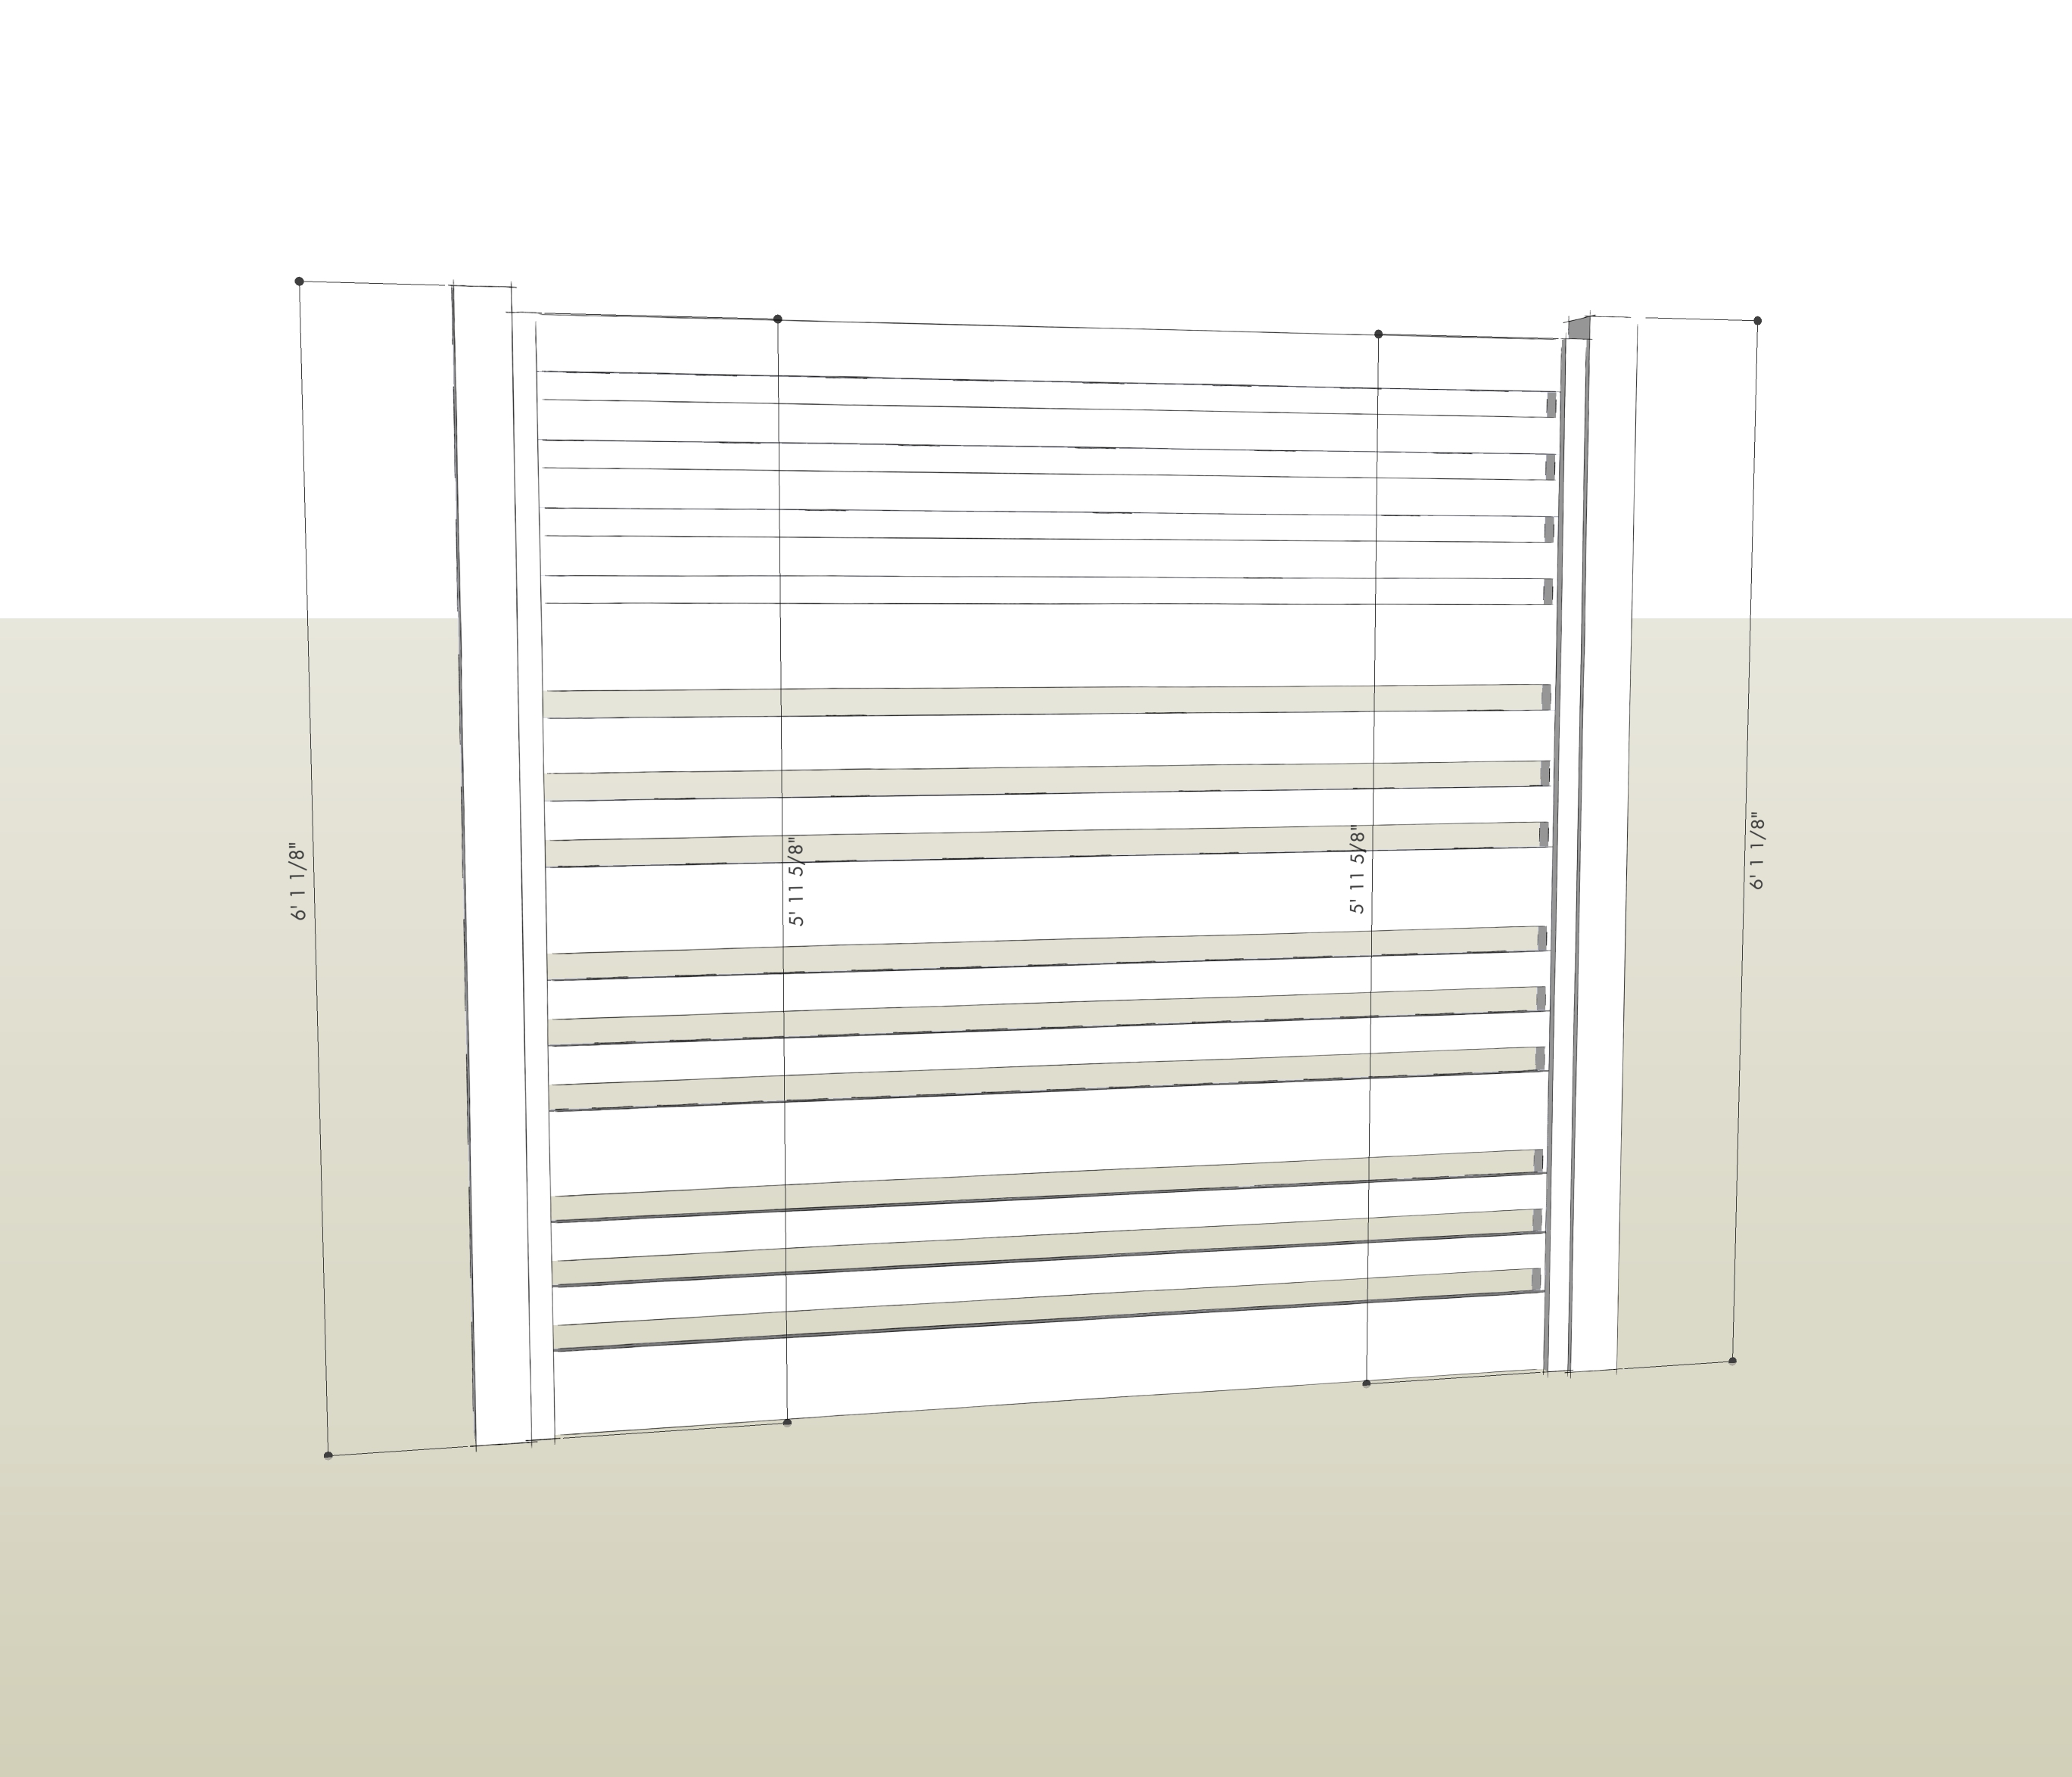
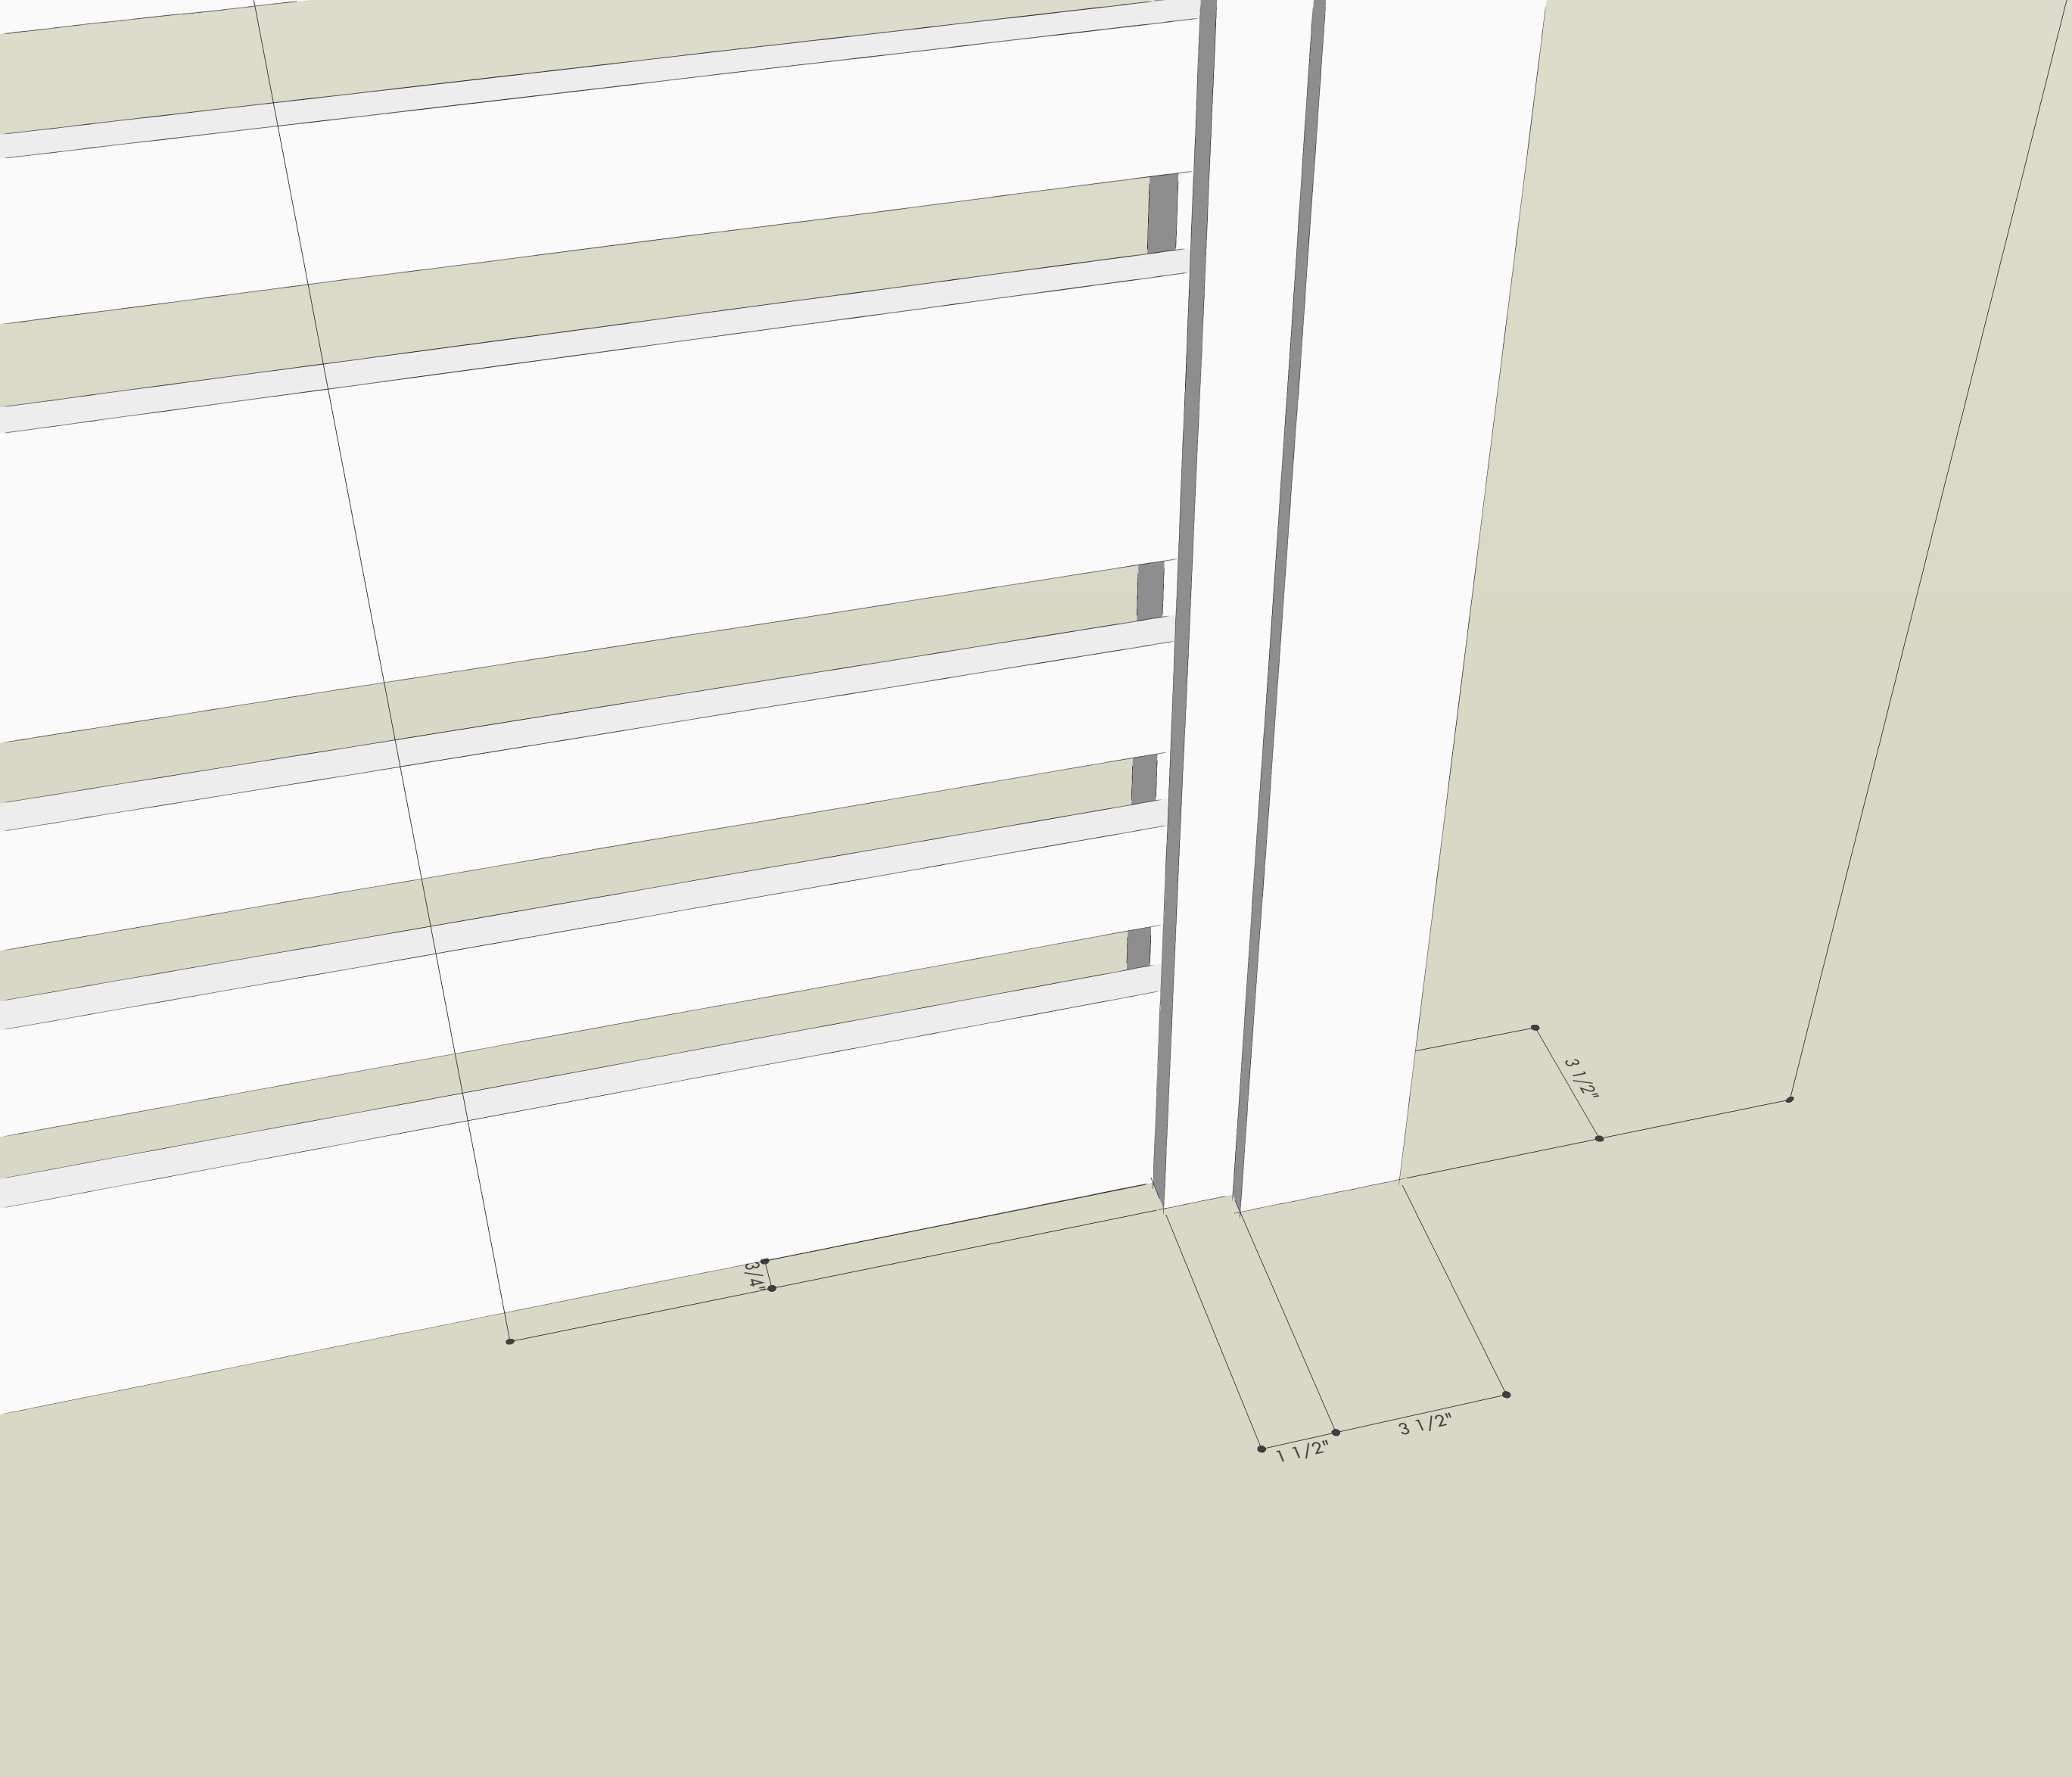
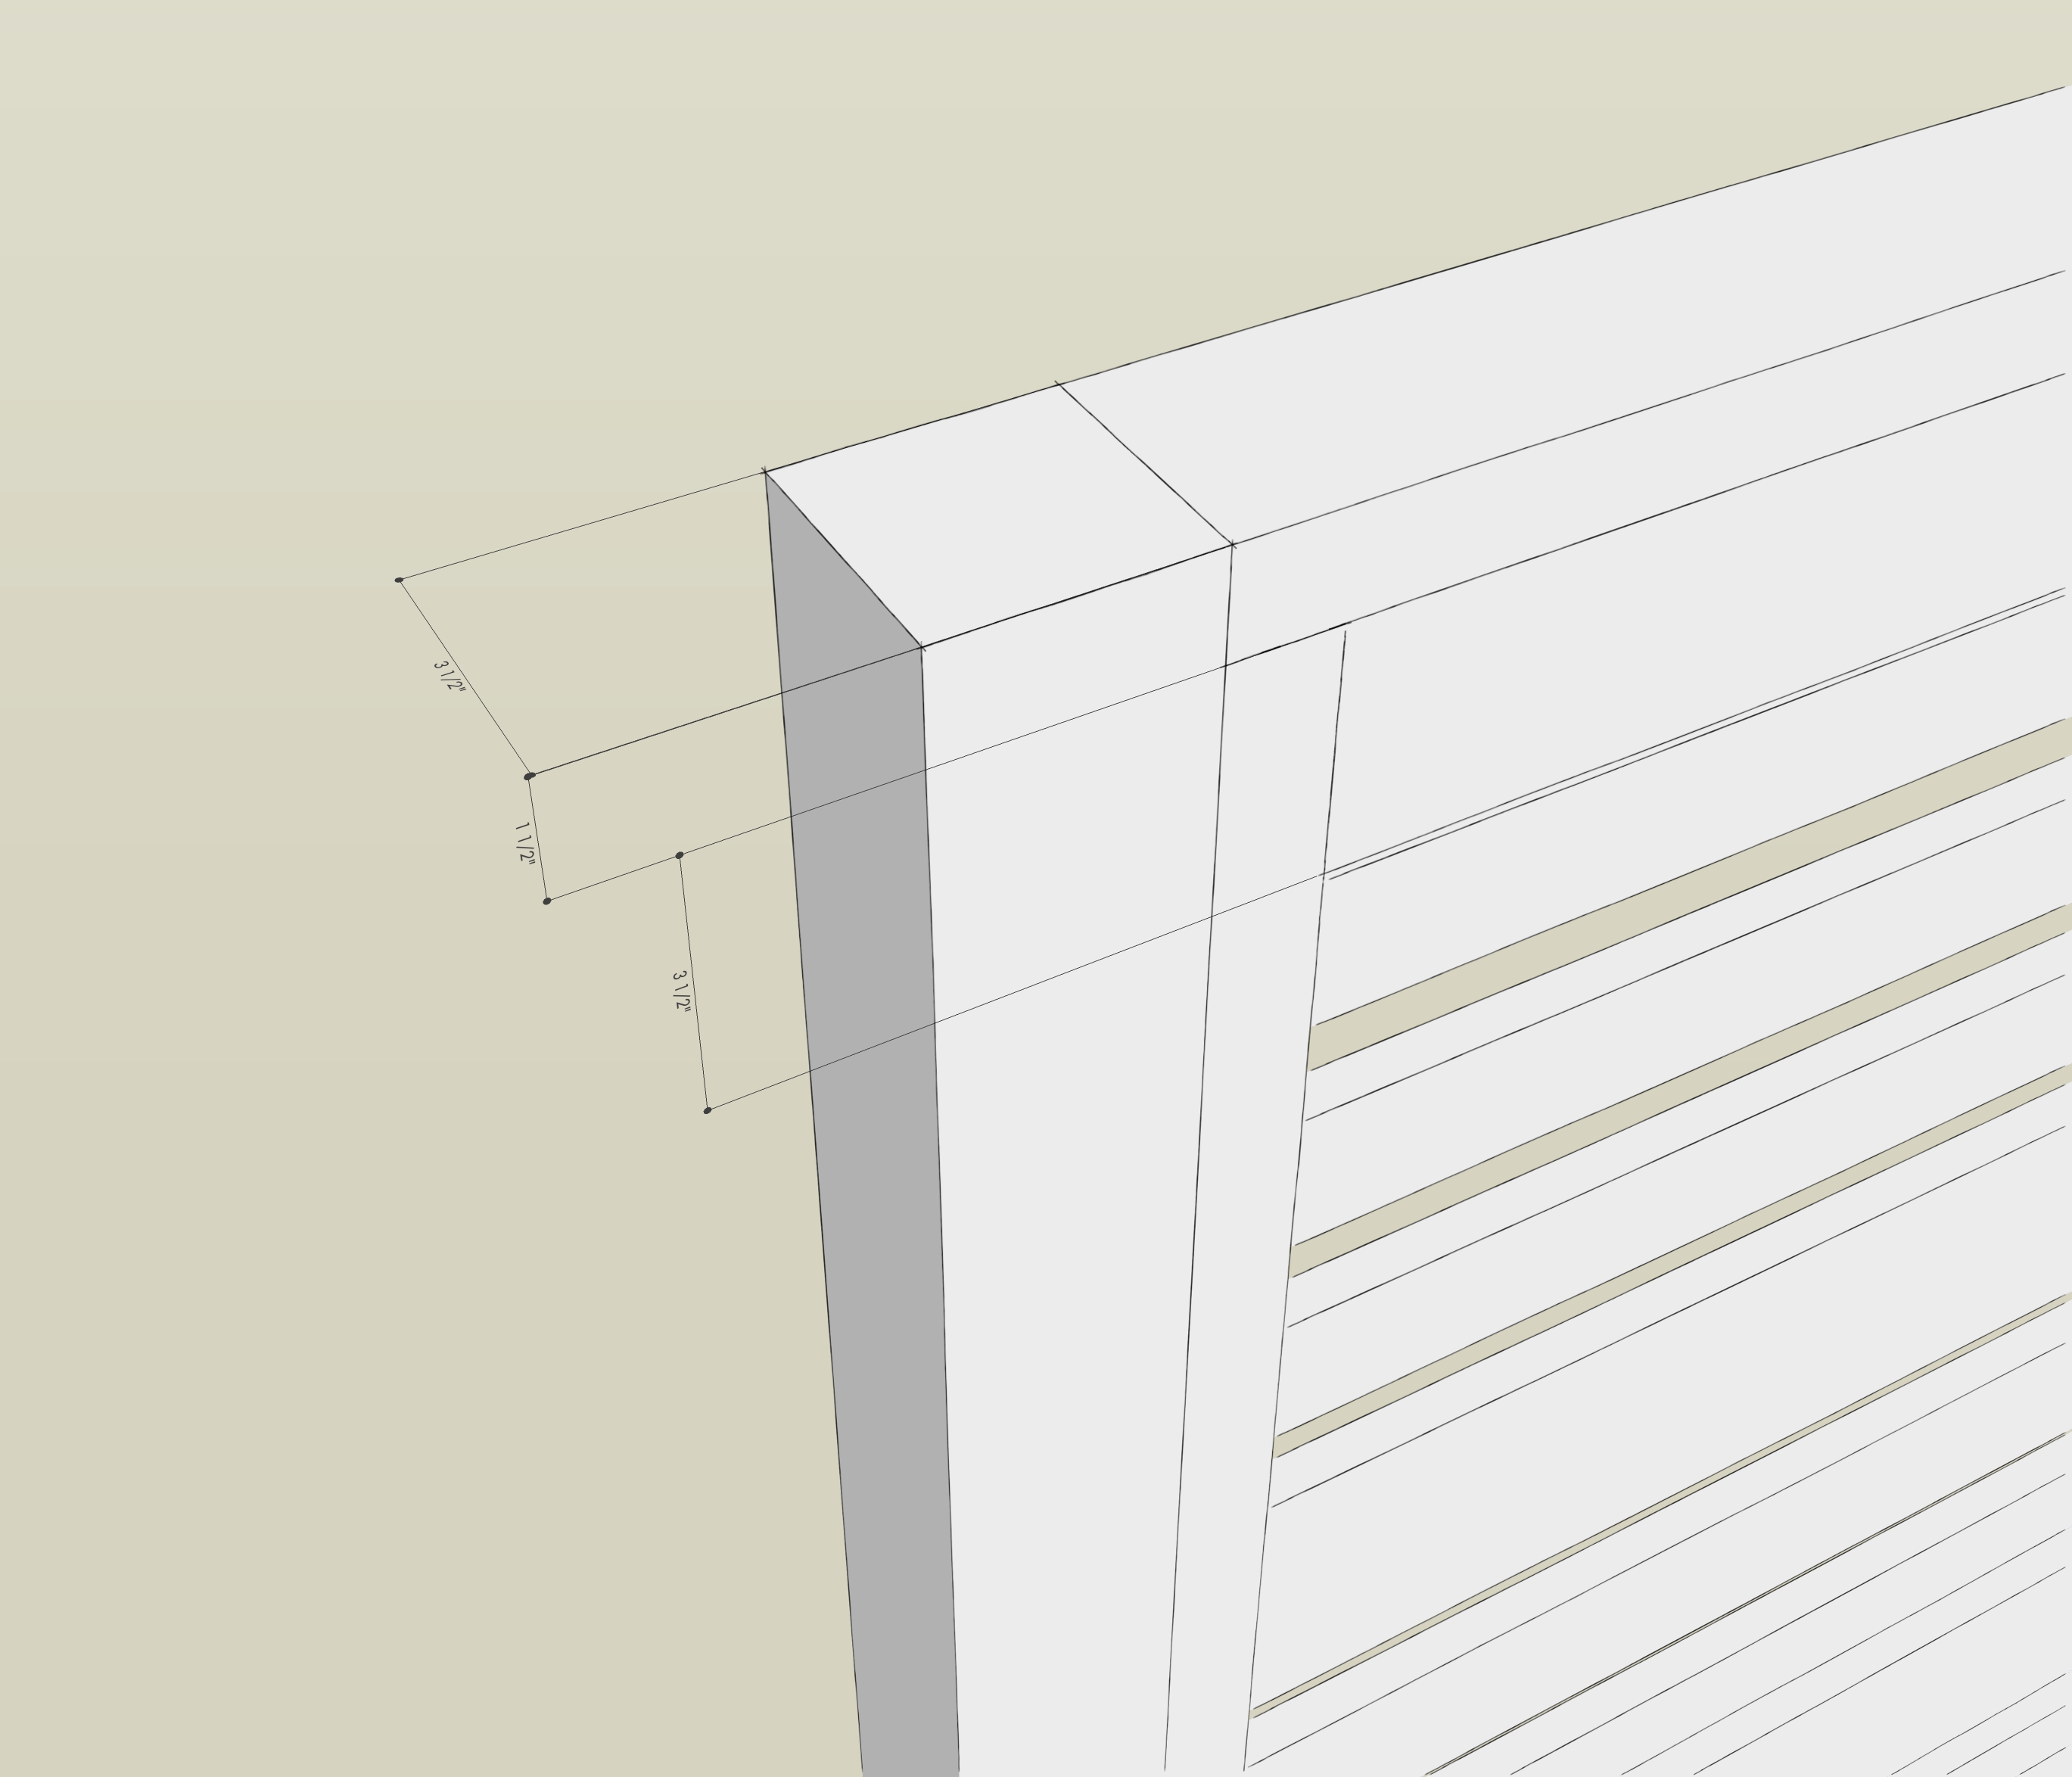
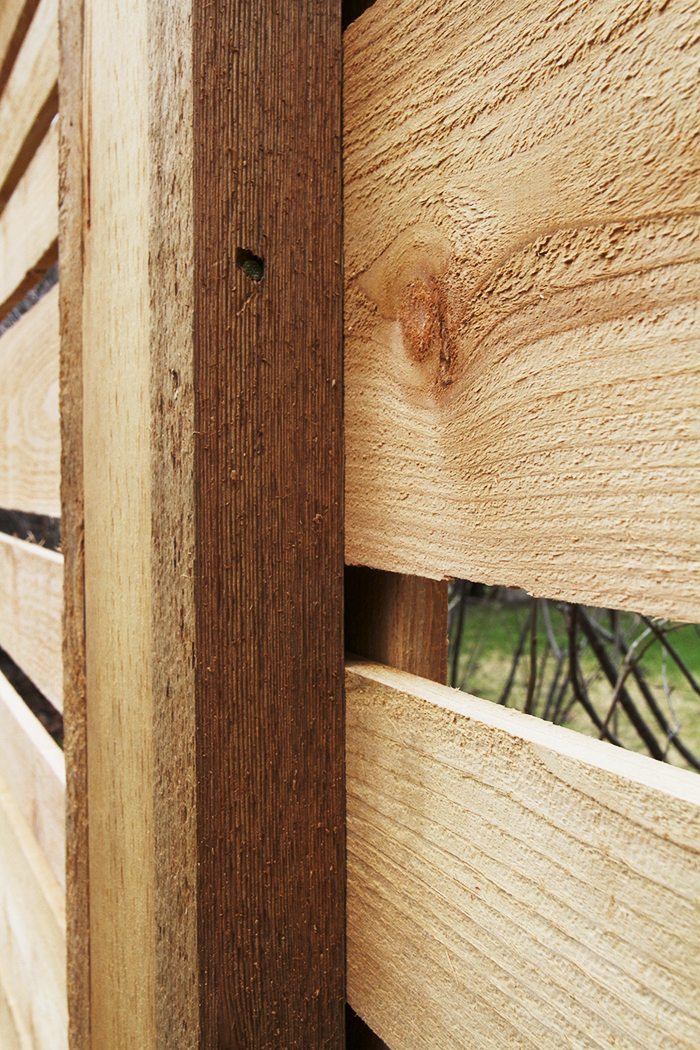
This is a close up of how the sandwich technique works. The basic framing consists of 4×4 posts and 2×2 boards. The 1x slats are are sandwiched in between the 2×2 framing and a 1×2 backing.
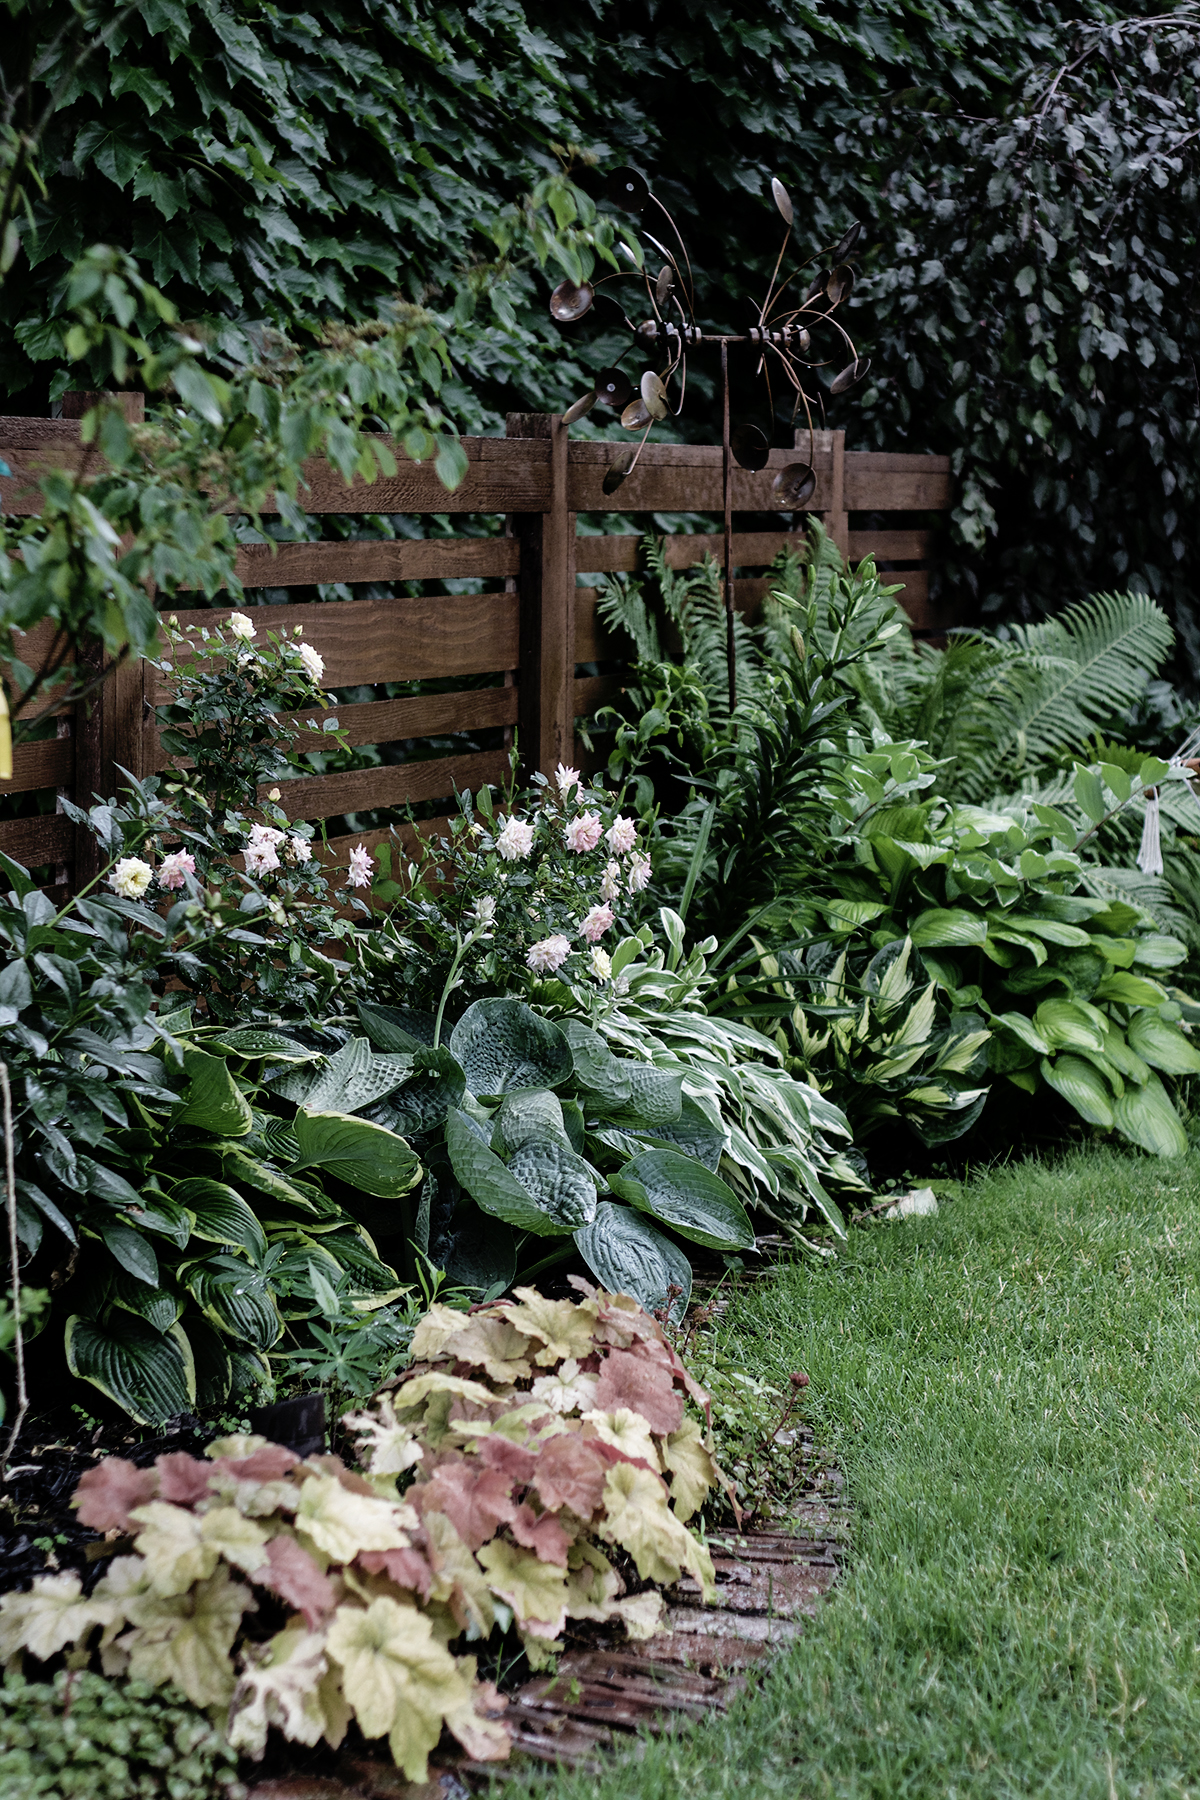
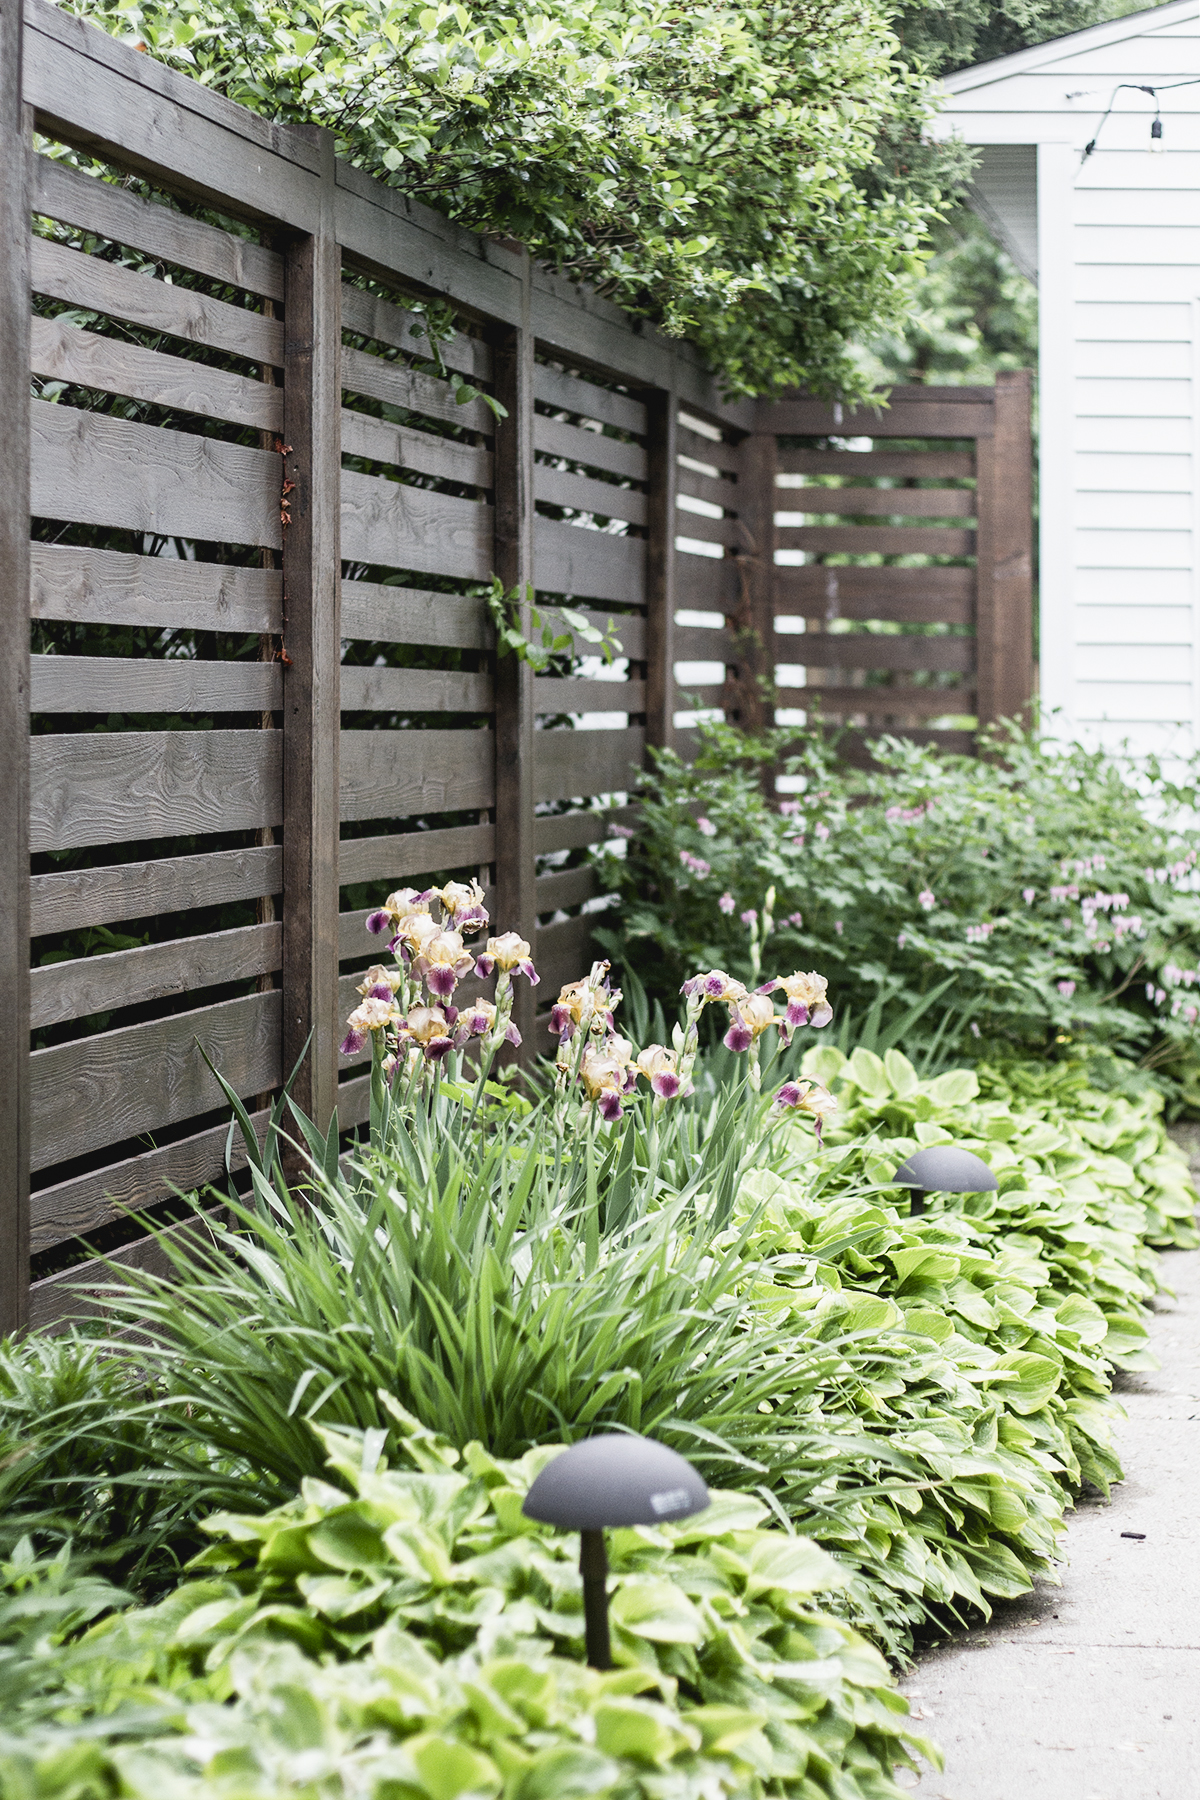
Here is an photograph of the fence from the outside, you can see that it looks exactly the same as it does from the interior of our backyard. Part of our fence is only 4 feet tall – that side faces our nice neighbor, while the other side is 6′ and faces the duplex next door.
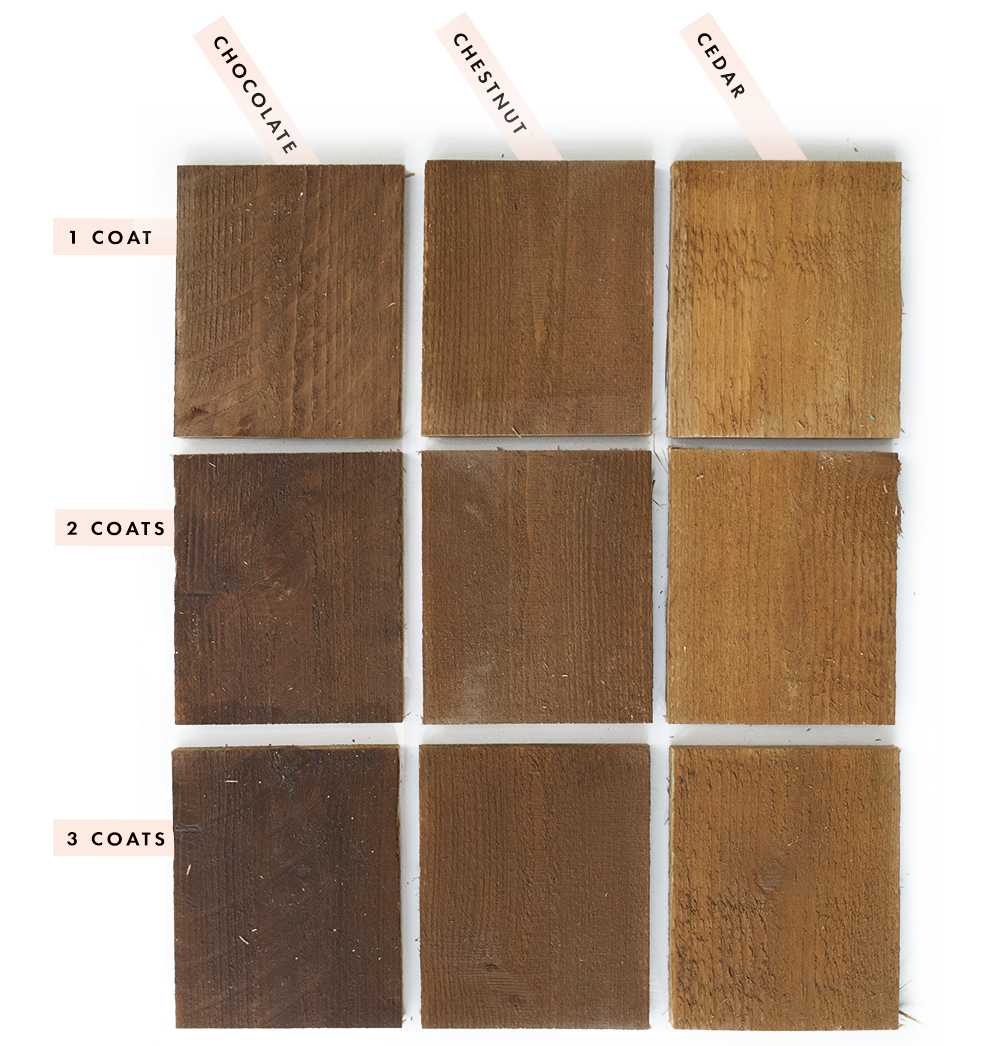
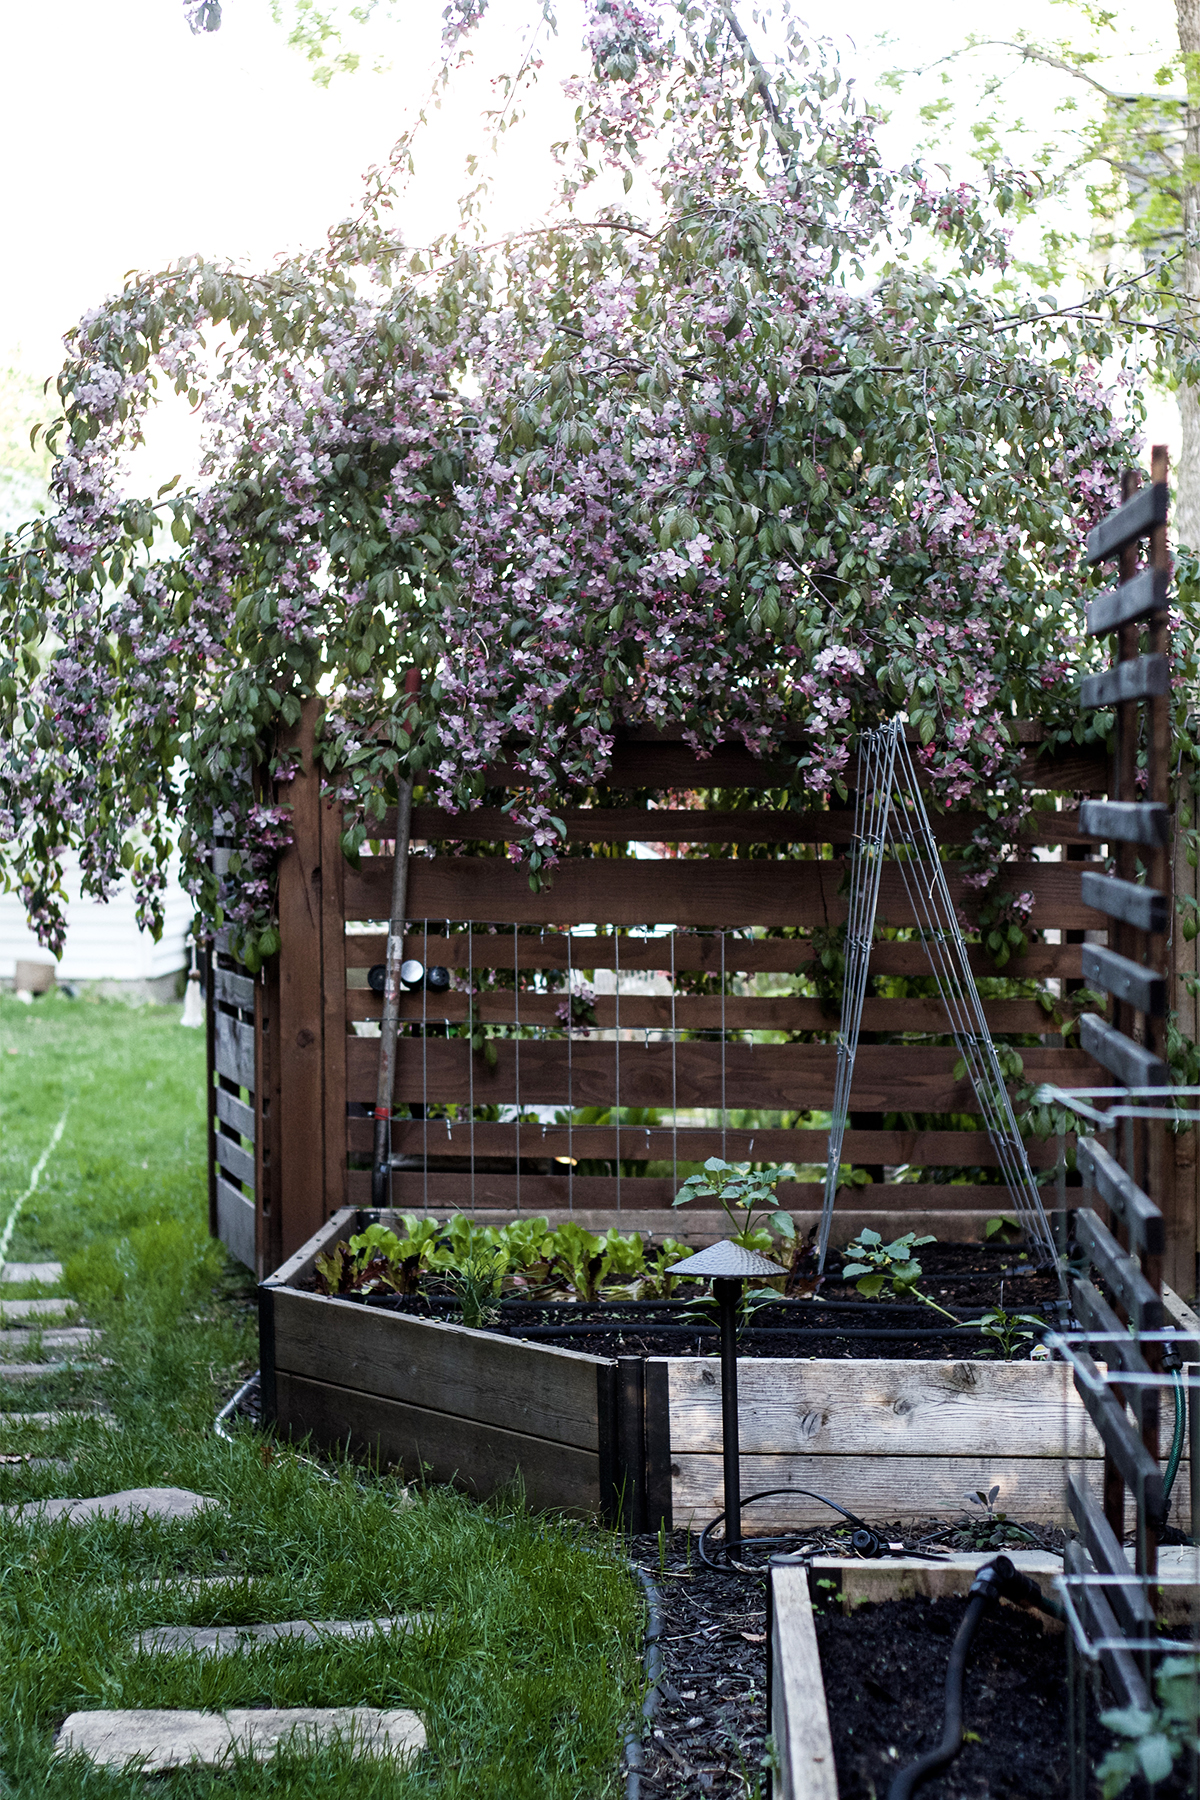
The other question I get asked most often about our fence is regarding the stain. I basically know everything (not really, but I know a fair amount) about dark stains since having this fence. One of the nice things about stain is that you can always add more. The above image features Behr Semi-Transparent stains (you can buy online!) in Chocolate, Chestnut and Cedar. Originally I wanted a dark brown and spent the first summer applying three coats of chocolate stain to the cedar fence boards. It was never dark enough for me and two summers ago I decided to take it even darker and go for The Behr Semi-Transparent stain in Coffee (which is what you see in the first photo and the one below). This is the stain that I am most happy with. Of course, it is layered on over three coats of the chocolate stain, so it might be hard to achieve the exact look, but I bet you could get close by going directly to the coffee stain.
I applied all of the stain with a brush (here’s a link to the exact brush I use). Yep, you heard that right. Spray can look uneven, and I didn’t want overspray on the house or garage, so the brush it was. I usually stain in the spring or fall when temps are cooler and the garden hasn’t grown in (or has been cut back if it were the fall), and I can freely access the boards. You don’t have to be too precious with fence stain either. I slap it on and let it dry. I try not to oversaturate any area because the stain will get gummy, but I also don’t wipe it off, I just let it sit on the surface and soak into the wood.
So lay it on me! I want this to be the one stop shop for fence questions. If I have failed to mention something let me know, I’ll answer in the comments and then add the info to this post.

Reveal : Our Fence – 1 year later
Let’s Talk About Fence Stain, guys.
The Fence Is Looking So Good
Fence in Progress : Part 2


Yess! I was thinking of messaging you to ask for dimensions and details so this will be very helpful!
Yay! Glad it’s of use. It’s not the way most people would typically build a fence, so I figured a demo would be helpful for folks to visualize the “sandwich” concept.
Your fence is gorgeous! So if your backyard. I would love to see a video tour of it. Your planting looks really beautiful and well thought out. I would love to see more!
I would love to make a video! Thanks for the idea!
Wow your fence and garden look beautiful! I love the coffee stain you chose for the wood! I’m inspired to try that stain on some flower boxes for the front house.
Thanks, Felicia! You should try the stain. It’s dark and muted and that’s why I like it.
I’ve been coveting your fence forever and am preparing to do something like it in Portland, Oregon! I’m torn on whether or not to stain, though, because of the maintenance. Have you been re-staining every year??
Hey Marisa, you def don’t have to stain every year. I am just very picky about the color so I have done a lot more staining than the average joe. It is a project, but it should last a few years if not more if you get a good base on it. Naturally silvered fences look pretty too!
love it! what is the tree/bush? flowering over your veggie garden?
It’s my favorite. It’s a newer crab apple called Ruby Tears. It wasn’t supposed to get as big as it has, but it is stunning. Don’t believe the tag when it says it grows to 10′ though ;)
Hi! Happy sunny day to you! Been wondering your opinion on fence hardware, or maybe you have custom hardware? I’m not stoked about the hinges and lock that came standard on Dave’s fences, you? I mean, they’re FINE, but with humidity and settling and well, horizontal boards, they don’t really scream, “Hey, I am MEANT to be on this beautiful fence!” Thoughts? Advice? Thanks : )
Hey! Thanks for compiling this information. So the cap is a 2 x 4 over the top of the top slat (like the sandwich framing but lengthwise) and then another 2 x 4 laid horizontally across the top (so that it’s the same dimension as the 4 x 4 post)? But on the backside the top slat is exposed?
And it looks like the photos show a bottom “cap” (for lack of a better descriptive term) as well. Is that right?
It looks great, by the way! I’m working on something similar and I’ve been debating on how to frame out the top and bottom of the slats for quite a while now, hence the questions. I’m also debating whether the posts should be flush cut with the top of the cap (like in your diagrams) or extend a few inches above the cap, like your built product seems to indicate. So many small choices!
We are doing this fence and wondered the same thing. I would love to know how it was done originally because the video only shows the top horizontal cap on one side.
Help!
Thanks
Pam Nihiser
Love the fence. Showed it to my carpenter husband who asked how much?!! Do you have a figure on the cost per linear foot? Or a ball park amount for the 6′ fence.
Thanks!
It was so long ago that I can’t really say. I think the entire fence with a large gate was in the range of 4.5K. Hope that helps.
Hi! Love this design – we actually plan to mimick this exact design and when I realized you provide all the details – we were extra convinced this is what we will do. Beautiful! We are also in MN can I ask how deep you put your posts in the ground as well as the time frame of when you dug your post holes? I see some snow present! Thanks in advance!
Hey Brittany, I don’t know how deep the posts are, at least two feet is my best guess, but I would do some research and see what is recommended for our climate and the frost/thawing that goes on. This was april in an overly wintery year.
What kind of wood did you use to build your fence? Cedar?
Great looking fence. I was hoping you could clarify the cap. The video seems a little different than the finished product. The top cap in the video appears to have a 2×4 on top and then 2×4 on either side. The top cap in reality appears to be either in between the 1×2’s and 2×2’s or the contractor did cut them at the top to allow the 2×4 to sit. Thank you!
Beautiful fence! Can you share details of the half gate you made With the 6’ post/trellis top?
Thank you for sharing all this!
Ed
Those are really nice horizontal fences! I opted for the composite Trex horizontal fence from https://www.trexfencingfds.com/horizontal-fence-design-101/ for my Arizona home and I think that the horizontal design fence is really elegant for the home!
Thanks for sharing these ideas! I’m getting a composite fence installed this summer and there are horizontal and vertical options. I was set on the vertical panels since it’s a classic look, but after looking at your photos I actually love your horizontal fence turned out! It looks so unique and modern, so I might actually end up choosing this option!
Where were your screws placed? I love how they are invisible in the photos.
Your horizontal fence is an absolute game-changer, and I’m completely smitten with the design! The sleek and modern look it adds to your outdoor space is stunning. It’s evident that you put a lot of thought and effort into planning and executing this project. The way you’ve detailed all the information, from materials used to the construction process, is incredibly helpful for anyone considering a similar project. Your creative touch with the landscaping and lighting around the fence truly elevates the entire backyard. Thanks for sharing this inspiring and informative post!
Hello, a bit late to the celebration of this beautiful fence … alas, 5 years after the writing of this post, it is the exact design we have decided on! It is architecturally very interesting, and since our yard faces a public walking path, something that looks amazing from both sides is oh so necessary. I am curious if you know how your contractor obtained the 2.5″ and 3.5″ 6 foot pieces of wood? I can only find standard 5.5″ x 5/8″ x 6′ foot cedar planks, and ripping 80 of those (the total we would need for our run) seems like a nightmare …. but I can’t seem to figure out a better solution. I would truly appreciate any advice or tips! Thanks :)