


Okay guys! I am so happy to share with you the finished kitchen!
I hope you don’t hate me for taking so long with this post, and maybe you happened to see it yesterday on Design*Sponge. It was all a matter of timing, the light fixture took forever to arrive, and then those crazy holidays happened. So here we are, months after the project started, at the finish line.
I cannot describe to you how great it feels to have invested the time and work to make this kitchen feel like it was a part of our home. This is especially true due to the sheer amount of time I spend in the kitchen as a stay-at-home mom. This space feels like a reflection of me and my family, and functions so much more efficiently for our day-to-day uses. I’m not sure if I have even been more proud of one project than I am of this.
It’s been awhile, I know, but you guys may remember me starting this project back at the end of the summer when I started to get the itch for an indoor interior project, I was so over gardening. Renovating the kitchen had been on my list for a while, but over the last month of summer I was able to really solidify a plan for how I was going to tackle it. As with most of the projects around this place, I tried to throw it all together on a tight (not tyte) budget, and ended up doing pretty decent job of staying close to what I had anticipated. I had planned for $1,500, but then we had a few additions as the project progressed – the kitchen cabinets, microwave and light fixture – that knocked it up to a grand total of $2,358. I’m not mad at that total.
All right, enough of me jabbering, check out some of these Before-and-Afters!
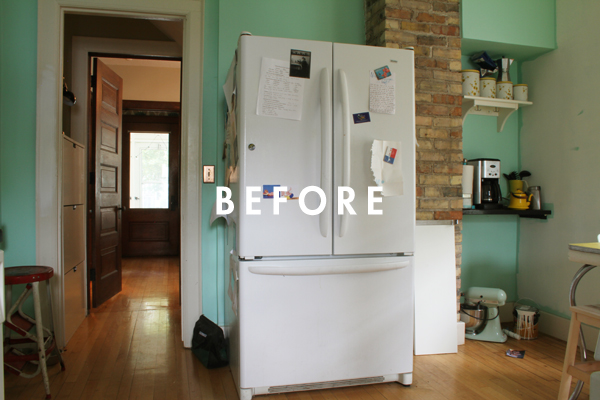
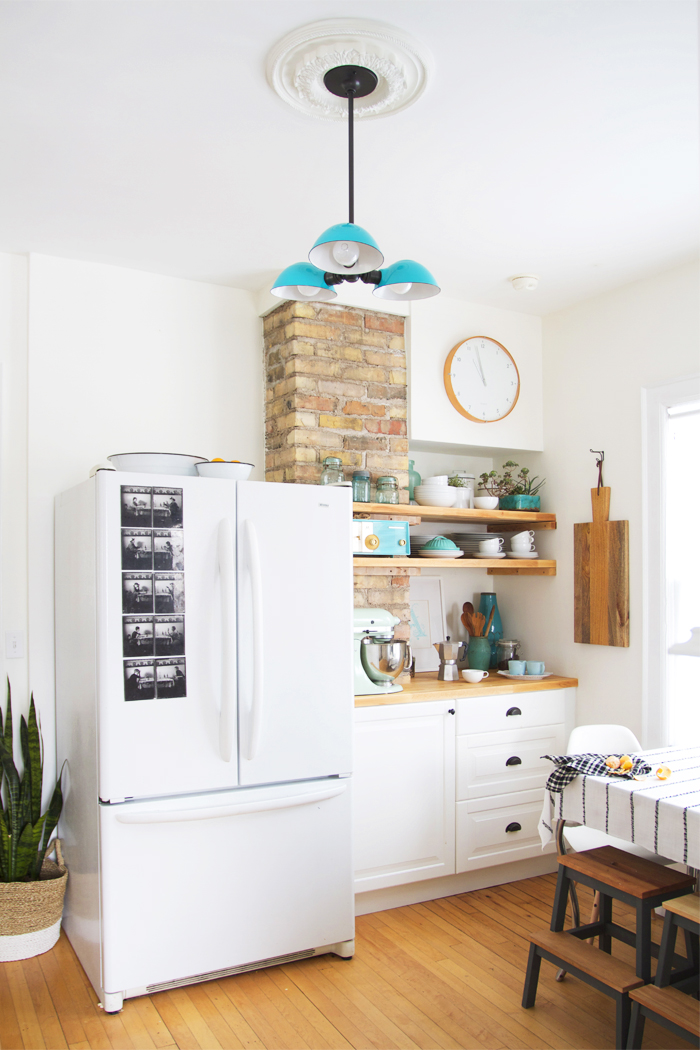
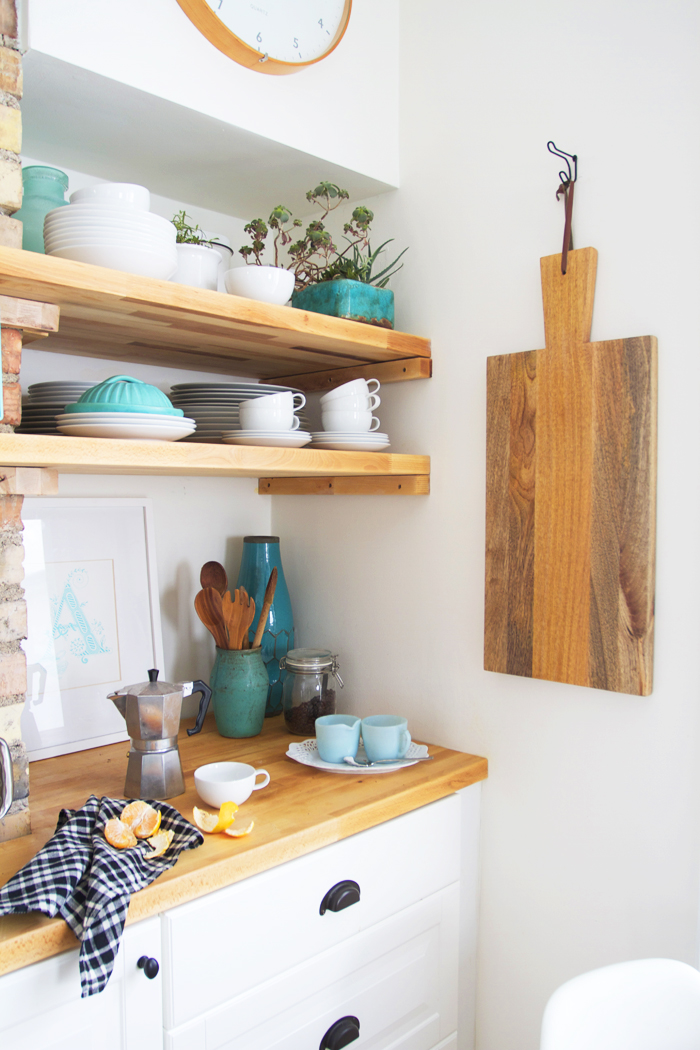
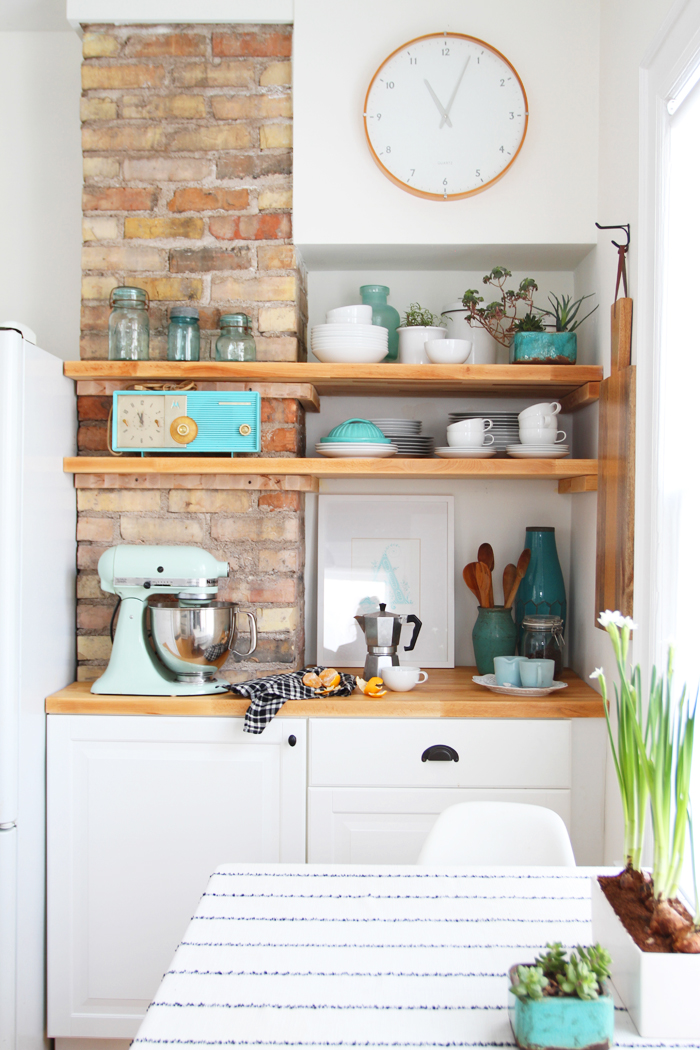
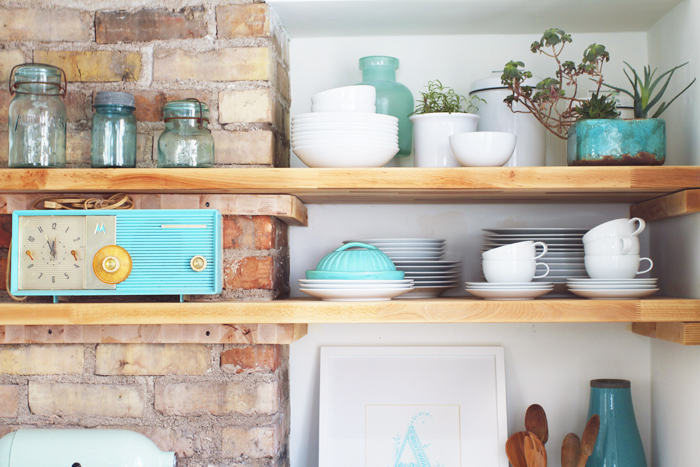
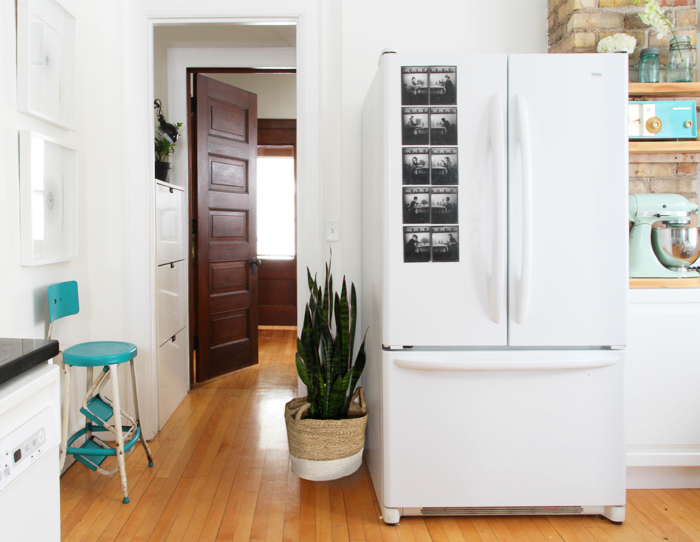
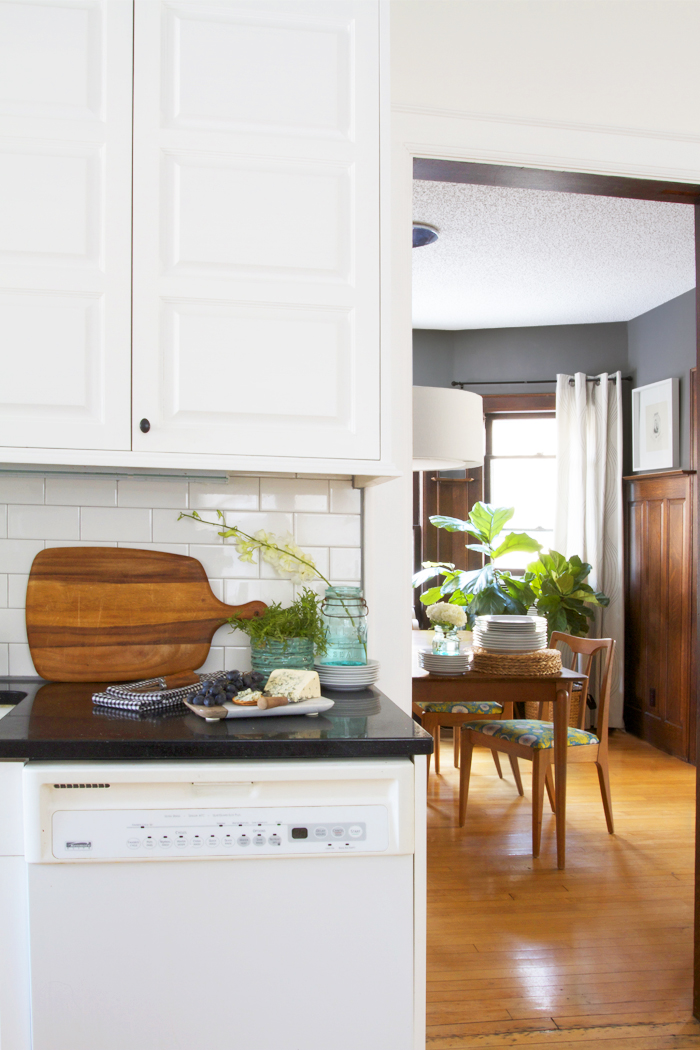
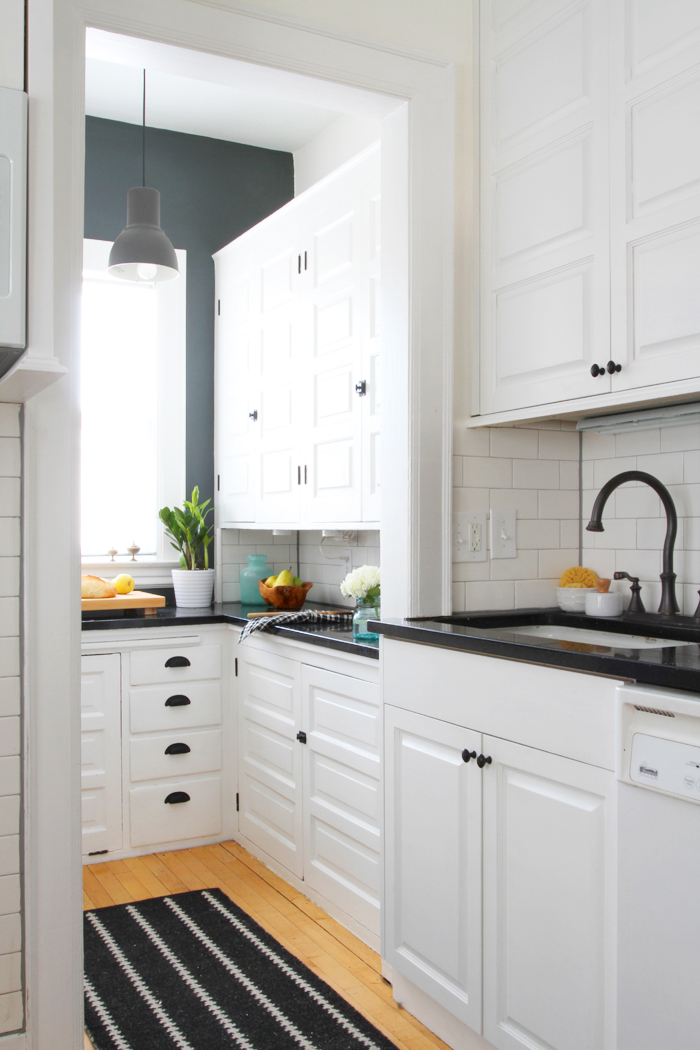
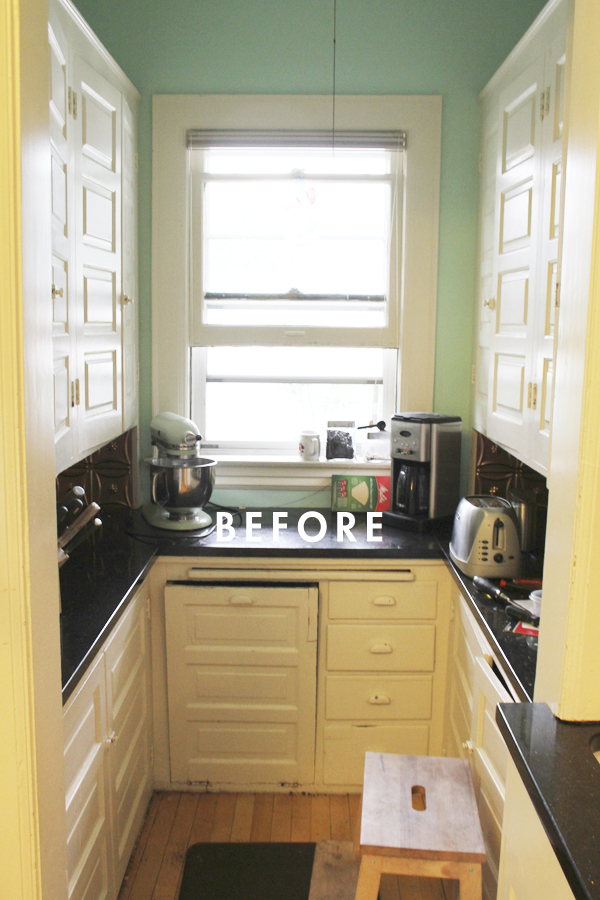
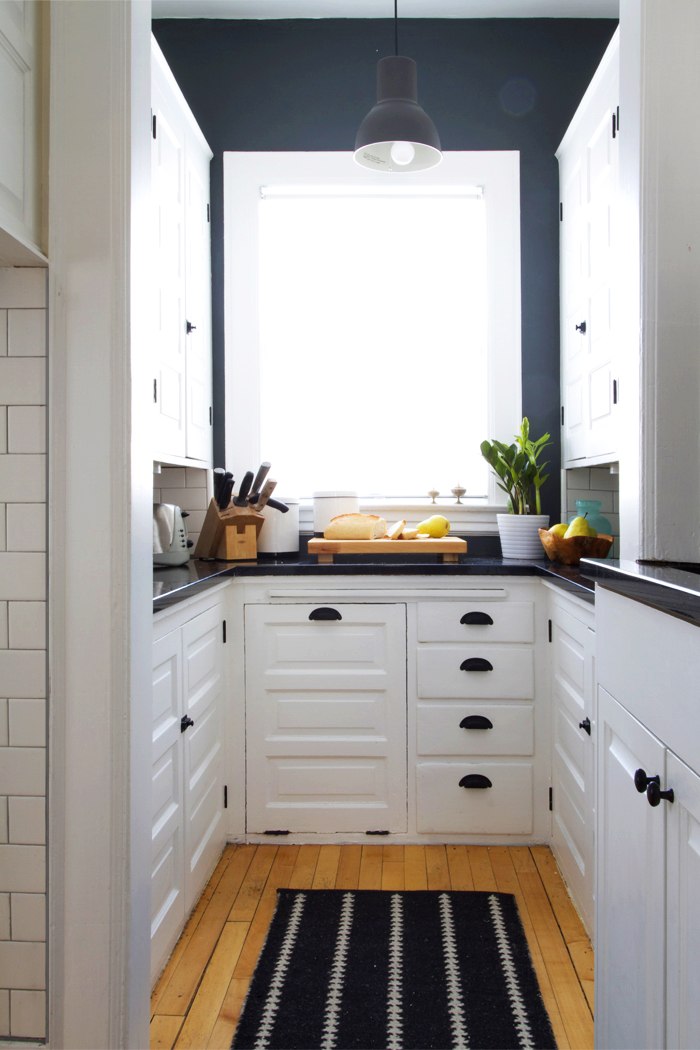
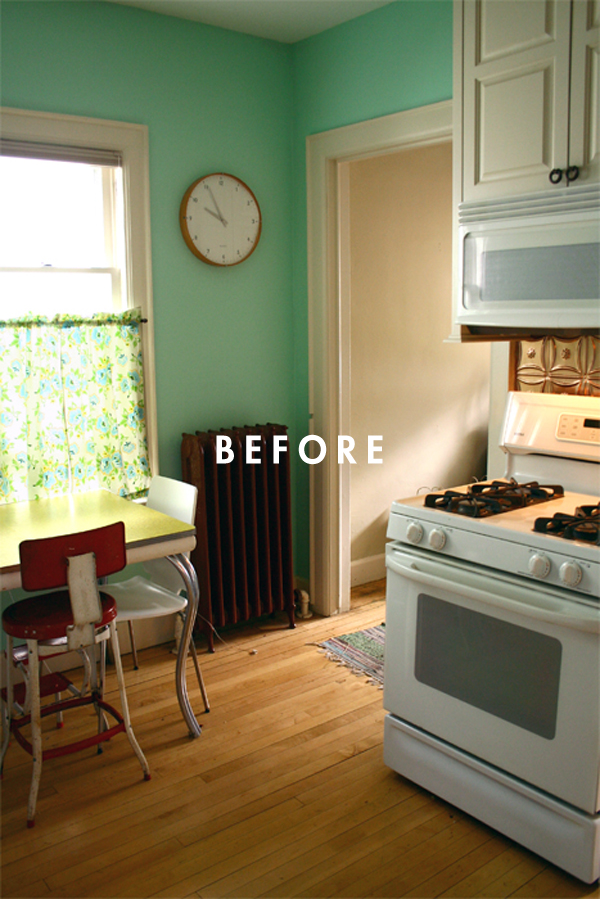
Without a doubt, the part of the kitchen I am most proud of is the transformation (below) of the weird corner space. This whole area was an almost completely-non-functional, junk-holding eyesore (above). Someone before our time had attempted to make it a bit more functional by adding one floating shelf and an outlet. I give them credit for the outlet, it has allowed us use the space as a place to make coffee in the mornings, but it just wasn’t pretty. From left to right (above), we have a huge ginormous fridge that just floated out in the middle of the space, then the brick chimney which had nice texture, but didn’t connect with any of the rest of the space, and then the cove which at some point had been the “utility” staircase. The stairs have been removed long ago and the “coffee nook” was all that was left. The entire wall of space had troubled me ever since we moved in, and I had no idea what was the best way to attack it. I went through a few different sketches for the space before coming up with a solution of custom fitting some Ikea cabinets in the cove and chimney space and finishing it off with some inexpensive butcher-block counters and shelves.
Not only does this look awesome now, but it also anchors, and minimizes the size of the fridge, which looks actually built into the space without overwhelming the nearby kitchen table. I love it. The cabinets house all our baking stuff, coffee accessories, and a very critical rack of paper towels inside the cupboard door – perfect for getting messy 2-year olds clean after their afternoon meals. Guess what else? Inside the top cabinet drawer is all of our silverware which used to make its home in the dining room buffet because there were not enough drawers in the kitchen previously – life changing, you guys. It has been so great to have a space dedicated to all these kitchen activities. Making pancakes is super easy, and Christmas cookies were not a chaotic mess. I am in love with the beauty and usefulness of this space.
Oh and also guys, part of the reason it looks so pretty is because my good friend Nicole Ripplinger (aka Colz) helped me style it all. She’s got a highly cool website called Middle North Creative if you’re interested in her styling skillz.
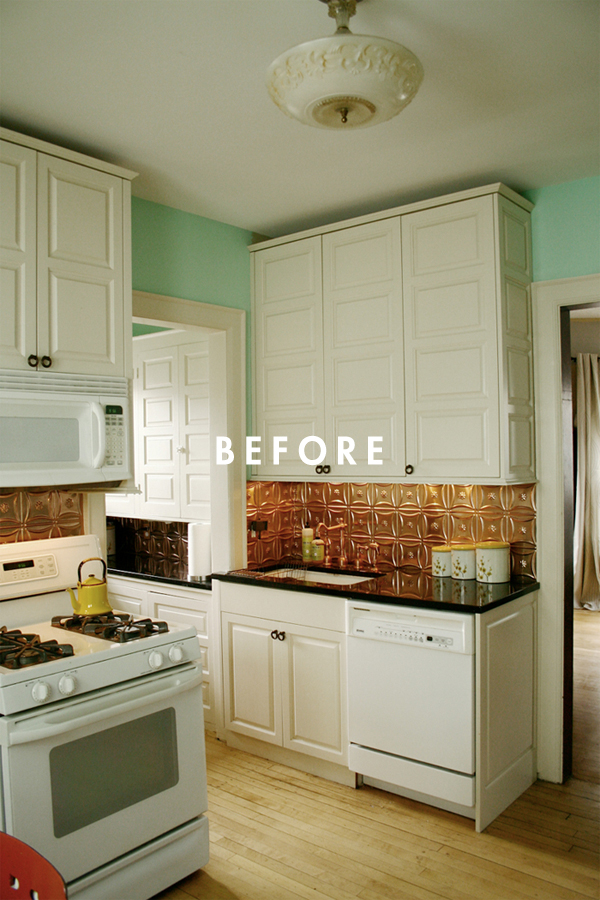
When we bought the house we inherited this metal copper backsplash (above). It wasn’t the worst thing in the world, but it was totally not my taste. I decided to live with it and tried to embrace it. In the end, I just couldn’t. It needed to go, and one warm September Sunday I just started ripping it out. There was no way it was staying any longer. One of the best things I’ve done to this house, for sure, dawgs.
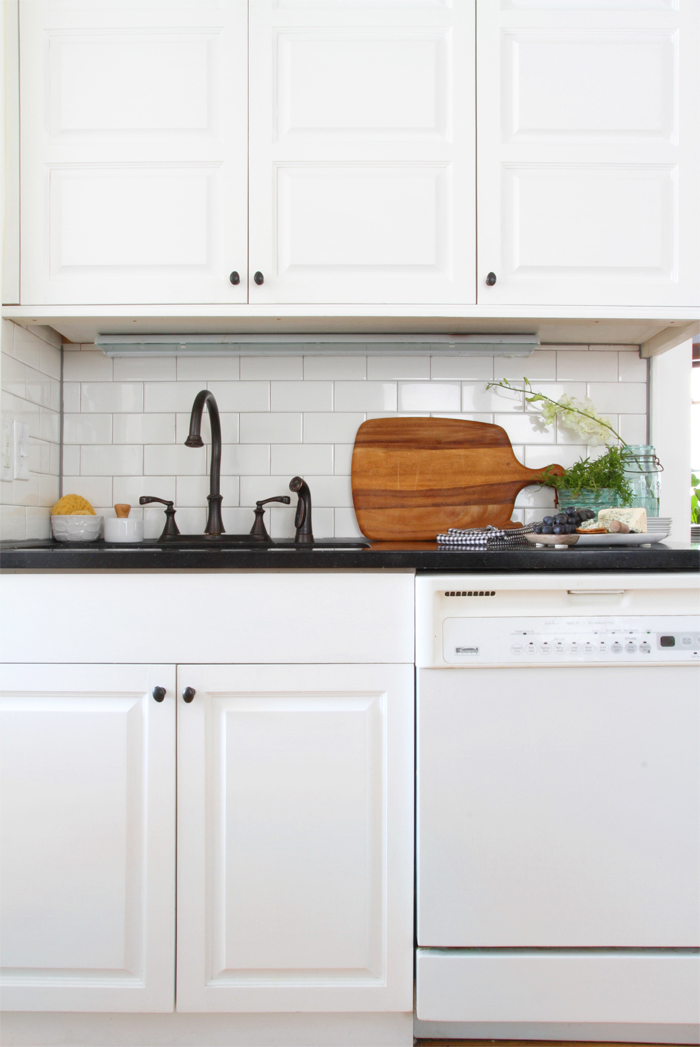
Can we talk about the backsplash yet? Can I tell you how much I love the new subway tile? Can I tell you how it makes such an amazing and dramatic difference in the space? Can I tell you how much I love it? I can? Thank you! Using subway tile as a back splash is a classic move, and yet so inexpensive. I love how clean and tidy everything is. Nothing seems messy and splattered anymore and I am so thankful for that. It also brings together the newer, more modern cabinets in the main part of the kitchen with the original pantry cabinets – tile is their common language.
I wanted to take a minute and let you guys know about a few of things I would do differently if I could do it all over again. Yes, most of them are barely noticeable and very small, but still, I am a GD perfectionist.
First of all, I would’ve waited to paint the cabinets until after the temperature started to drop and the air became drier. Like all things wood, they expand and contract. The cabinets contracted and minimally shrunk after I painted them in the warm fall weather, and now there are cracks in the paint at many of the seams. I can go back and fix this, yes, it’s just finding the motivation to do it now that the project is done.
Secondly, I would’ve trusted my gut on the color of the grout. I originally wanted black grout because it looks awesome. But I wimped out, thinking that it might not be the best option for a first time tiler like myself, as I thought a darker color might highlight imperfections. I had to play a little game of “What would piss you off more?” Having black grout and seeing all the screw ups, or having a shade lighter and not seeing as many of the screw ups. I determined that seeing the screw ups would piss me off more. I decided to go a shade lighter with the grout, and I was totally cool with this choice. But then when confronted face-to-face with grout options at the hardware store, I went even one more shade lighter. “Oops – Stick with your gut, Scoops” (cool new rap). This isn’t a major crisis or anything, but I do regret it. I wish the grout was just a shade darker. I shouldn’t have second guessed myself.
Thirdly, when measuring the butcher block counters I allowed for an overhang of 1/2″, but I measured just the cabinet bases without the drawers or door front being considered, which were 1/2″ deep. I now have a counter that is totally flush with the front of my cabinets. This could be much worse – I could’ve forgotten to add any depth to the counters at all. So I am thankful for that. However, if I had to do it all over again, I would add an additional 1/2″ overhang (1″ deeper than the base cabinets).
Other than that, I am over the moon with how the kitchen turned out. Please, if you have any questions, or need tips on a project, leave a comment below and I will try my best to give you advice based on what I have learned.
When I started this renovation the biggest motivation was to get these original cabinets and hardware whipped into shape. Our house was originally built in 1910 (that’s more than 100 years ago, dawgs) and I’ve done my best to honor and highlight all of the unique eccentricities of the house and draw out that original character while still ensuring that it speaks to our style.
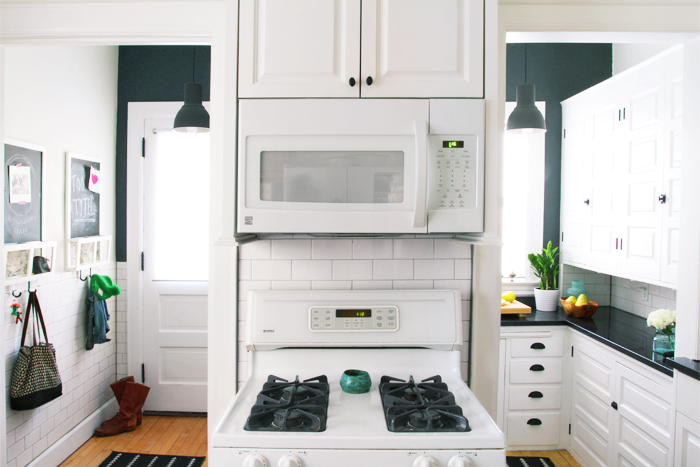
Our kitchen is oddly set up (seen in the post). I’m fairly certain all the walls and the layout are original to the house, but I don’t understand why it was set up this way. This house was built with this pantry back in 1910. Was it used as a pantry then? I dunno, but it’s still here and tucked back in this little area of the kitchen. I have no idea how the original kitchen was laid out, but it has to be similar to how it functions now – just with an older stove, an ice box and definitely no dishwasher. I wanted to make sure I honored that history in some way, so I made restoring the cabinets a major focus.
I started by stripping all the hardware, which had at least of 5 layers of paint on them. Then I spent weeks sanding and painting and sanding and painting and sanding the cabinets, making them look as perfect and pristine as I could manage without losing my mind. After 100 years, the cabinets had adjusted to the natural settling of the house; in other words, not one of them closed properly. With a lot of sanding, I was able to get each cabinet door to hang properly in its cabinet box and I now get to enjoy the click of closed cabinet latch.
It doesn’t look like much, but I really put a lot of heart and soul into this old pantry, and I’m really proud and happy with how it turned out. It functions as a traditional pantry – keeping all our canned and boxed goods – and as a place to also store pots and pans, some bakeware, and I have a few cabinets that still have room for more stuff. I’m good on storage now! I also built the big butcher block cutting board, added under-cabinet lighting and now use this space for all my meal prep. It’s great for chopping and I love that this space now has more purpose then just storing all my kitchen junk!
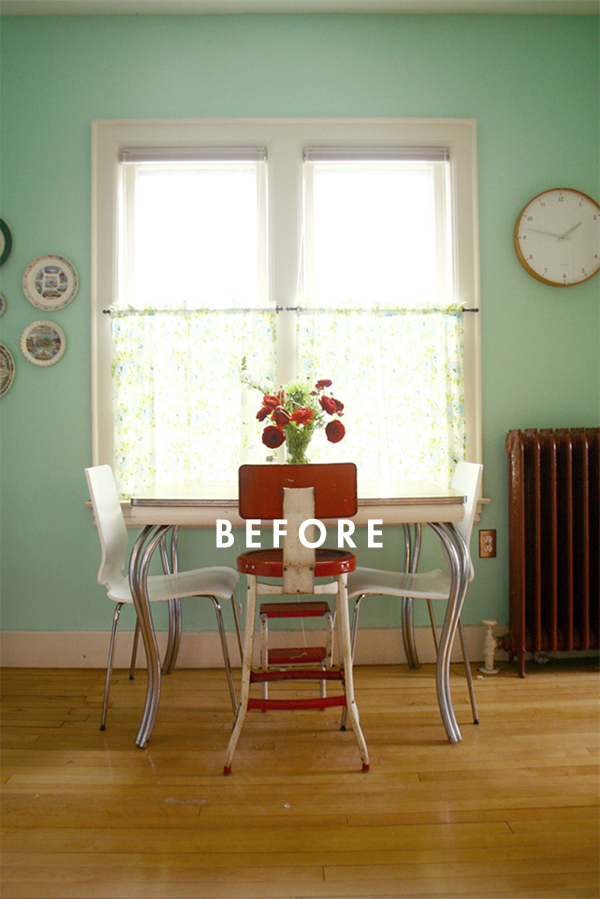
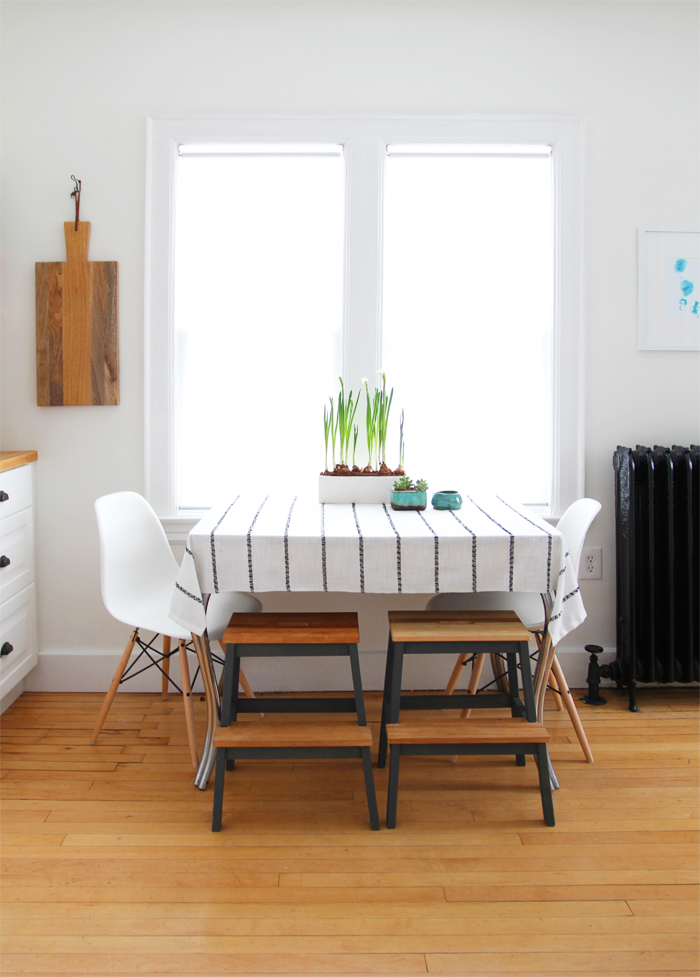
So I told you guys in my renovation updates that I was having trouble with this table. It was really pulling at my heart strings as well as my creative problem-solving strings. The table has been with me since I was 18. It’s lived with me and Jeff at all our old rentals, our loft, and now here at our house. Our kids eat all their meals here, and both Jeff and I are way sentimental about it. I also am a big believer in having your home being a museum of objects you love. So the table was staying. And although we loved the crap out of it, it was hard to make it look it good in our new “vintage industrial” kitchen with turquoise accents. This table has a bright yellow formica top and curvy chrome legs. Although it’s vintage, it’s not the vintage I had in mind.
After trying different ways to disguise its existence – none of which were really that successful – it came down to an extra piece of curtain paneling made into a table cloth. Although Jeff isn’t entirely convinced that this tablecloth is cool, I kind of love it. I think the table looks great, I love the kids’ stools painted to match the grey wall in the pantry and mudroom, and I think the Eames chairs with their dowel bases look great with all the cutting boards and butcher block. I like that it just sinks into this space, right between the new cabinets and the radiator (that I painted black), and I love how it gets bathed in winter light pouring through our kitchen windows. It’s good, yah?
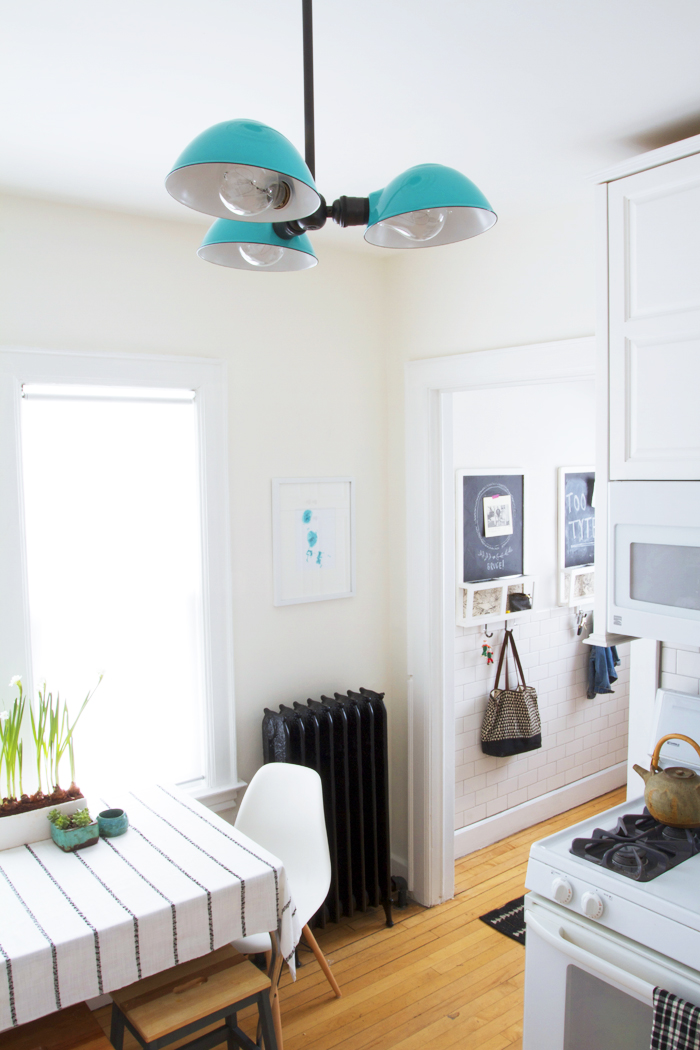
This photo is here to show you how totally amazing this aqua light fixture from Schoolhouse Electric is. I had to close my eyes when I clicked the “order” button on the net. Nearly $400 bucks on an seriously-aqua light fixture is not something that I normally go for, but fer realz guys, in this space, it is 100% amazing. I’m so glad Jeff talked me into it after I suggested this crazy scheme to him once in passing.
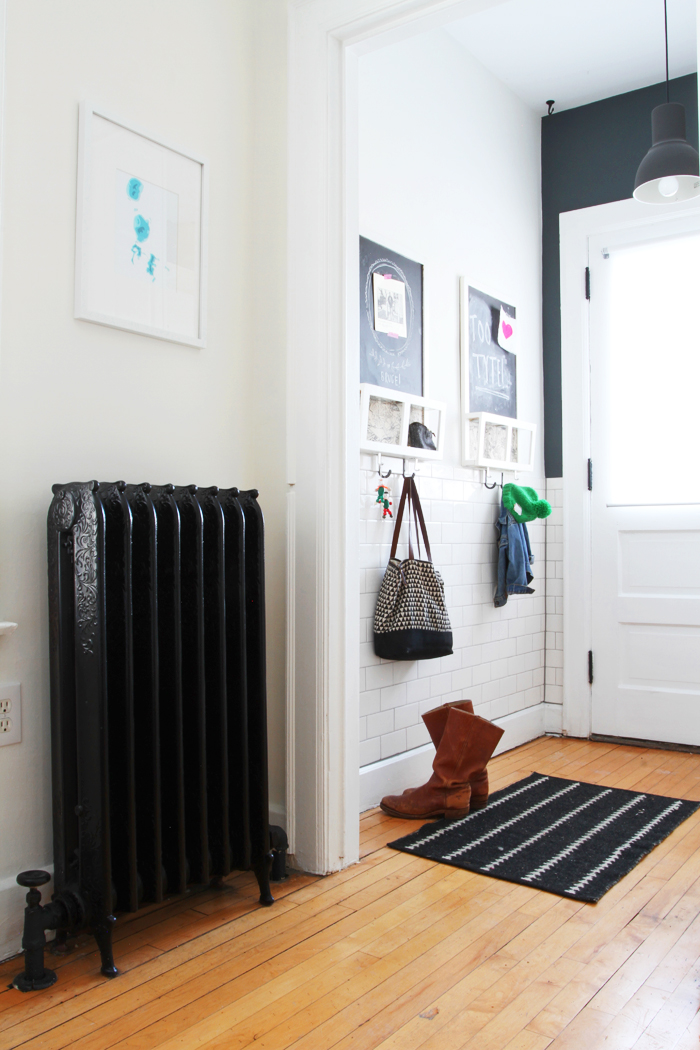
You guys! Guess how much money I spent on the tile in this mudroom? Would you be surprised if I told you that all this wonderfulness cost less than $100 and 2 days worth of work?
I was just sitting in the living room one day, staring at my handy tile job in the kitchen when it occurred to me that tiling the mudroom would be the best idea ever. I’d tile it so that it would be an identical height to the height of the tile in the pantry. It would go around the entire room and it would be totally awesome. Jeff was not convinced at all that this would be a good idea. We were already weeks into the kitchen project and he was definitely over having me spend all my waking time focusing on it. I had to convince him that this wouldn’t add on that much time or money and that it would be so awesome. 48 hours later, and blamo, it was done. This is probably the best $100 bucks I’ve ever spent.
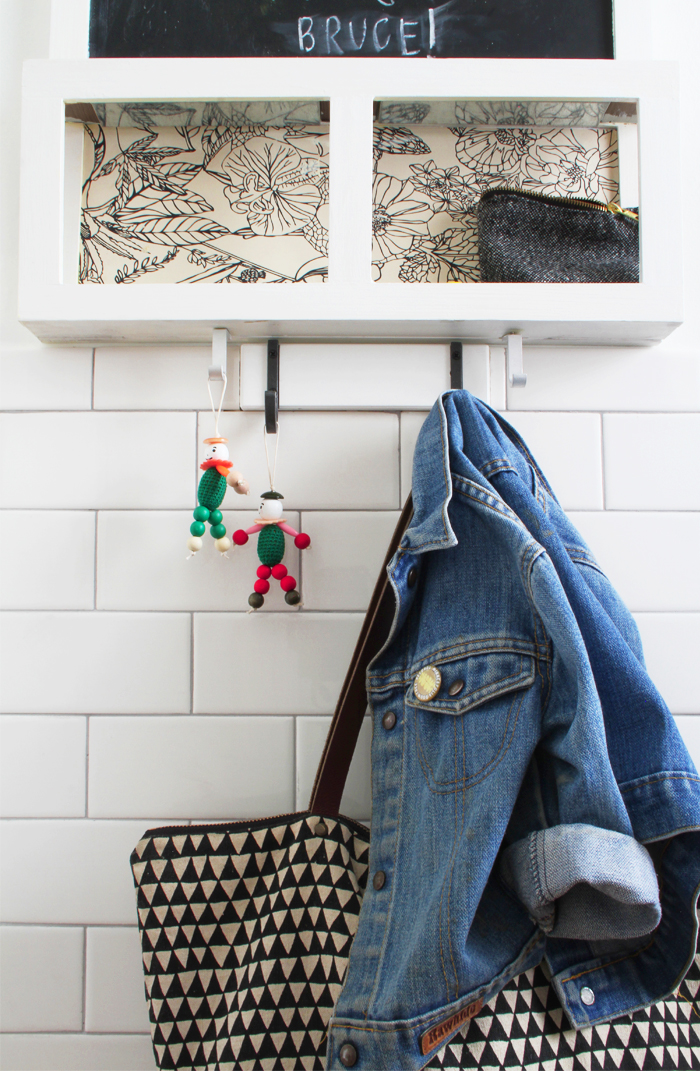
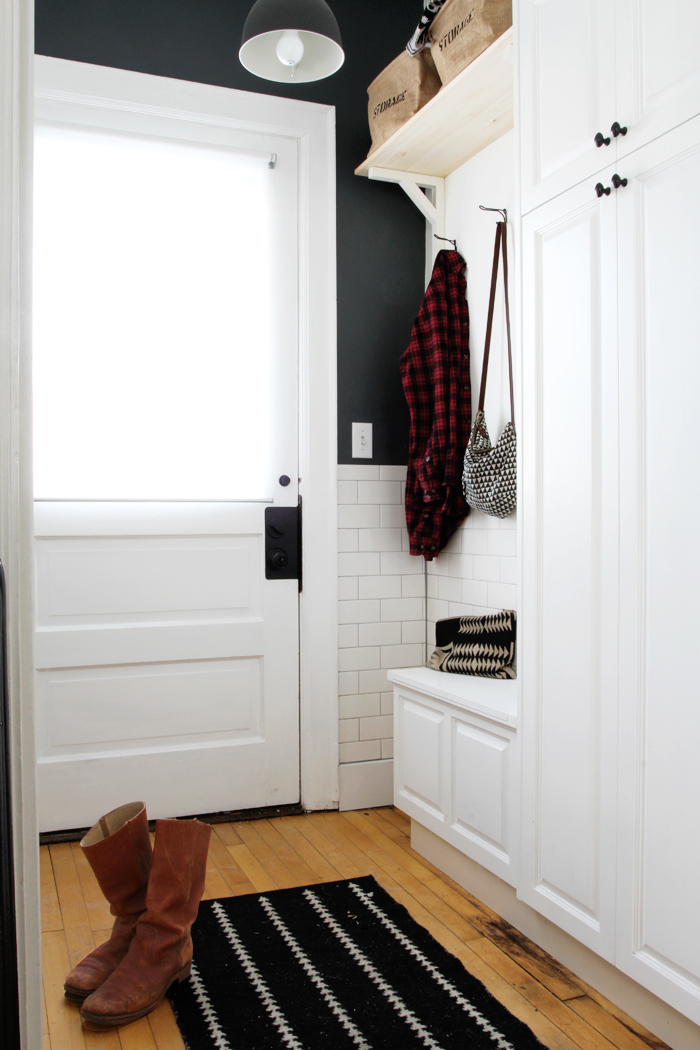
I added the magnetic chalk message boards a few years ago. I painted and wallpapered them way back then, to add a bit of function and a little bit of pretty to this space. When I tiled the mudroom I added built-in hooks for the kids to hang jackets and backpacks. It has become an essential part of our house, so much so that I don’t think I could design a new more modern kitchen without including a space like this. We had problems with a “landing space” forever. Keys, coats, shoes, hats and mittens were taking over our house. It probably took us 3+ years of living in the home before we really figured it out and started utilizing the mudroom. This space is organized; everything has a place. Towels for summer backyard pools, car keys, gardening shears, gardening gloves, canning gear, bubbles and bubble accessories, scarves, hats, mittens, snowpants and all that good wintery stuff. It’s basically all the stuff we need for the outdoors – all in one place, no matter what time of year. Plus we have the shoe storage right off the kitchen, which by the way, has entirely changed our clutter and our lives – couldn’t recommend it enough.
I mentioned it in my 2013 post from last week, but this has seriously been such a great project for me. I’ve learned that I am capable of doing most home repairs! I know I can’t do everything, but I can do a lot. I have the skillz and every time I tackle a new unknown project I get an education on what I need to know to accomplish the next home renovation waiting around the corner. The satisfaction I feel from this project is pretty great, and it doesn’t hurt that the end result turned out so amazing (I must humbly say).
I honestly think we could live with this kitchen for a long time. We had originally scheduled a kitchen gut job and renovation around the 10-year mark of owning the house. But as of this moment, I don’t envision that happening because it really doesn’t need it. This old kitchen is so pretty and functional for us now with these tiny renovations, and has maintained the original character of the house. Owning an old home is a special thing. Although all of them need renovating and updating, it’s important to respect the age and history of these places whenever possible.
Thanks for all the support and comments throughout the project, guys. It really helped motivate me to see it through. You’re the best!
Paint
▽ White Wall Paint : Clark & Kennsignton – Casual White
▽ Dark Gray Wall Paint : Behr – Paramount
▽ Trim and Cabinets : Farrow & Ball – All White
▽ Radiator Paint : Rustoleum Universal : Satin Black
▽ Hardware Paint : Rustoleum Universal : Flat Black
Decor
▽ Light Fixture : School House Electric – Factory Satellite 3 in Aqua Shades
▽ Ceiling Medallion : House of Antique Hardware 16″ Medallion
▽ Enamel Basin & Bowl : West Elm
▽ Lidded Atlas Canning Jars : Etsy Vintage
▽ Aqua Waterscape Vase : West Elm
▽ Kitchen Aid Mixer in Pistachio : Kitchen Aid
▽ Butter Dish : Antrhopologie
▽ Utensil Pottery : Crooked Creek Studio on Etsy
▽ Raw Wood Large Cutting Board : West Elm
▽ Tall Hive Vase : West Elm
▽ Coffee Canister : Ikea
▽ Black and White Kitchen Towel : Anthropologie
▽ Clock : Crate and Barrel
▽ Vintage Clock Radio : Good Bones Vintage Co on Etsy
▽ Vintage Fire King Sugar Bowl and Creamer : Etsy Vintage
▽ Enamel Canisters : West Elm
▽ Plant Hanger : Handmade – Tutorial Here
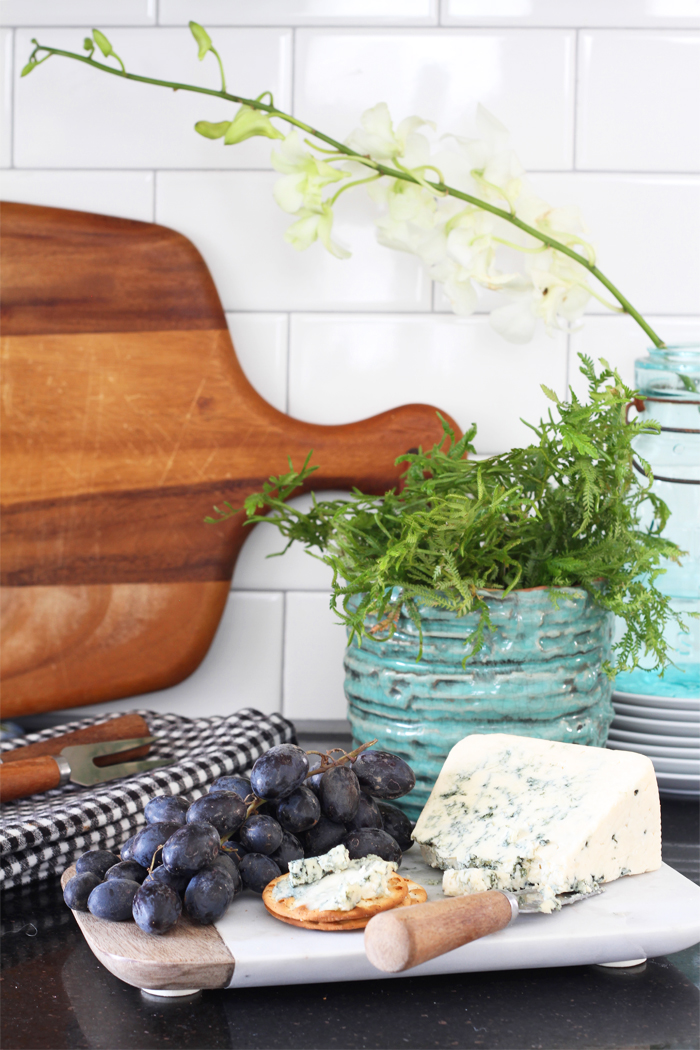
▽ Marble Cheese Board : West Elm
▽ Wooden Cheese Board : West Elm
▽ Cheese Knife Set : West Elm
▽ Dish Scrub Brush : Honest Company
▽ Sponge Bowl : Target Threshold
▽ Footed Butcher Block Cutting Board : Handmade – Tutorial Here
▽ Wood Bowl : Target Threshold
▽ Mortar and Pestel : Ikea
▽ Mudroom Chalk Boards : Ikea
▽ Black Light Fixtures : Ikea
▽ Table Cloth : Ikea (Curtains turned Table Cloth)
▽ Tea Pot : Warren Mackenzie
▽ Beaded Ornaments : Fox & Owl
▽ Storage Bins : H&M Home
▽ Arrowhead Rugs : Nate Berkus for Target
Artwork
▽ Spiral Artwork : Kalie Eckerson via the MCAD artsale
▽ Chain of Lakes Topographic Art : Crafterall on Etsy
Furniture
▽ Chairs : Eames White Side Chairs with Dowel Base
▽ Step Stools : Ikea
Styling
▽ Nicole Ripplinger @ Middle North Creative
Paint & Paint Supplies
▽ Paint Brush – $15.99
▽ Radiator Roller – $4.99
▽ Paint Roller – 2 @ 3.99 = $7.98
▽ Masking Tape – $7.99
▽ 1″ Brush – $7.58
▽ Builder’s Paper Roll – $10.97
▽ Wall Paint | Clark & Kennsington Paint 2 gallons @ 25.99 = $51.98
▽ Wall Paint | Behr 1 Quart – $11.23
▽ Trim and Cabinet Paint| Farrow & Ball – 1.5 gallons – Free
▽ Spray Paint Black – 3 @ 5.76 = $17.28
Total = $135.99
Tile and Tiling Supplies
▽ Tile Adhesive – 3 gallons @ 20.18 = $60.55
▽ 3×6 Subway Tile 4 boxes @ 22.00 = $88.00
▽ White Bullnose Cap Tile 30ct for $22.20
▽ Grout Float: 11.97
▽ Quarter Round Tile 13 for $12.74
▽ Wedge Spacers $5.97
▽ Delorean Gray Non-Sanded grout $13.27
▽ Delorean Gray Caulk – 2 @ 11.97 = $23.94
Total = $238.64
ElectricalL & Lighting:
▽ Light Switch – $1.59
▽ Switch Covers – $7.16
▽ Hecktar Pendant Lamp – 2 @ 29.99 = $59.98
▽ Grundtal Under Cab Lighting System – 2 @ 24.99 = $49.98
▽ Schoolhouse Light fixture – $359.00
▽ Halogen Bulbs – $27.35
▽ Ceiling Medallion – $42.99
▽ Liquid Nails – $4.99
▽ Paintable Caulk – $1.99
▽ Dimmer Switch – $12.97
Total = $568.00
Window & Wall
▽ Ekby Shelf – $9.99
▽ Ekby Brackets – 2 @ 4.00 = $8.00
▽ Enje Rollers – 4 @ 19.99 = $79.96
Total = $97.95
Hardware
▽ Sash Lift – 2 @ 3.99 = $7.98
▽ Anchors and Screws $4.94
▽ Shims – $2.49
▽ Plant Swag – $2.99
▽ Staples – $4.99
▽ Lampholder – $3.99
▽ Cabinet Knobs 13 @ $8.10 = $105.39
▽ Vintage Repo Pulls 3 @ 9.09 = $27.27
Total = $160.04
TOOLS
▽ Mouse Sander – $29.97
▽ Steel Square – $7.90
▽ Magnetic Torpedo Level – $4.47
▽ Mouse Sand Paper 3 @ 5.97 = $17.91
▽ Sand Paper 6 @ 4.47 = $26.82
Total = $87.07
Cabinets and Counters
▽ Ikea Lidingo White Cabinets – $486.93
▽ Ikea Butcher Block Counters – $324.00
Total = $810.93
Appliances
▽ Over the Range Microwave – $259.98
Total = $259.98
Grand Total = $2,358.60
Previous Kitchen Updates:
▼ Kitchen Plans
▼ Kitchen : Week 2 Progress Report
▼ Kitchen : Week 4 Progress Report
▼ Kitchen : Week 6 Progress Report
▼ Kitchen : Week 8 Progress Report
▼ Kitchen : Week 10 Progress Report
▼ Kitchen : Week 16 Progress Report


I haven’t commented here in a long time, but have been checking out the blog every so often and just have to say, WOW. Your friend Nicole has skillz but what you’ve done with this room is incredible! Completely transformed, and I love the way it looks like a showcase but so comfortable and livable at the same time.
Thanks for showing us!
Nicole does have the skillz! She did a good job, I try and keep it styled in the same way she set it up, and I love it. Thanks for dropping a line, hope you are doing well!
What an amazing job! That odd corner space was completely transformed — and I love the use of the butcher block counter! I redid my own kitchen years ago and the contractor putting in my new countertops was doing the tile. I had white subway (like you) but for some reason forgot to specify that I wanted dark grout. It is my only serious regret — so I totally feel your pain.
Hey Leslie! Thanks so much, we love the new corner area, it’s what makes the kitchen functional for us now. Happy New Year!
This kitchen rules — congratulations!
My favorite part is that aqua light from Schoolhouse Electric.
Their products, though spendy, are amazing!
I am obsessed with dark grout with white tile, + I need to give you + Leslie the heads up that you can re-stain your existing grout.
My husband bought the product for our current kitchen, but we then opted to move.
I can get you the name of it, if you’d like.
I blogged about said-same here: http://redbirdv.wordpress.com/2013/04/03/kitchen-tile-obsessions/
Anyway, love your blog, love your kitchen!
Excuse me while I go back + read your old posts!
Thanks Kay! I love so many things from Schoolhouse Electric, I have a running list of favorites. I read about re-staining grout, and I might do it someday. I am worried that it would look blotchy, but if it really worked and looked good I would totally try it out. Maybe not any time soon though, I need a break for a bit ;)
Yes read the old posts, and thanks for leaving a comment! Hope to see you around again!
WOW!!! So beautiful and so inexpensive! I can’t wait until I can do this someday…
Thanks Jessica! Hope you are doing well.
Just fabulous and even more so considering your budget. A beautiful labor of love and a well done post describing your efforts and sources, bravo and congrats!
Thanks Cathy! It was a labor of love, and so worth it. I think it means so much more to me now – and it makes me so happy to know that I did it!
um…. stunning! I adore your renovation! I just finished up a reno in my 100 yr old craftsman and I can totally appreciate how much blood, sweat, and tears go into a project like this. I love how you highlighted all the quirky nooks. Bravo! New fan and reader here.
xo Lea Hart
Hi Lea! Thanks for dropping by! Congratulations on finishing up your reno, that must feel so good. If you’re anything like me though, there is always more projects… Hope to see you around again!
The kitchen looks great! I can’t even imagine how much time and effort you spent on this project. It must be so gratifying to know all your hard work has culminated in something that looks great and better yet functions well.
Thank you, Becky! Yes it is so gratifying. We have plans of re-doing the basement down the road. I know we will need a contractor to do a lot of the basement work, but after the gratification of this project I am a little bummed that I won’t be able to contribute more to a future basement. The gratification feels that good!
Beautifully done! I’m especially impressed that you accomplished this with two little boys in the house. You are a rock star!
Thanks Kathy! I take full advantage of nap time, preschool time and dad-entertainment-time. I couldn’t have done it all without those three things.
love. it. LOVE IT. Wow. This is so inspiring! My house was built in 1962 and the kitchen seems to have been updated recently, but it’s ugly as hell. To see that you got such a great kitchen for generally, very little money, is really revitalizing. I may need to talk to the dude of the house. How did you find tiling for the first time? That would be my biggest goal, really. Any tips you would be giving to a new-timer?
Seriously. Love this kitchen.
Hey Caroline! That is the worst, when things seem to have been updated recently but don’t really show it. That is how I felt about our kitchen too. It’s great for someone else’s taste, but not your own.
The tile went a long way for our money. I was really scared to tile at first, but I just watched a bunch of you tube videos, this one was especially helpful. Once I started, I realized there wasn’t that much to be scared of.
I did back-butter all of my tile instead of putting the mastic (I used mastic because there wasn’t a lot of water being splashed around – otherwise you would use thinset) directly on the wall. I think this was a good method for me, because trying to get mastic on the wall and then tile it quickly was to daunting. I did get pretty fast at back-buttering and things moved quickly.
Grouting was also a big unknown. I think the biggest surprise for me was really having to remove the grout out of the tile spaces with a damp sponge after the grout began to set. I thought it would be a quick wipe down but the grout gets really built up around the spaces between the tiles, and if you don’t get in there and wipe it down you will end up with fat old grout lines.
I think anyone can do it though, it’s not that scary, even though I know it seems like it is.
Oh also, I borrowed my parent’s neighbor’s tile saw. It was awesome because I was able to cut out all the hard outlet spots and weird tricky corners, but it totally sucked because it was 40º outside and I spent an entire day out there with a wet saw. I was frozen.
Saw the post on Design Sponge – what a stunning transformation! Can’t pick one special thing, it’s just overall amazing.
Glad I found your blog!
Greetings from Austria!
Hey Tanja! Than you! I’m glad you found the blog too, hope to see you around again!
Your kitchen makes me so envious! I’ve always wanted to tile my kitchen using subway tiles but since I live in a rental, I just may have to wait. The look of the white tiles against the white cabinets is so classic and never goes out of style.
I am also admiring your white dishware. Mind sharing where you picked it up?
I agree with you on that Jessie, white tiles and white cabinets is pretty classic. I hope it lasts for us for a long time.
The white dishware is a mix of Mikasa (picked up at the oulet store a few years back) and Ikea 365+ dishware.
Fellow Minneapolis resident here. So happy to find your blog through Design*Sponge. Great job on the kitchen — current and yet so classic. The pantry is a dream. I’m starting my house hunt this spring, and as an old house lover will try to remember how much can be done even with an awkward layout. You mentioned in another post that your realtor suggested bringing along a contractor or designer to view the house a second time. Did they line that up for you, or how did you go about finding one?
Hey Katie! Thank you, I’m glad you found me too ;)
Our realtor was such a pro about the whole house-buying thing. We fell in love with this house but were so uneasy about it because of the kitchen. Our realtor was a smart guy and knew us well enough that he showed us a bunch of other houses and then took us back to this house even though we had written it off at that point.
Our realtor coordinated having a contractor meet us at the house, the contractor talked us through our options and then sent a quote over the next day with two different potential layouts at two different price points. He also told us what walls were load bearing and all that stuff that first time homebuyers worry about. It was enough info to convince us that this is where we were supposed to be.
Good luck on your house hunt, so exciting for you!
Your home, and this revived kitchen, are so so so lovely. Thanks for sharing all of your great ideas and your beautiful home with us.
Robin! Thank you so much, sharing this with you guys makes me happy!
What an absolutely beautiful kitchen.Every detail was obviously considered with such loving care in honoring the age of your home.I have always lived in old houses(my present home is a 96 year old Craftsman in Northern Ca.) and I’ve never wanted to gut the kitchens and make them magazine perfect. Congratulations! I love what you have accomplished.
Hi Annette! Thank you so much! I agree, although I adore many magazine perfect kitchens, I feel so much happiness and satisfaction in maintaing a bit of character from the old not-so-magazine-perfect kitchen in our home. It makes it feel even more like “our home” to me! Glad to meet another old home caretaker!
I’ve been following your blog for over a year now – love it! We live in a 1925 bungalow in Winnipeg, MB, and I was hoping to get any thoughts/ideas from you about painting and furniture for our dining room and living room. It’s the oak trim that’s killing me and an old faux brick fireplace with built in shelving that takes up the main living room wall. I could go on and on but i cant seem to get past this “hump” – would love your opinion whenever you get a chance and can send a few photos.
Thanks,
Tricia
Hey Tricia, I feel your pain. I’ve had such a struggle with the oak trim in our house too. I have to say, the one thing I wish my house had was a fireplace flanked by built in book cases in my living room, but I can see that design-wise it can cause problems for you too. Feel free to send photos, you can email me at scoops at deucecitieshenhouse.com
This turned out so lovely! I really like how clean and bright everything is — modern but totally fitting the era of your home. I also love the typographic chain of lakes print! I have her Lake Harriet print in my sunroom to commemorate our Mpls days. Such a fun Minneapolis tie-in and a great pop of turquoise on the wall!
Thanks Kristen! Yes, Crafterall does such a great job with her lakes artwork, it was a toss up for me between the chain of lakes and lake Harriet, I loved them both, I might even have to go back and get the lake Harriet piece some day.
Beautiful work! I especially love the torequoise accents.
Thanks Joanna! I love the turquoise too, I am a sucker for all things blue.
LOVE it – really looks great!
Thanks Stacey!
I just have to tell you how much I love that nook next to your refrigerator! It looks AWESOME! It makes me want to get back to some projects at the house. Also, for your stools, did you stain the tops and just paint the bottom?
Nice work Alison!
Oh! I forgot…Where did you get the Fiddle Leaf Tree? I’ve been wanting one of those since before you tipped me off the the Fiddles at IKEA! I need that height!
In the picture above it’s a combination of both my fiddle leaf figs (I was trying to cover up the air conditioner, shh, don’t tell anyone). You know about the first fiddle leaf fig, it is huge now, probably 3.5′ or so. It’s tripled in size. The other tree that is more tree shaped I picked up at Bachmans. They had a container sale last spring (half off all container) so I got the fiddle leaf fig for 19.99. I always check their website for deals. My mom just got a really nice sized (and healthy looking) fiddle leaf fig at the greenhouse we went to last Friday. The nursery is called Tonkadale and is located out in Minnetonka. It was $59.99
Hey Janelle, hope you and your little fam have been doing awesome this winter! Regarding the stools, I painted the bottom, and then oiled the tops with the countertop oil I used for the butcher block (you can buy it at Ikea). You may (or may not) have noticed that the stool tops are different tones. One has been our 5 year olds kitchen chair for 3 years, and the other is new to our youngest and he’s only been using it for 9 months. It’s all age. I did sand both of the stool tops before I oiled them, but the difference in wear and tear is still visible.
Thank you!
It looks absolutely fantastic!!! I don’t even think I noticed it was a weird layout until you mentioned it. Everything looks so great and cohesive… all I saw was a fantastic kitchen!
Thanks! I guess I shouldn’t point out it’s shortcomings, huh? Glad to hear that you didn’t even notice them – that’s big for me!
I am in love! This is amazing! I am honestly trying not to drool : D lol What an odd space though, you did a great job with it. : ) I really like your blog, I am now a new follower.
Sarah! Thanks so much! It is an odd space, but much less odd now. I’m glad you found me, I hope to see you around here again!
Hi there!
I’m a new reader, so I apologize in advance if you’ve answered this before, but what paint colors did you use in the kitchen and mudroom? The blue and white are perfect shades!
Hi Erin, you were asking about the colors from before? The blue wall color was “aqua bay” by behr. If I misunderstood and you are asking about the white walls I just painted the color used is “Casual White” from clark and kennsington and the trim is “All White” by Farrow and Ball. Hope that helps
Wow! A million times better. Am so glad you didn’t buy that awful fridge though, it still dominates that corner – but looks way better than before!
Thanks, Mandy!
My first foray into your wonderful blog. Congrats on your kitchen reno. Nice job! I might have painted that brick white to ‘pull’ the entire area out with the fridge. But not everyone likes painted brick. Thank you for sharing your project.
I’m in the nmiddle of a ‘frugal’ kitchen reno as well. Gutted the entire space (he he it’s only 13.5 x 9.5 feet) and I considered driving an hour away to Ikea (a store I’ve never been to) to check their cabniets out. However I went to Home Depot and got my white Hampton Bay Shaker cabinets (uppers and lowers), new allure wood flooring, stock laminet countertops, paint, fridge, stove, microwave for just shy of $5K. I said Frugal right? I’ts not all installed yet but anything would be an improvement over the 1976 decor that was there. It’s a condo and I’m going to rent it out so it’s perfect. I reno’d both bathrooms as well. They are a work in progress but one was gutted to the studs except for the tub. The other is a 2/3 bath in the den. Gutted all to studs. Did not take the floor tile up as I kind of like it and left the shower pan in place. Otherwise they are all retiled including floor in main bath. I am using decorative mirrors that I’ve had for many years over the new bath vanities. All 3 rooms, including my contractors labor costs are just shy of $20K which, to me, is a wonderful goal. I can’t wait to see it all done (about 3 more weeks) and compare ‘before and after’ pics.
Hi Linda! Thanks so much! I considered painting the brick, but in the end, I really like the way it looks next to the butcher block, and I like that I kept it natural. Your kitchen project sounds intense, and wow, 20k for 3 rooms, that’s amazing. It will feel so incredible for you when it’s all done, the end is in sight!
So. Beautiful! You’ve done such a terrific job in here! Could the original pantry have been some sort of butler’s pantry? You know, back when it was totally normal to sequester areas of rooms such as the back of your kitchen?
Hey Morgan! Yes, I need to understand more about how these turn of the century four squares were meant to function, there must be some sort of book out there. I do think it was a butlers pantry, our house isn’t super huge or anything but there are lots of signs that point to having help and keeping them unseen. There was a swinging door from the kitchen to the dining room. There is a button under the dining room table that at some time used to to buzz the kitchen, and there were at one time “butler’s stairs” leading to the kitchen. I would like to know more about how these houses were intended to be used and the culture of the time. I mostly do a lot of supposing, but don’t really know. Crazy.
Hi! It’s my first time here and I just had to leave a comment. I am in LOVE with this kitchen. I especially love how you kept the house’s quirks and charm. We are trying to do the same in our never-ending renovations.
P.S. That overhead light fixture from Schoolhouse Electric is the bomb (if people say that still).
;)
Hi Sarah, Thanks so much! Never ending renovations are fun though, right? Good luck with yours! Yes, I want so many things from Schoolhouse Electric, they have the best stuff.
I absolutely LOVE the light fixture from Schoolhouse. They always have some of the coolest and unique lighting. Great job on the kitchen!!!!
Thanks, Melissa! I agree, Schoolhouse is totally the best and I love that they have housewares now too.
Hi there! Im visiting from HouseTweaking and Ive got two words for this awesomeness I just feasted my eyes on: YES, PLEASE! This room is perfection! Its just gorgeous. I loooooove that it looks completely original to the house. I adore the way you maximized so much of the small space and layout with the cabinet height. This has got to be one of my favorite kitchens ever. I believe kitchens should be cozy yet functional and this is a wonderful example. Thank you so much for sharing this with us.
Hey Shavonda! Thank you so much! Wow, totally makes my day!
I have a silly question. What did you use to frame out your cabinet and over the range microwave? I’m struggling when searching for the items to do the same thing to mine. Beautiful kitchen! Love all the accents and details.
Hey Evan, I wish I had a better answer for your question, but the cabinet and the framing was there when we moved in, so I don’t know what the previous user did to frame it out. I have learned from our neighbor that the cabinets were custom made to match the originals. Basically it’s an upper cabinet, flanked by two longer panels on the side, and then trimmed on the bottom so that the microwave looks built in. To replace the microwave I did have to remove the trim and the reattach it after the microwave was installed. Hope that helps.
Amazing! I absolutely love it! You have a beautiful style of photography, too!
Jenna @ Wife in Progress
Hi Jenna! Thanks so much!
You did amazing. Love the white. Its time less. Great bones. And your budget was amazing. Im beyond impressed. I’m just saying….
I just found your blog through Dana at Housetweaking and I absolutely love it! Your home and recent kitchen remodel are amazing. I love how you honor the true character of the old home while infusing your personal style. I was wondering if the tall cabinet in the mudroom is from IKEA or something you had custom-built? We do not have a proper mudroom in our home and this cabinet seems look like a great solution to hide some of our junk! Thanks!
Hey Sara! Thank you so much, I’m so glad you found the blog! I wish I had more info on the cabinet in the mudroom for you. It was there when we bought the house, I just painted it and changed the hardware. We use it as a place to store odds and ends, it’s not even deep enough to be a real coat closet – it is nice to have to hide all that junk that you need away. Thanks again!
Love everything about your kitchen! I moved into my house 6 years ago and chose cherry cabinets. My biggest regret. I bring up refacing our cabinets to white just about once a week to my husband. He’s not biting. Your kitchen looks so bright and clean and perfect. Where did you get the white rectangular planter on your table? I have a hard time finding nice, simple planters. Thank you!!
Thanks Nicole! Awh, that stinks that you feel regret over your newish kitchen. I wonder if there is anything you can do to love those cherry cabinets more? I find my taste changing all the time too, especially lately. I guess we all just go through phases, hopefully you can come up with a solution you are your husband are both happy with.
I wish I could provide a link to the planter, I bought it at a flower shop and there are no marks on it. Sorry I can’t help more with that.
Thanks for your reply. My cabinets have to many grooves so refacing is the only way to go other than gutting which will never happen. I also want new countertops. I’m so over granite! My tastes change all the time! A lottery win would be nice! Enjoy your gorgeous new kitchen!
Hey Nicole, you made me laugh with your granite comment. I hate granite counters in the kitchen and could never see spending all the money for a finish that needs so much TLC. I hear you. And my husband did hit the lottery for enough to partially remodel the kitchen so I want you to know that it does happen. I thought I wanted cherry cabinets too, but I’m going with painted cabinets with this remodel. Have you considered painting them? Or maybe that just doesn’t work for you or your DH. Just a thought.
It’s fantabulous! I love how you worked with the old-timey kitchen layout.
Question: How did you repaint the radiator? I’m trying to convince my husband to paint our hideous gold [!] radiators. They look just like yours. Did you do it in the summer? Did you have to drain them? Any help greatly appreciated.
Again, congratulations.
Charlotte
Thanks Charlotte! Oh, the radiator – it was worth the mess, but really stressful. I actually have painted two radiators in my day, you can find instruction posts here and here. Anna over at Door Sixteen also repainted her radiator recently and did it in a much more responsible way then I did. Also, you can always use a good old brush and save yourself the headache of spray paint
Thanks for the information. I’ll keep working on him for it, and now I have some ammunition.
You did a beautiful job on your kitchen. My old home was a foursquare and it had a pantry, but the pantry had become a bathroom before I bought the house. I turned it into a powder room + laundry room and remodeled the kitchen. There was a swinging room from the narrow hall to the dining room.
Just a note about painting radiators: it can make them less efficient, but I can’t take the gold or silver paint that many have been covered with in their lives. I love the black that you used. Originally there were few built-in cabinets. That didn’t really become a thing until the 1920’s. They used free standing pieces like hoosiers and stored stuff in the pantry which probably did have built in cabinets. Refrigerators were much smaller but stoves were usually bigger than modern stoves. Many people who lived in foursquares had hired help because the houses were built for people who had money. Housing thqt was more affordable didn’t start to happen until after WWI. That is when bungalows became popular, especially the 2 bedroom one bath models.
Good luck with your work on the house. You are doing a wonderful job.
Hey! Thanks so much for all the info! How do you know all this stuff about four squares? Do you have any book suggestions? I’d love to learn more about this style of home.
I always imagined that if we did the big kitchen renovation that our pantry too would be a powder room. It would be so nice to have a main floor bathroom but I guess we are surviving just fine without one.
Thanks for the radiator tip. Our kitchen radiator had recently been sandblasted and only had one other coat of paint on it, so I wasn’t worried about gungking it up with paint too much.
Thanks again for all the info, and please pass on any sources you have regarding the history of four squares!
Hi again S! I know a lot about housing types through my classes in architectural history and from studying them after I moved to Denver from Phoenix. I grew up in AZ in a new suburb that was built after WWII. (I am old.) When I moved to Denver I did a lot of research about the housing types in books about old Denver. I can’t recommend any specific titles, but I’m sure that there is a history of the duece cities – probably many of them that you could start with to learn about them.
The foursquare designs go back to the italians, however and are an ancient building type. After looking at your photos again I realized that the brick chimney on the refrigerator wall may have been the chimney for a big old cookstove. It probably sat by itself on that wall with a wood box next to it. My grandma had one like that until her kitchen was remodeled in the 1950’s. It was enormous. That chimney may have also had the vent for the furnace that was originally in the house or there may be another chimney for that somewhere else. I used my second chimney for a cable raceway to wire my house for data and additional electric. LOL, I’ve designed too many office building spaces I think! Now that everything is wireless, though it isn’t as important.
Some bungalow books also have some info on that housing type and the foursquares that preceeded it. Here is an article that will give some information. http://www.northwestcrossing.com/images/DesignGuide_FourSquareStyle.pdf
Just search for foursquare house history and you will find others.
Can I ask where you purchased the backplate behind your door locks? We are looking for a plate just like that for our front door. We added new deadbolts and there is an extra hole we would like to cover. We have only found flimsy plates. Thanks in advance.
Hey Kelli! Sorry I can’t be of any help, the doors and locks were from before our time. If it helps at all, it was just an ugly brass lock and deadbolt and I painted the whole thing with Rustoleum Black Flat, I love the finish and it’s held up really well.
This is awesome and so inspiring! Great job!! Love, love, love.
Such a beautiful transformation! I love everything you did – you have such a great eye for design!
Thank you so much!
Love love looove your kitchen! Can you tell me your source for the subway tile?? Thanks?
You can buy grout paint to make your grout lines darker
Thanks Fredy, I might do that someday, but for now it’s kind of growing on me :)
All of the after pictures look awesome. Some great transformations. There is so much potential with small kitchens to make them look more spacious.
Thanks, Caleb!
Hi! I so love your kitchen. I always come back to that site to look at it. Could you tell me where I can buy your clock or a similar, I can’t find it nowhere on Crate and Barrel.
Oh Geez, Sophia. I wish I could tell you where to find that clock! We registered for ours at Crate and Barrel 11 years ago when we got married, so it’s no surprise that they don’t stock it anymore. I am sure you can find something similar somewhere. I am going to keep my eyes peeled and if I see something, I’ll come back and reply to your comment here. Good luck, and thank you so much!
Thank you so much, that would be awesome! I love the simple design of the clock and the wooden frame.
I forgot to tell you that to me the kitchen is just perfect. I’m building my own kitchen moodboard around the picture where you can see the brick wall and the kitchen aid. The mix of the colours and the style is just brilliant and simply perfect. :)
You can find people who have a lot more, but there are usually
extenuating circumstances. If so, let people know and tell them why
this matters to you. Dont be a lazy dude and upload a cropped
image of your team.
Hey Alison
Just did a major reno on our kitchen exposing brick and doing a coffee nook similar to what you have. We didn’t seal the brick, wondering if you did? And your thoughts on that. I love what you did with your kitchen! Having just stubled on your blog I checked out your house tour, we also own an oldy, our is 1924 and we have some similarities :)
Hey Melodie! I did not seal the brick – I didn’t have it close to anything that would cause it to be exposed to moisture or staining. Good luck on your renovation!
I’m back…and now I am remodeling my kitchen. This house was built in 1954 – and I still miss my 1908 foursquare. We demolished 2 closets and found that one short leg of one of them had a small load on it – a kicker from the roof for the roof load. Carpenter is due tomorrow to shift that load to another beam so that short stub wall can come out. Then we will gain 8′ of additional counter space. I can’t wait.
I just love your kitchen reno – it makes me miss my old 1908 square. Every time I come back here I pine over your photos.
Thanks so much! I feel your pain, I’m sure your new house is great, but these old ones are special. Good luck on the remodel!
Amazing space! And I found your regrets very enlightening. In fact, I was searching for the grout color because I want to add subway tile to my kitchen but am worried about using the darker grout. Like it might date it and in five years I would be kicking myself for not staying more neutral! And I’m looking at a butcher block counter too and will keep in mind that overhang measurement too!
:) Linda
I would like to know where you found the drawer pulls (the half moon ones). They are beautiful.
Where can I find the hardware/drawer pulls (the half moon ones). They are beautiful.